This blog post will discuss how to edit your bot's avatar images. To start you must first create a bot, for information on creating a bot see, How to create your own chat bot in 10 clicks.
When you create a new bot, it will start out with the default image, which is a simple robot. You can change this image to a picture to one of the many shared images available on BOT libre, or you can upload your own images. Another option is to choose a template when creating your bot, or clone your bot from another public bot using fork.
Shared Images
BOT libre provides a repository of shared images. The images come from many different sources, and are available under many different licenses. When you select a shared image, its name and license will be shown. Many of the images are public domain, so can be used freely, anywhere. Some of the images are copyright by third parties and have been licensed only for usage on the BOT libre website. If the image lists a copyright, you can use the image, but if you want to embed your bot on your own website, you will need to license the image.You can also upload and share your own images. Only share images that are not copyright, or that you own the copyright to, and are releasing your copyright to the website.
Templates and Forking
BOT libre provides several different templates when creating a bot. You can also use another bot as a template by browsing it and clicking its 'Fork' button (only some bots allow forking).Creating a bot using a template is useful as it preloads the bot's database with existing responses, and defines a set of avatar images. Avatars allow multiple images to express different emotions, so using a template saves you from having to configure an avatar yourself.

|

|
| Contains images copyright Iko @ Fotolia |
Uploading Images
If you are creating your own personal avatar, you may upload a picture of yourself, so you can train your bot to be your virtual clone. If you are creating an avatar for your business, you may use your business logo, or create your own avatar image to represent your agent. Ensure the images you upload are not copyright, or that you own the copyright.Your bot avatar allows different images for different emotions. So you can upload multiple images. If you are creating your own person avatar, you can take several photos of yourself expressing different emotions.
If you are creating a bot for your business, you may wish to use a model for your bots avatar. There are many photo websites such as Fotolia that make it easy to license royalty free images. Many contain different models expressing different emotions.
How to edit your bots Avatar
To begin editing your bots avatar, first sign in, and browse to your bots page. Every bot has its own URL, yours will be "http://www.botlibre.com/BrowseServlet?browse=bot-name", i.e. "http://www.botlibre.com/BrowseServlet?browse=Jessy". When you browse to your bot, you can select its URL from your browser and use it as a link to share your bot with other people.
On your bot's main page, there is an 'Admin' button. Click this and you will go to your bot's Admin page.
From your bot's Admin page select 'Avatar Configuration' or 'Avatar' from the menu bar. This will open your bot's Avatar page.
The Avatar page allows you to pick, upload, and tag your bot's images.
Tagging images
Your avatar can have multiple images, an each image can be associated with different emotions. Your bot learns to associate emotions with different words and phrases. When you chat with your bot you can use the 'Emote' drop down to associate an emotion with your response. Your bot will then associate that emotion with that word or phrase.To tag an image with an emotion, select the image, then click the emotions to associate it with and click 'Tag'.
You can also set the default image for your avatar by clicking 'Use as default image' and clicking the 'Tag' button. The default image will be the image shown on your bot's main page, and while browsing.
|
|
| Contains images copyright Iko @ Fotolia |
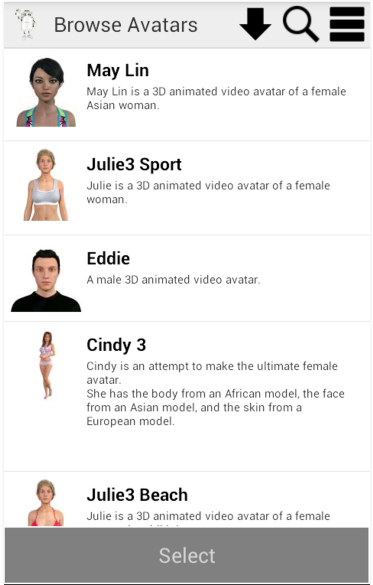
Picking a shared image
You can add images to your avatar from the shared image repository. To add a shared image click on the 'Pick Shared Image' button at the bottom. This will bring you to the shared image page where you can select the image and click 'Pick'.

|
Uploading an image
There are two upload options, 'Upload Image' and 'Upload and Resize'.'Upload Image' allow images to be uploaded as is, without any resizing or compression. This is useful when uploading png images that use transparency, or other image types such as gif.
Caution should be used when not resizing, as you do not want to upload images that are too big. BOT libre currently imposes a 1 megabyte size limit on uploaded images. Ideally your images would be less than 50k. BOT libre currently only displays the images as 200px by 200px, so there is no reason to upload images bigger than that. It is recommend that you first resize your images to be less than 300px by 300px.
'Upload and Resize' will first resize the images locally before uploading. This will make it much faster to upload the images, and have them display faster as well. The image resizing requires browser support, so may not work with all web browsers (Firefox may be required).
Both image uploads allow you to select multiple files at once, just use multi-select in the file dialog your browser opens. Before uploading images you must click that you certify the images do not contain offensive or adult content, and that you own the copyright, or the images are licensed in the public domain, or through creative commons. Also ensure the images do not infringe on anyone's personality rights.
When uploading images you can choose to share them. You can specify the license and name to shared the images under.

|
So that's it. You should now be able to create your own personalized bot.
You can also connect to BOT libre from your Android phone or device. The BOT libre! app also allow you to edit your bot's avatar. Creating your avatar from your phone can be easier, as you can use your phone's camera to take your own picture.