Pages

Monday, April 30, 2018

How to connect IBM Watson to Facebook, Twitter, Telegram, Skype, Kik, WeChat, web, and mobile using a Bot Libre proxy bot

IBM Watson is a brand that includes a set of products and services, made famous by its Jeopardy prowess. Watson includes a chatbot platform and conversational API.

You can access Watson's API from your own web server through any programming language. Bot Libre lets you create a "proxy" bot that forwards request to your Watson bot. This lets you leverage Bot Libre's many integrated services including integration with social media platforms such as Facebook, Twitter, Telegram, Skype, Kik, WeChat, and integration with web and mobile speech and 3D animated avatars.

To get started with Watson you can create an IBM Bluemix account here. Once you have created and trained your bot, you can access its web API credentials to connect it with Bot Libre.

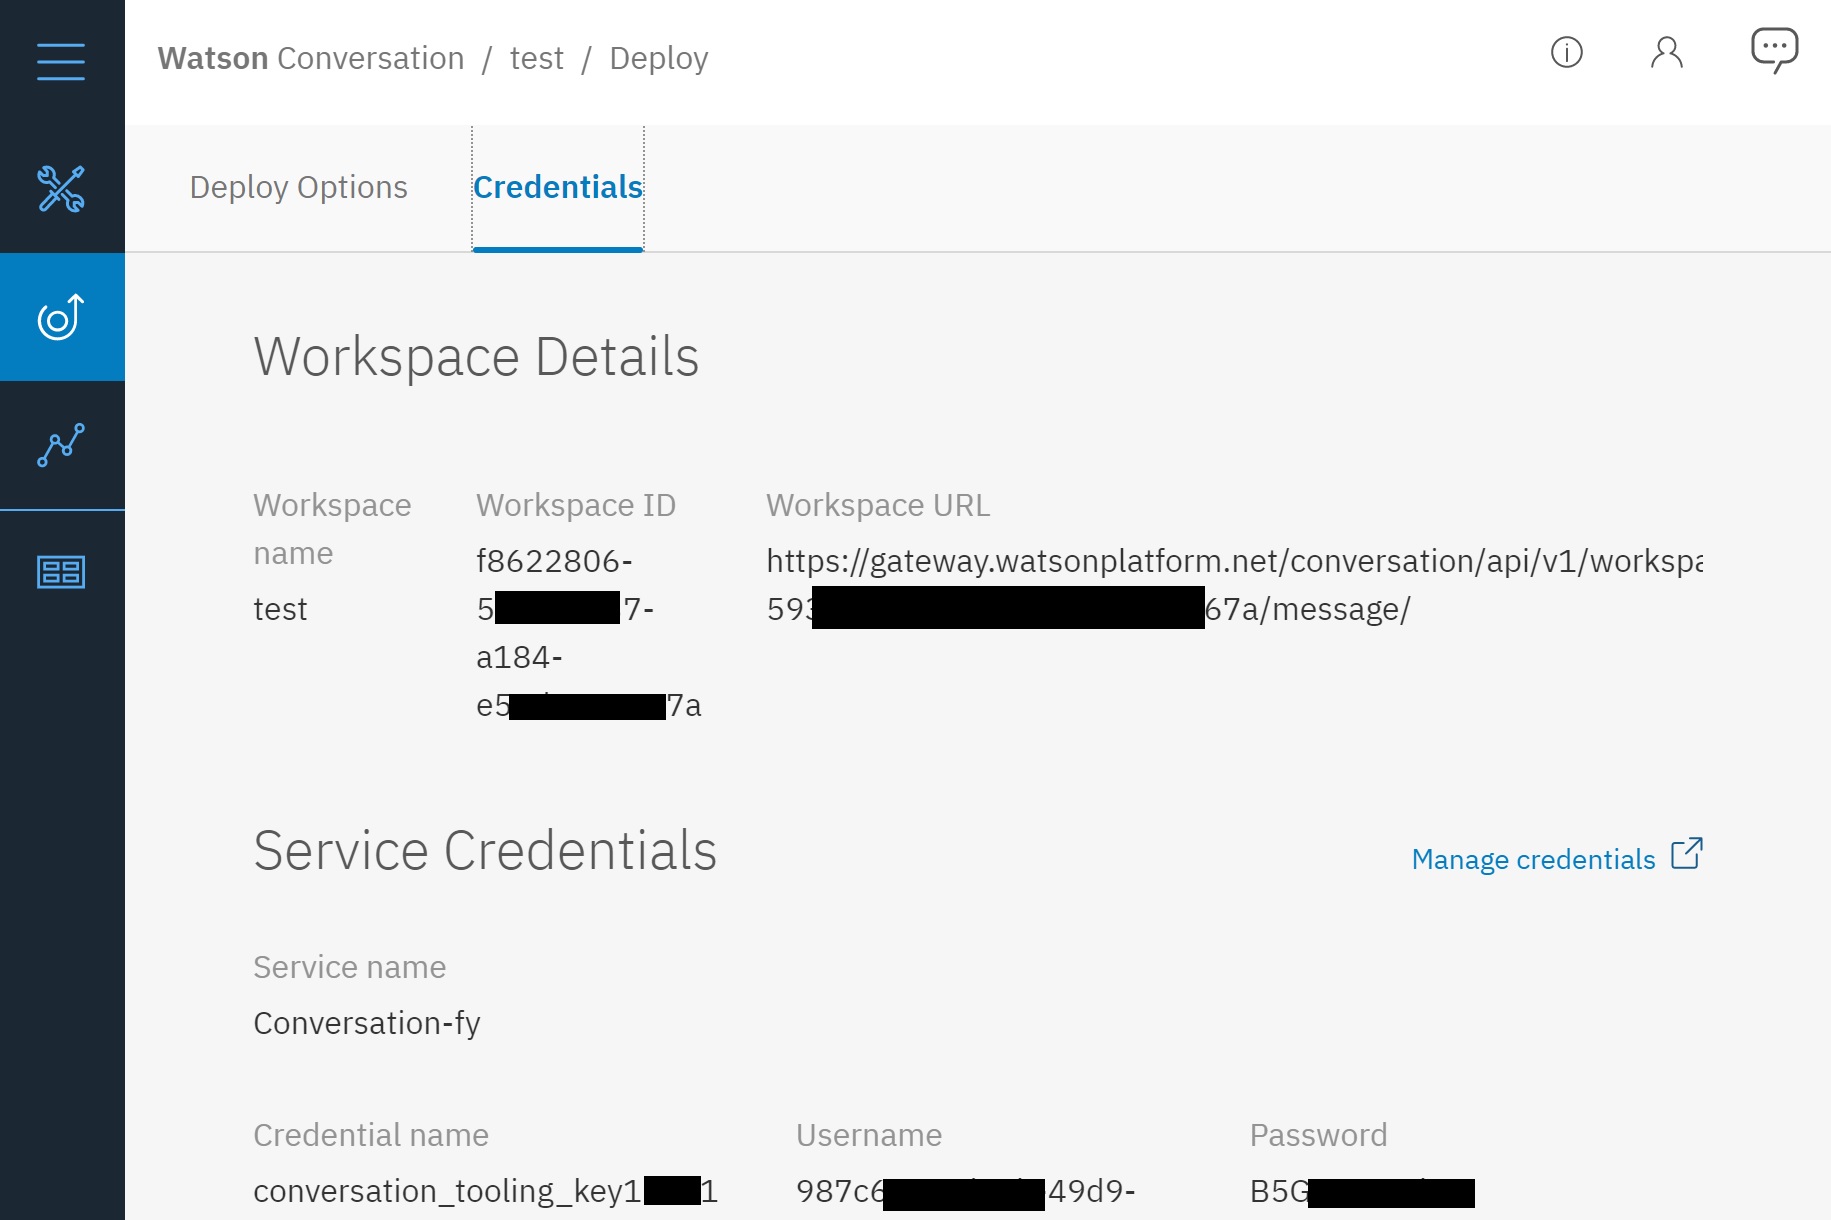
This will give you the bot's web API URL, and the API user and password. Copy these and return to Bot Libre.

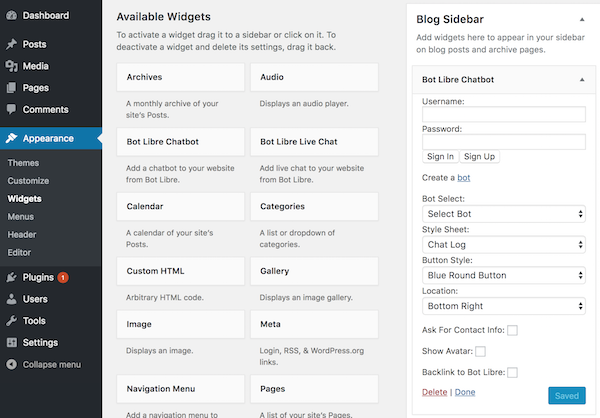
On Bot Libre create a new bot, and select the "watson_proxy_template" template. This will give you a new chatbot that has a single Self script the forwards all requests to the Watson API.

  • Click on your bot's "Admin Console" (gear button).
  • Click on the "Scripts" menu button.
  • Click on the "Watson" script and click the Edit button.
  • Find the below line of code in the script.
  • Replace the postJSONAuth URL with your Workspace URL from the Watson deploy console.
  • Replace the postJSONAuth user (2nd parameter) with your "Service Credentials" "Username".
  • Replace the postJSONAuth password (3nd parameter) with your "Service Credentials" "Password".
var json = Http.postJSONAuth("https://gateway.watsonplatform.net/conversation/api/v1/workspaces/616b5f69-dd49-4206-9c55-75f25b57ba18/message?version=2017-04-21", "0543af58-910d-4666-85be-7a8550279404", "txgVzPxkLup4", message);

Now your Bot Libre bot should be connect to your Watson bot. You can test it by clicking on your bot's Chat button. You can now connect your bot to social media, web, mobile, avatars and speech. You can also enhance your Watson bot by adding responses or scripts to your bot in Bot Libre to take advantage of Bot Libre powerful NLP, AI, and scripting features.

Monday, April 16, 2018

Deep Learning as a Service (DLAAS)

Bot Libre now supports creating and hosting Deep Learning and Analytic services.

Deep Learning and Analytic services are different than bots, as they perform a specific analysis function. They do not chat, nor interact with users, but use artificial intelligence and deep learning to perform analysis such as classifying images, recognizing speech or faces, performing NLP functions, playing games, and analyzing data.

Bot Libre lets you host your deep learning analytic on the web, and access it through the Bot Libre web API. Bot Libre provides an open analytics repository that lets you use analytics that we or other users have defined, or share your own analytics. You can also create your own private analytics, or only share your analytics with specific users.

To create an analytic you need to create and train a model using a deep learning framework such as Tensorflow or Bot Libre Analytics.

For example to train a model for image classification you can use the Inception model and retrain it for classifying your own image set. There are a lot of resources, models, and data available on the web such as the Poets tutorial for image classification.

Once you have trained your model you can upload the Tensorflow .pb and labels files in your analytic's Admin Console.


If you are interested in using deep learning for your business or project, we can also develop a deep learning neural network for you through our development services. If you are interested in knowing how artificial intelligence and deep learning can be used in your business or project, we can help through our AI consulting services. Contact sales@botlibre.biz

Friday, April 13, 2018

Using Response Next to Define Conversation Flows

Bot Libre 6.5 added support for define isolated conversation flows through using the response "Next" elements.

The next is a follow-up question that the user might ask after the bot gives the response. For example, if you had a response to the question "help" as "Do you want help with web or mobile?", then if the user responded with "web", that would be a follow-up question. Previously these could be defined using "Previous" elements, or using Self scripting. Using next provides a better option that is more powerful than previous, and easier to use than scripting.

A next question can be defined when adding or editing a response from your bot's Training & Chat Logs page. Click on the "show" next checkbox to enable the next input in the response editor.

After you enter the next question and click save, the next question will appear below the response in the response browser. Click on the checkbox before the next question to edit the next and define its response (and optionally another next for a nested dialog). You can add multiple next question to a single response. The response's next question form an isolated conversational context.

If a response has a next question, the bot will only choose a response from the response's next, it will not consider any other responses. The bot will find the best matching next question, otherwise use the default response. To enter a default next response, enter the question as #default.

You can nest next questions and responses to easily form complex conversations. Next question form an isolated and inherited conversational space. Each nested next level can define its own default response, but if it does not, then the bot will consider responses from the parent level, or use the parent default response.

Example Next Conversation
question: help
response: Do you want help with <button>web</button> or <button>mobile</button>
keywords: help

    question: web
    response: Is you issue with <button>HTML</button> or <button>JavaScript</button>?

        question: html
        response: See https://www.w3schools.com/html

        question: javascript
        response: See https://www.w3schools.com/js

    question: mobile
    response: Are you using <button>Android</button> or <button>iOS</button>?

        question: android
        response: See https://www.android.com

        question: ios
        response: See https://developer.apple.com/ios

    question: quit
    response: Okay. Let me know if you need further help.

    default: Please specify <button>web</button> or <button>mobile</button>, or type <button>quit</button> if you do not need help.

The above example using the response list format, which can be imported or exported from the Training & Chat Logs page. To define a next question add a tab to indent the next question and response. Using multiple tabs allows next to be nested.

The next questions are shown in the response browser as a set of nested tables so you can easily visualize the entire conversation. You can edit or delete next questions and response from the response browser.

Wednesday, April 11, 2018

Announcing Bot Libre 6.5 - Deep learning, conversation flows, new training editor, synonyms, sentiment

We have released Bot Libre 6.5. Bot Libre 6.5 includes many enhancements including:

  • Deep Learning analytics as a service
  • New Training & Chat Logs browser and editor
  • Response next, and nested conversation flows
  • Exclusive topics
  • New word browser and editor
  • Word synonyms
  • Word and phrase sentiment
  • Enhanced WeChat integration

Deep Learning & Analytics

You can now create deep learning analytics for using artificial intelligence to classify images, or analyze data. You can upload Tensorflow network files and access them through Bot Libre's web interface and API.

Browse our open analytics repository for analytics that can classify images and perform other functions.

If you are interested in using deep learning for your business or project, we can also develop your neural network and analytics for you through our development services. Contact sales@botlibre.biz

Training & Chat Logs

Our Training & Chat Logs browser and editor have been redesigned and enhanced. The browser and editor support new options and properties.

Response Next, and Nested Conversation Flows

You can now easily define nested conversations using a response "next". Next lets you easily define isolated nested conversations without having to use scripting.

Exclusive Topics

You can now define a topic as "exclusive". An exclusive topic provides an isolated conversation. When you set an exclusive topic on a response or conversation only response that have that topic will be considered.

Word Browser

You can now view all words your bot knows. You can edit the words sentiment, synonyms, and define if the word is a keyword or topic.

Synonyms

Synonyms let you define a word's synonyms so the bot will consider all of a words synonyms when matching responses. Synonyms are global, so can be defined once, and apply to all of the bot's responses. Synonyms can be automatically loaded from Wiktionary as the bot learns new words.

Sentiment

You can now define the sentiment for a word or phrase. Sentiment lets the bot determine the user's sentiment or feeling about their responses and conversation. The user sentiment can be access from Self, and it tracked and can be visualize in the bot's Analytics.

WeChat

Bots connected to WeChat now support speech recognition for voice messages. Bots can now also include links, images, and menus in their responses and interface.

The 6.5 release also included a new user message interface, new response list export options, enhanced user verification, enhanced NLP, UI improvements, and several minor enhancements and fixes.

Thursday, April 5, 2018

How to Add a Bot or Live Chat to Your Wordpress Website

Through Bot Libre, you can now add a bot or live chat widget to your Wordpress website. A chatbot allows you to provide automated chat or customer service to your website. You can also connect to your live chat channel as an operator and respond to your user live on your website. Bot Libre also allows an automated bot agent to be connected to your live chat channel to respond to your users when you are unavailable.

The Bot Libre Wordpress SDK is open source and available from Bot Libre's GitHub account.

Bot Libre provides 2 plug-ins, one for chatbots, and one for livechat.

This "How To" will give you a step by step process for how to install the Bot Libre bot and live chat Wordpress plugins on your site.

Step 1 - Create a Bot

First you must create a bot that you want to connect to Wordpress, or you can use one of your existing bots. To create a bot, follow the instructions here: How to create your own chat bot in 10 clicks.

Step 2 - Add Bot Libre Plugin(s) to Wordpress Dashboard

Navigate to your Wordpress site's admin Dashboard.

Click on the "Plugins" link on the menu on the left side of the page.

Next, click the "Add New" button as shown below:

In the search bar, type "Bot Libre" to view the Bot Libre Bot and Live Chat plugins.

Click the "Install Now" button on the plugin(s) you wish to install. Next, click the "Installed Plugins" link on the sidebar on the left side of the screen.

Click "Activate" under the Bot Libre plugin(s) that you have installed.

Step 3 - Activate Widget(s)

In the "Appearance" submenu on the left, click the "Widgets" link.

Drag the "Bot Libre Chatbot" and/or "Bot Libre Live Chat" widget over to one of the areas on the right, such as "Blog Sidebar". The location you drag it to does not matter, the widget's location will be configured in its settings.

Now that the widget has been activated, you will be able to edit its settings.

Step 4 - Configure Widget

To begin configuring the widget, enter your Bot Libre username and password into the corresponding fields, then press the "Sign In" button. 

You will now be logged in to the widget. This example will use the "Chatbot" widget, but the settings for the "Live Chat" widget are very similar.

  • The "Bot Select" dropdown will now have a list of bots you have created on the Bot Libre website. Select the bot you would like to use.
  • The "Style Sheet" dropdown has several options for how the chat with the bot will appear.
  • The "Button Style" will change the appearance of the button used to begin the chat.
  • The "Location" dropdown allows you to select the location on the website that the button to begin chat will appear. 
  • If you select "Ask For Contact Info", the user will be asked for their name as well as email address/phone number before the chat begins.
  • The "Show Avatar" option will allow select whether you want the bot's avatar to be shown while chatting with it.
  • Select the "Backlink to Bot Libre" if you would like to include a link to the Bot Libre website.

When you are finished configuring the widget, click the "Save" button.

A button will now appear on your Wordpress site in the location you have selected that will allow users to chat with your bot.