Pages

Tuesday, December 17, 2019

Announcing Bot Libre 8, now open source!

We have released Bot Libre 8!

The worlds most advanced bot platform just got better. Bot Libre 8 is a free and open source platform for developing and hosting bots. Bot Libre 8 includes support for chatbots, virtual agents, virtual assistants, social media bots, SMS bots, IVR bots, IOT bots, game bots, live chat, animated avatars, speech, deep learning analytics, and more. Bot Libre supports bots for the web, mobile, Facebook, Twitter, Skype, Telegram, Kik, WeChat, Slack, email, SMS, IVR, Alexa, Google Home, IRC, and new platforms are being added every month.
The Bot Libre 8 web platform is now open source, download now to host your own bot server. Host on your own server on-premise, or on your own cloud instance on any cloud platform such as Amazon EC2, or Microsoft Azure.

"Bot are the new apps".

Chat and chatbots are the new application paradigm that is replacing mobile and web as the new leading method of engaging your customers and users. Chat lets you engage your customers everywhere, on web, mobile, social media, phone, and on the Internet of things.

Bot Libre lets anyone create a bot for the web, mobile, social media, phone, and the Internet of things. Connect your bot to Twitter, Facebook, Telegram, Skype, Kik, Slack, WeChat, email, SMS, IVR, Alexa, Google Home, and more.

Bot Libre 8 supports rich HTML responses including buttons, links, choices, images, video, and audio. Bot Libre supports HTML responses on the web, mobile, and automatically maps HTML to social media platforms.

Bot Libre bots can be trained using natural language, chat logs, response lists, Twitter feeds, AIML, and scripting. Responses are automatically matched using a heuristic artificial intelligence algorithm and does not require any programming. Responses can also use keywords, topics, required words, labels, repeats, and other meta data.

Bot Libre 8 supports programming and scripting your bot using AIML 2, and Self. Self is our own dialect of JavaScript. Self is an object oriented scripting language, and integrated with an object database. Self extends JavaScript to provide support for natural language processing, state machines, object persistence, and includes a class library for accessing web services and utilities. Self also supports all AIML 2 operations, and some aspects of ChatScript patterns.

Bot Libre 8 is more than just bots, but a complete artificial intelligence platform. Bot Libre lets you create deep learning analytics for image recognition, speech and audio recognition, object detection, prediction and data analysis. You can create and train an image recognition analytic without any programming, just by uploading images. You can then access your analytics through our web API and mobile SDK, or from your bot.

New features in Bot Libre 8.0 since 7.0 include:

  • The Bot Libre web platform is now open source, download now to host your own bot server
  • Interactive Voice Response, automate your voice phone call center
  • Redesigned Training & Chat Logs user interface
  • AIML Map, Set, and properties file import support
  • AIML compatibility option
  • Knowledge graph view
  • Redesigned user and bot messaging
  • NLP 4 - Bot Libre's NLP engine has been redesigned to make bots response's better, make training bots easier, and better support international languages
  • User profile avatars and friends (add bot's as your friend using @bot-name)
  • Updated support for Microsoft Speech
  • Analytic testing repository and test reports

Create your own free account and bot today on botlibre.com,
or let us build your bot for you on our commercial service Bot Libre for Business.
or download our open source platform to run on-premise on your own server

Monday, November 18, 2019

How To Connect A Bot to Microsoft Speech

Through Bot Libre, your bots may use Microsoft Speech for text-to-speech. This "How To" will give you a step by step process to connect your bot with Microsoft Speech.

Step 1 - Create a Bot

First you must create a bot that you want to connect to Microsoft Speech, or you can use one of your existing bots. To create a bot, follow the instructions here: How to create your own chat bot in 10 clicks.

Step 2 - Sign Up For Microsoft Account

Click the "Free Account" button to create an account, or sign in if you have an existing one.

Click the "Start Free" button to begin.

If you have an existing Microsoft or Skype account, you can sign in with that. Otherwise, click the "Create one!" link.

You will be asked to enter your email address. Click the "Next" button to continue when ready.

Enter a password to use with this account then click the "Next" button.

You will then need to verify your email address by entering a code that has been emailed to you. Click "Next" to continue.

You will now need to prove you are a human by entering a set of characters. Click "Next" when complete.

You will now need to confirm that the information you have just entered is still accurate. Click "Looks good!" to confirm.

On the next screen, confirm whether you want this account to remain signed in.

Step 3 - Sign Up For Microsoft Azure

You will now need to enter some personal information on the following form. When complete, click the "Next" button.

You will then need to verify your phone number and credit card information.

Once you have finished verifying your information, submit the form to continue.

Click the "Skip and continue to the Azure portal" button to continue.

Step 4 - Create Speech Resource on Azure Portal

You will now be taken to the Azure dashboard. Click the "+Create a resource" link on the left toolbar.

Type "speech" into the search bar and click the "Speech" option that appears in the dropdown.

Next, click the "Create" button on the following screen.

You will now need to fill out the following form. Enter a name and select a location. You will also need to select a pricing tier. For more information about which pricing tier to select, click here.

You will need to create a resource group if you do not already have one. Click the "Create new" link under the Resource group dropdown.

Enter a name for the resource group and press the "OK" button.

Click the "Create" button at the bottom of the form to continue.

It will take a few moments for your Speech resource to be deployed. When it is ready, your screen will appear as below.

Click the "Go to resource" button. You will be taken to the following screen.

Make a note of the URL listed in the step 2b above, "https://eastus.api.cognitive.microsoft.com/sts/v1.0/issuetoken" in this example. You will need URL for a later step.

Next, click on the "Keys" link in step 1 above.

Click on the button to the right of one of the keys to copy it to your clipboard. It does not matter which key you select.

Step 5 - Connect to your Bot Libre Bot

Return to the Bot Libre website and navigate to your bot's admin console by clicking on the gear icon in the bottom menu.

Next, click the "Voice" link.

Select "Microsoft Speech" from the "Speech Provider" dropdown.

Enter the API Key that you copied to the clipboard in the previous step into the "Microsoft Speech API Key" field.

Enter the URL noted from the previous step into the "Microsoft Speech API Endpoint" field.

Click the "Test" button to test that you have entered these values correctly. If you receive an error message, double check that you have entered the values correctly from the Azure portal.

Click "Save" when you are finished.

Your bot will now be speak using the Microsoft Speech voice that you have selected. If you encountered any issues, or would like help setting up your bot please email us at support@botlibre.com or upgrade to our Platinum service and we can build your bot for you.

Tuesday, November 12, 2019

How to Connect a Bot to Email and Gmail

Bot Libre allows a bot to be connected to email. This lets you create a bot to be your first tier of support or customer service for your business. The bot can answer common user questions and differ more difficult questions to your second tier support. Connecting a bot to email can also be used to let your bot send email notification from scripting, such as when a user wishes to escalate an issue from live chat. Email also provides a novel way to let people interact with your bot.

You can connect a bot to any SMTP, POP3, or IMAPS email account, such as Gmail. Connecting a bot to email can allow the bot to read and reply to email messages, and can let the bot send email from scripting. This post will show you step by step instructions on how to connect your bot to a Gmail account.

Step 1 - Create Bot

First you must create the bot that you want to connect to Gmail, or you can use one of your existing bots. To create a bot, follow the instructions here: How to create your own chat bot in 10 clicks.

Step 2 - Connect Bot to Email Account

In the admin console page of your bot click on "Email" link. This will take you to your bot's "Email" settings page.


Step 3 - Configure Email Settings


In the "Email" text input field enter the Gmail email address. In the "User" text input field enter the same email as above. In the "Password" text input field enter the password that you use to login to this email address.

A bot can be connected to an email account in two ways. The bot can either just use the email account to send messages (such as a script that escalates issues through email), or the bot can check for new messages and reply to all messages. If you want your bot to reply to new messages, enable "Reply to Email" check box. Then click save.

Upon successful user credentials authentication you should see the following message at the top of the page.


Note, if there is a problem with connecting your bot to gmail, then at the top of the "Email" page you will see a message highlighted in red colour. At this point go to Step 5 and adjust your email settings.


Step 4 - Test your bot to email replies

In the "Test Email" text input field enter an email to which you want your bot to send message to and click "Test" button. At this point you should see a new "test" message appear in your email.

To test bot's reply to any new messages in your user email account, first send a new message to user@gmail.com account from another account. At this point your user@gmail.com account has a new message. Since the "Reply to Email" check box is enabled there should be grey "Check Email" button to the right of yellow "Disconnect" button. Click on "Check Email" button. At this point the bot will send a reply message to an email that originated the original message.

Note, be careful. Since the "Reply to Email" check box is enabled, the bot will reply to all the new email coming in to the user@gmail.com account. How often the bot checks it messages depends on your account level. For a Bot Libre for Business account the bot will check its email about every 5 minutes. For a Basic Bot Libre account the bot will only check its email once per day.

To disconnect a bot from user@gmail.com account, click on yellow "Disconnect" button. At this point your bot is no longer connected to user@gmail.com account and will not reply to any new messages.

Step 5 - Configuring Gmail Account Settings

By default Gmail does not allow external apps to access an email account. You must enable a few settings in Gmail to enable this.

Sign in to you gmail account. Then click on settings icon and choose settings from the drop down. Then select "Forwarding and POP/IMAP. Make sure "IMAP access" is enabled. Click on "Save Changes" button at the bottom for changes to take effect.


In addition, make sure that you gmail account has "Less Secure Apps" option enabled. For this follow this link Less secure apps access.

Click on option (1) under Turn off "Less secure app access" and click the button to enable it as shown in the image below. At this point you should successfully connect you bot user@gmail.com account by clicking on "Save" button once again.

Your bot should now be able to send and receive email. Please ensure your bot does not spam.

Wednesday, June 19, 2019

Installing BotLibre Enterprise Bot Platform on Microsoft Azure

Azure is a cloud computing service created by Microsoft for building, testing, deploying, and managing applications and services through Microsoft-managed data centres. Azure Virtual Machines (VM) is one of several types of on-demand, scalable computing resources that Azure offers.

This guide is to work through the steps to install Bot Libre platform to the Azure VM.

Step 1. Create an Azure Virtual Machine

First go to Azure website https://signup.azure.com and sign up a new account if you do not have one yet.

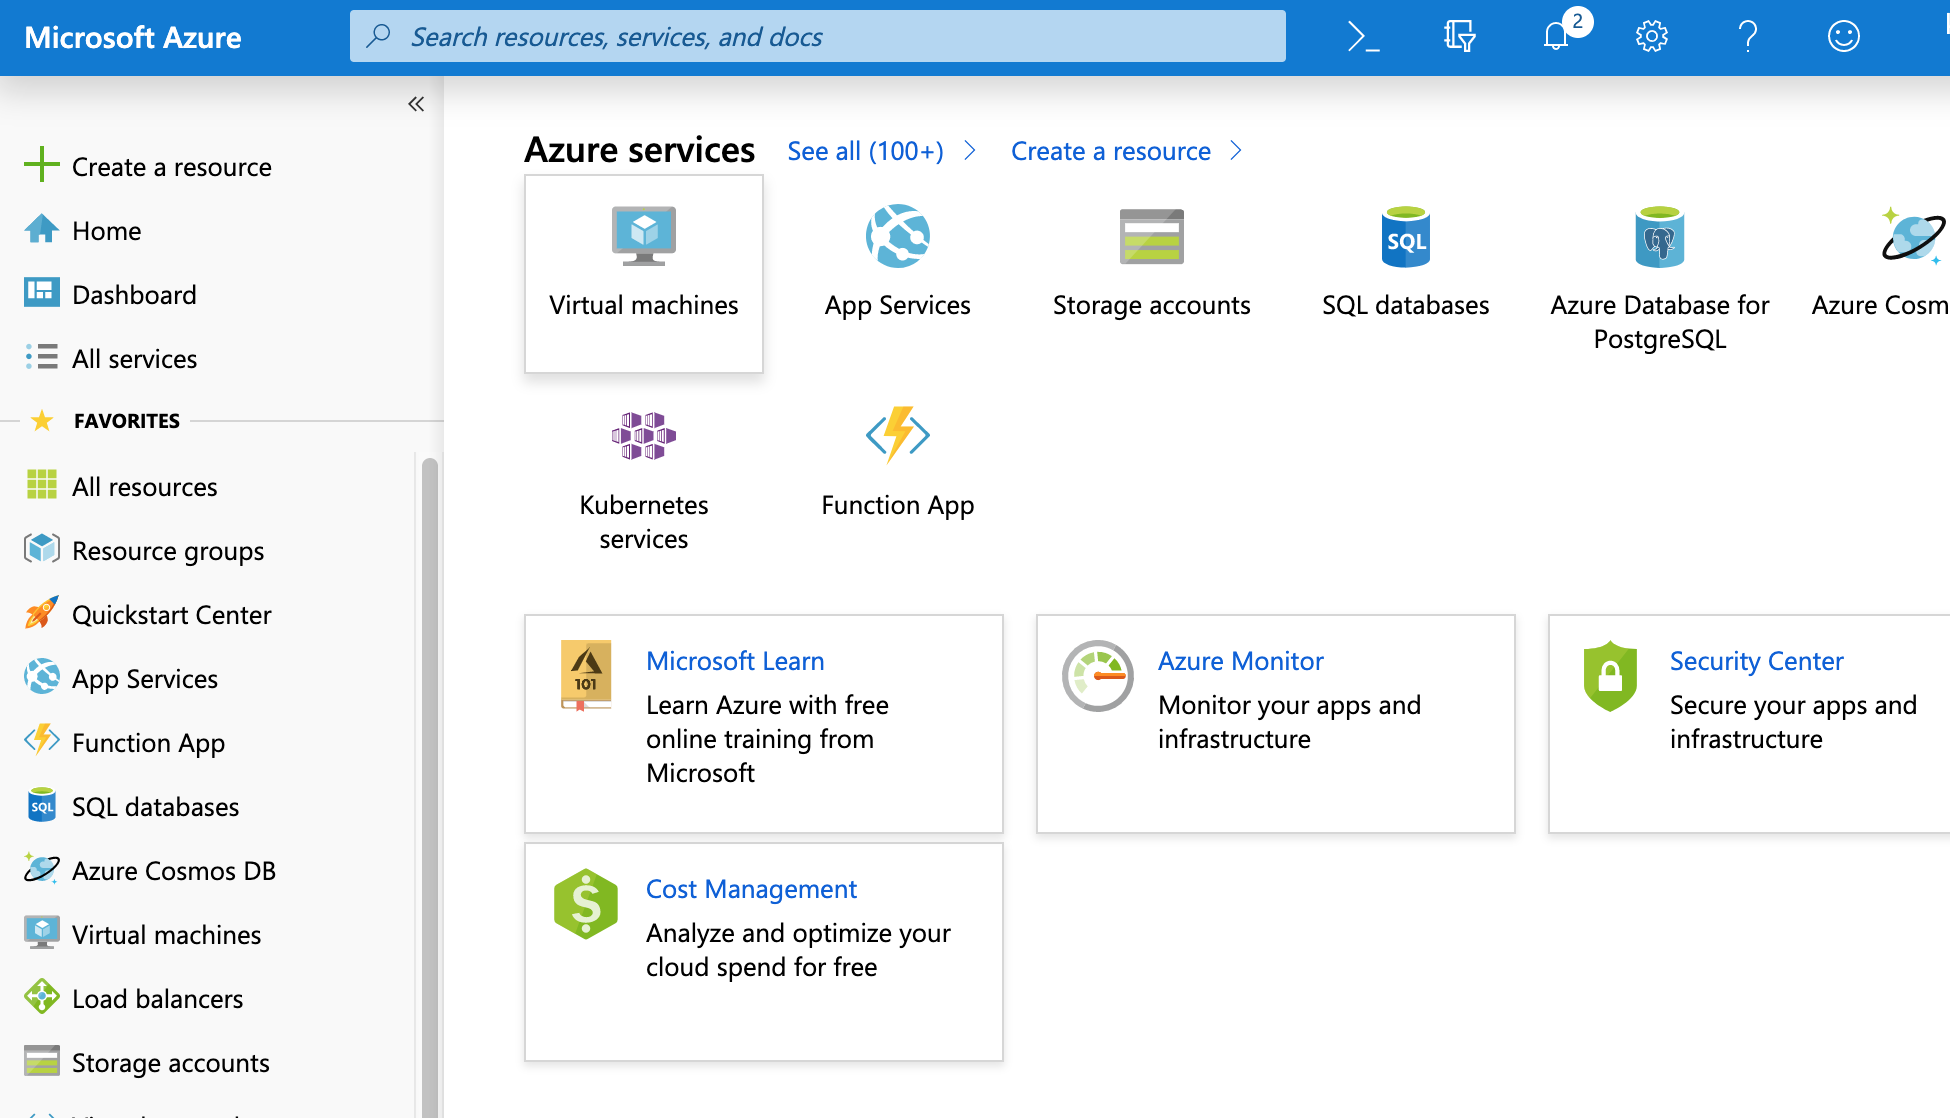
Then login, and go to Azure portal site:  https://portal.azure.com/

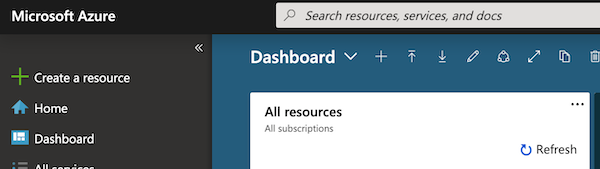
And click the ‘Virtual machine’ button below and follow the steps to create a new VM.

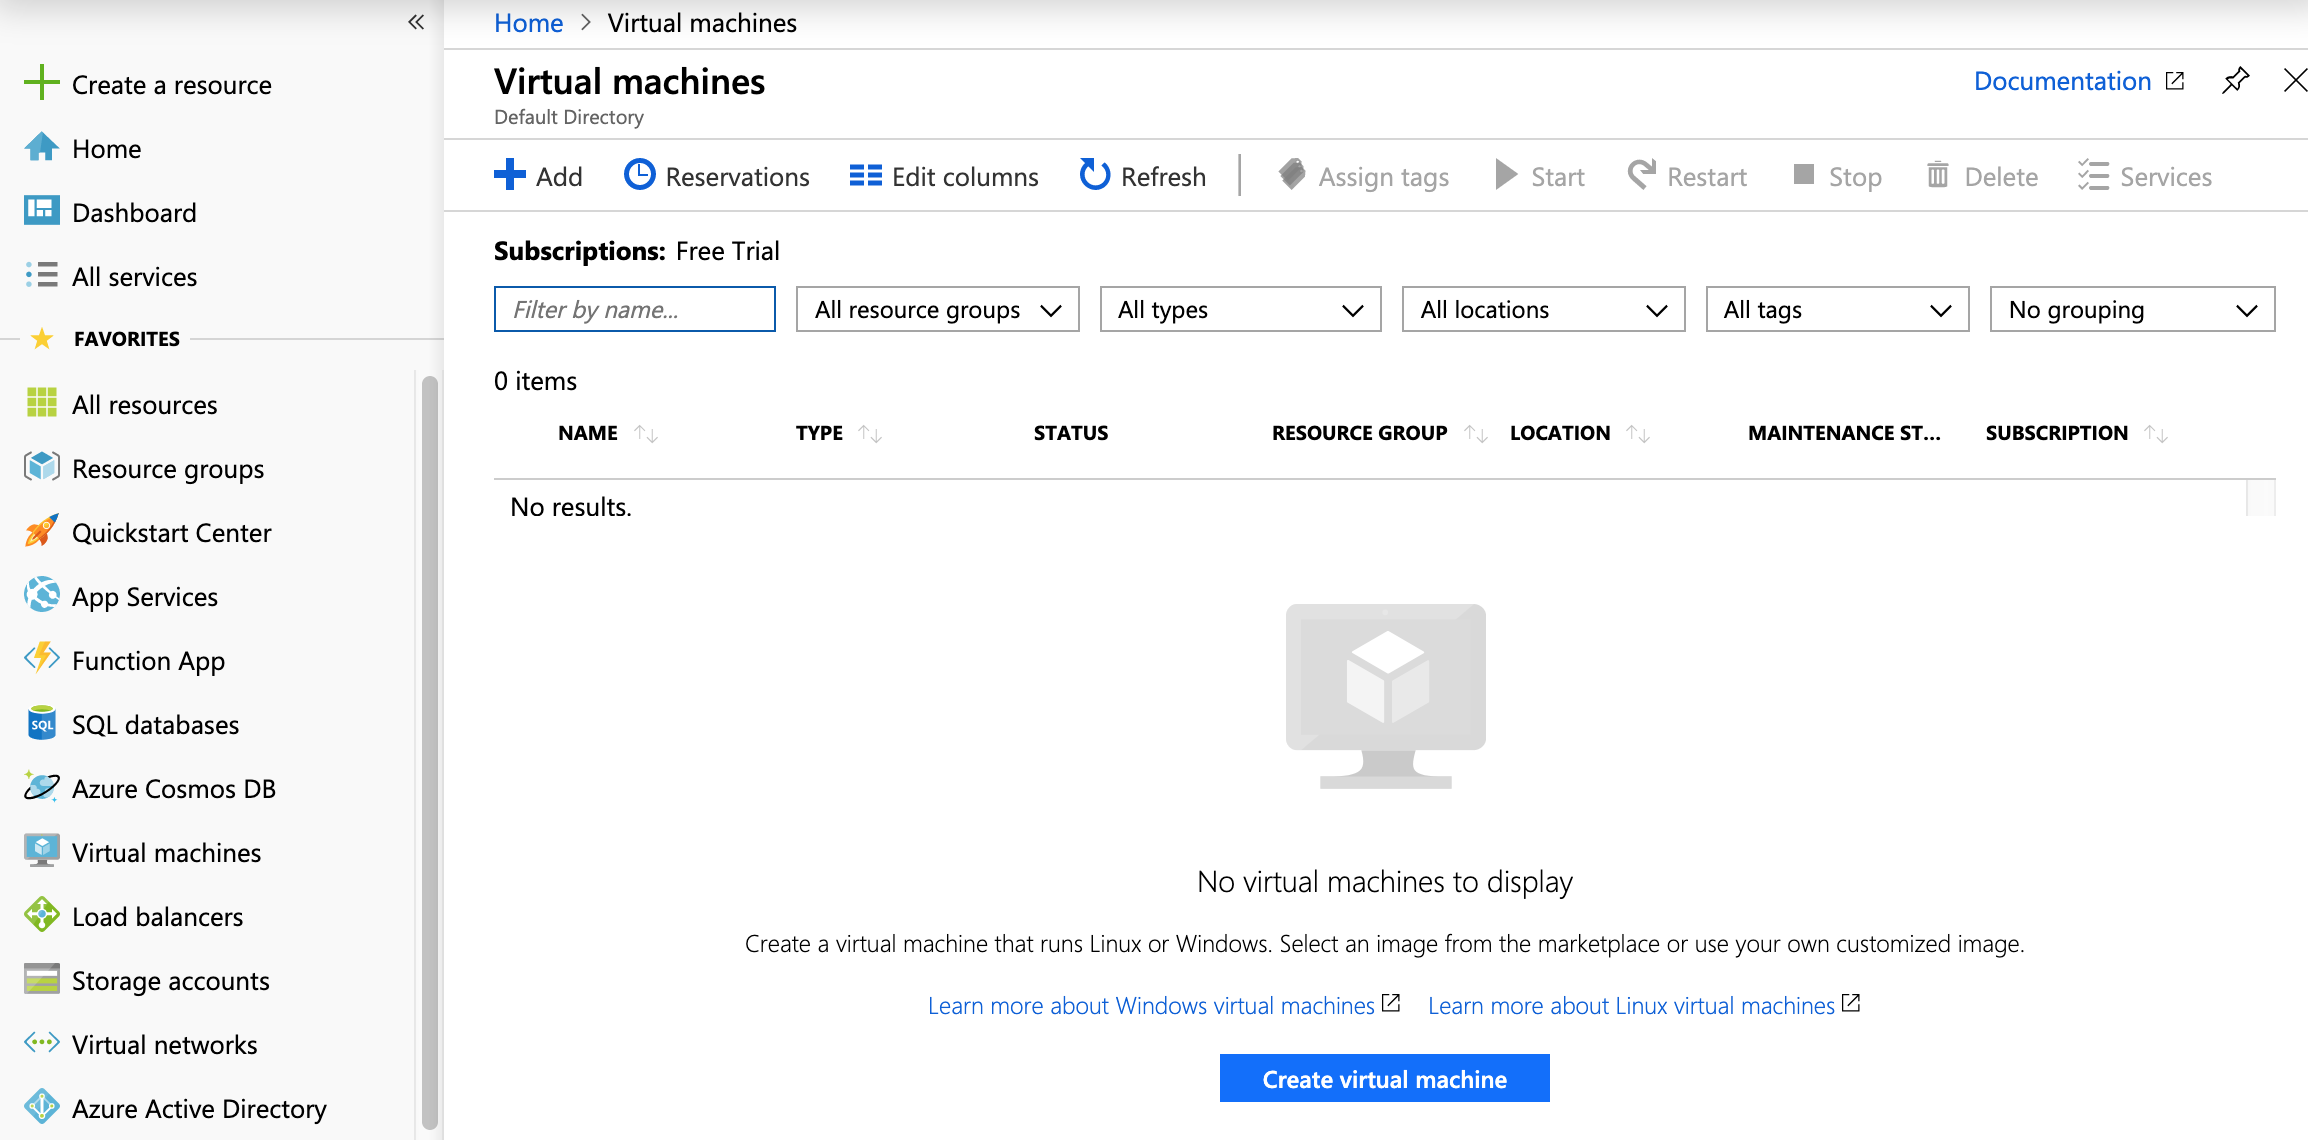
From the new Virtual machines creation page, click blue ‘Create virtual machine’ button.

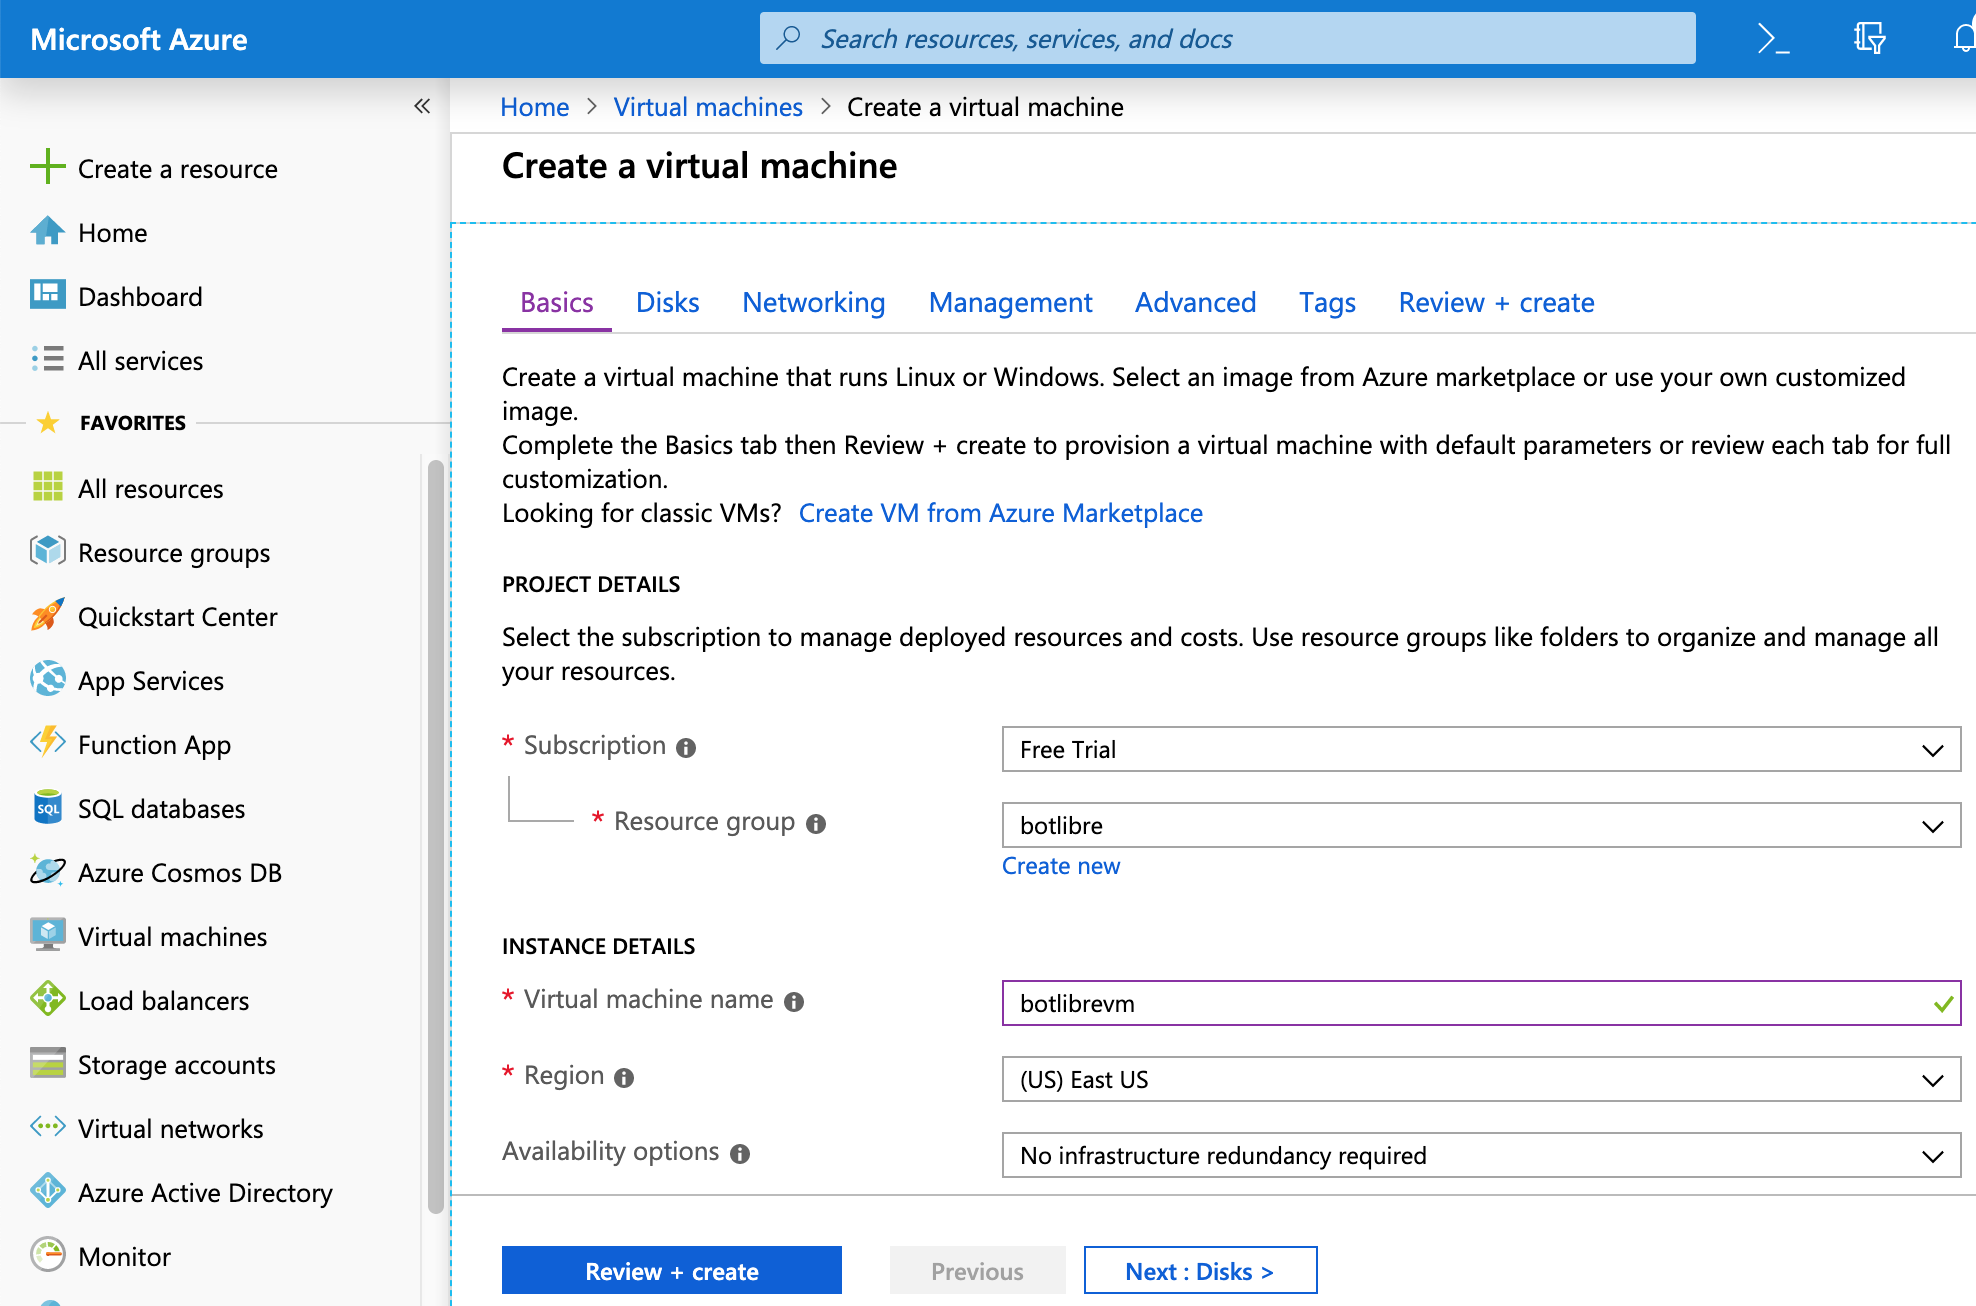
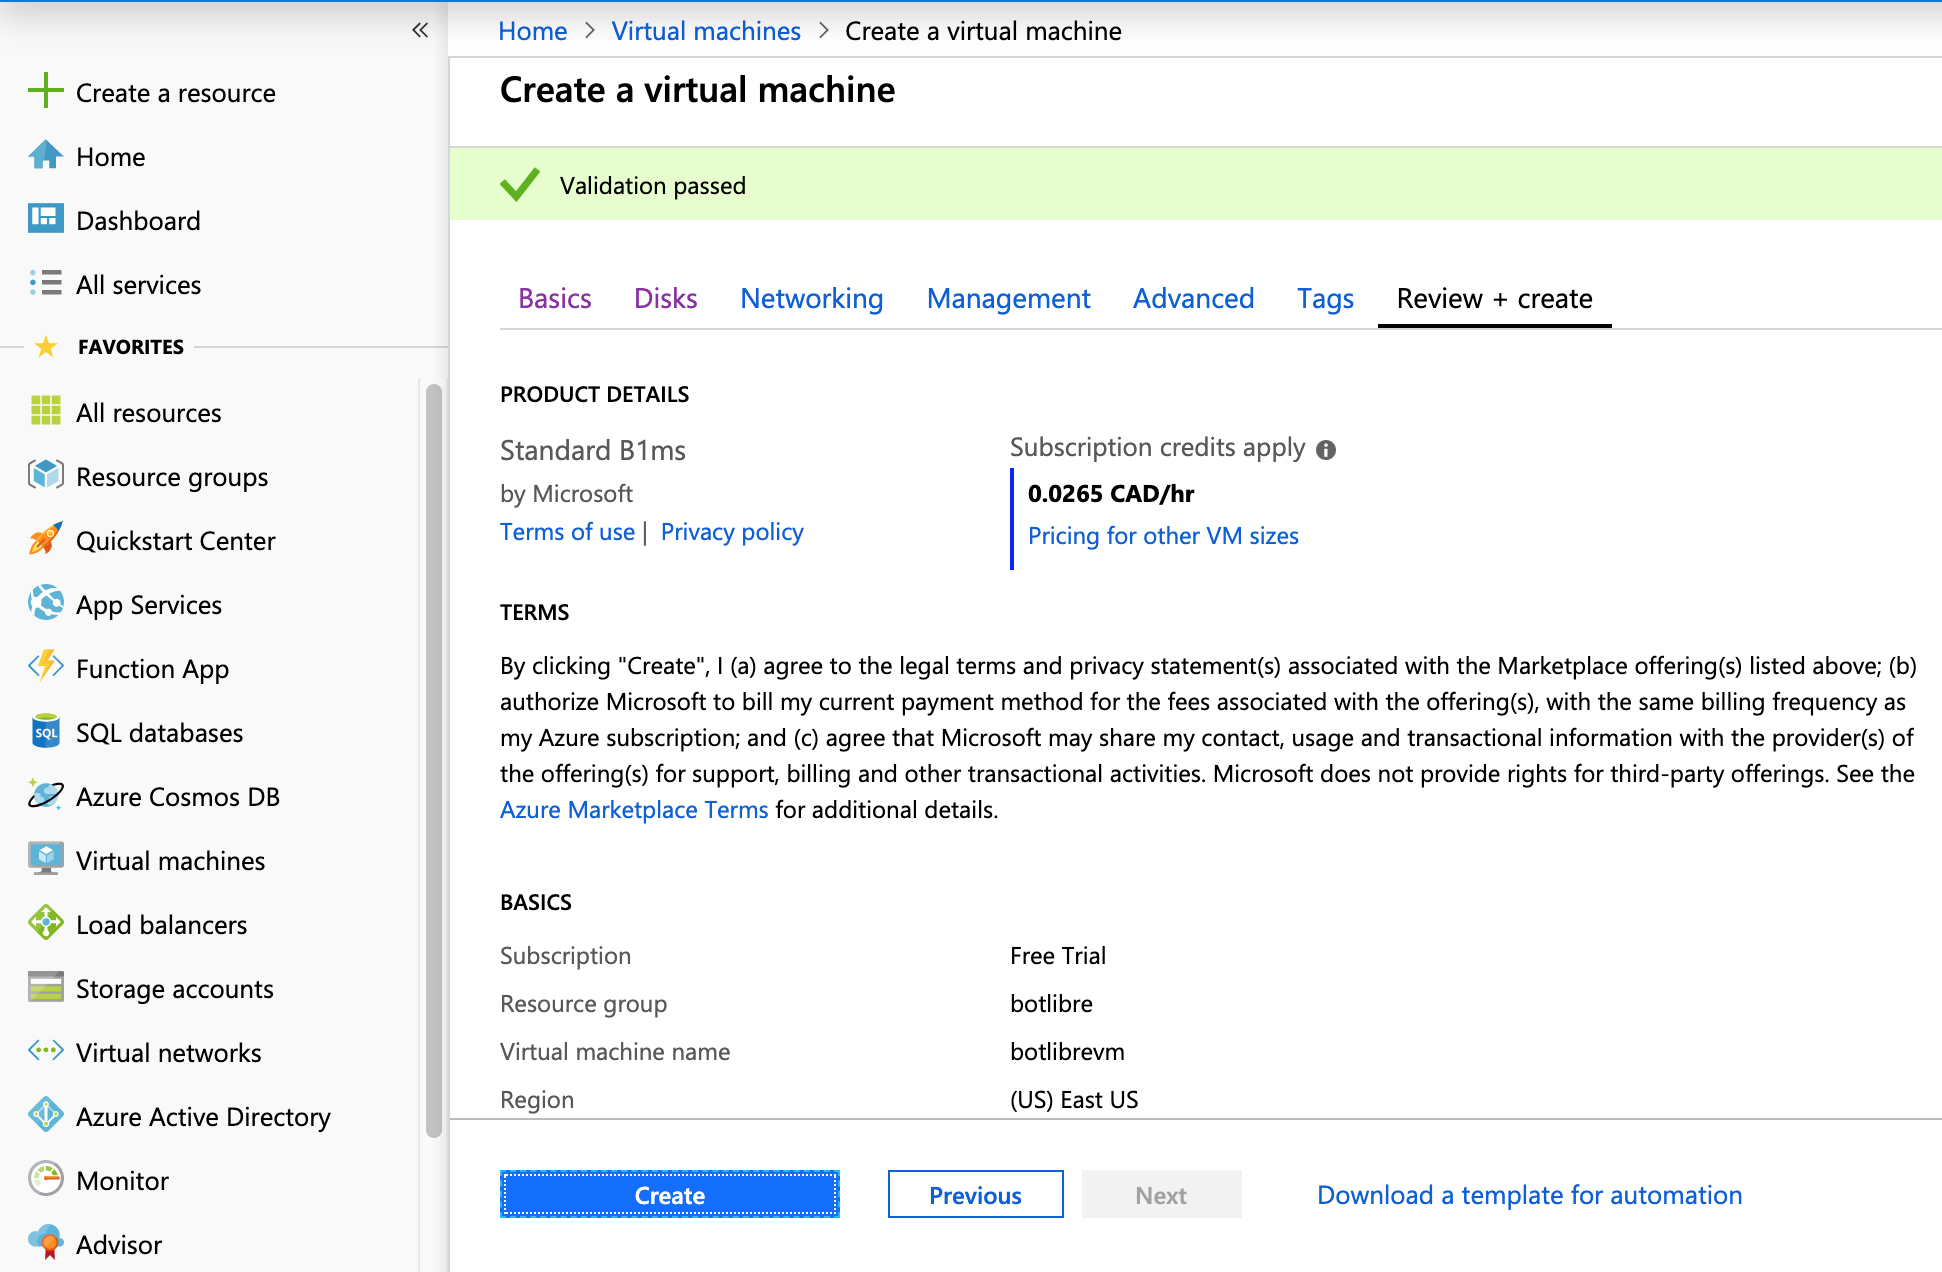
From the “Basics” configuration page, specify a VM name (e.g. botlibrevm) and select the region close to your location (e.g. East US)

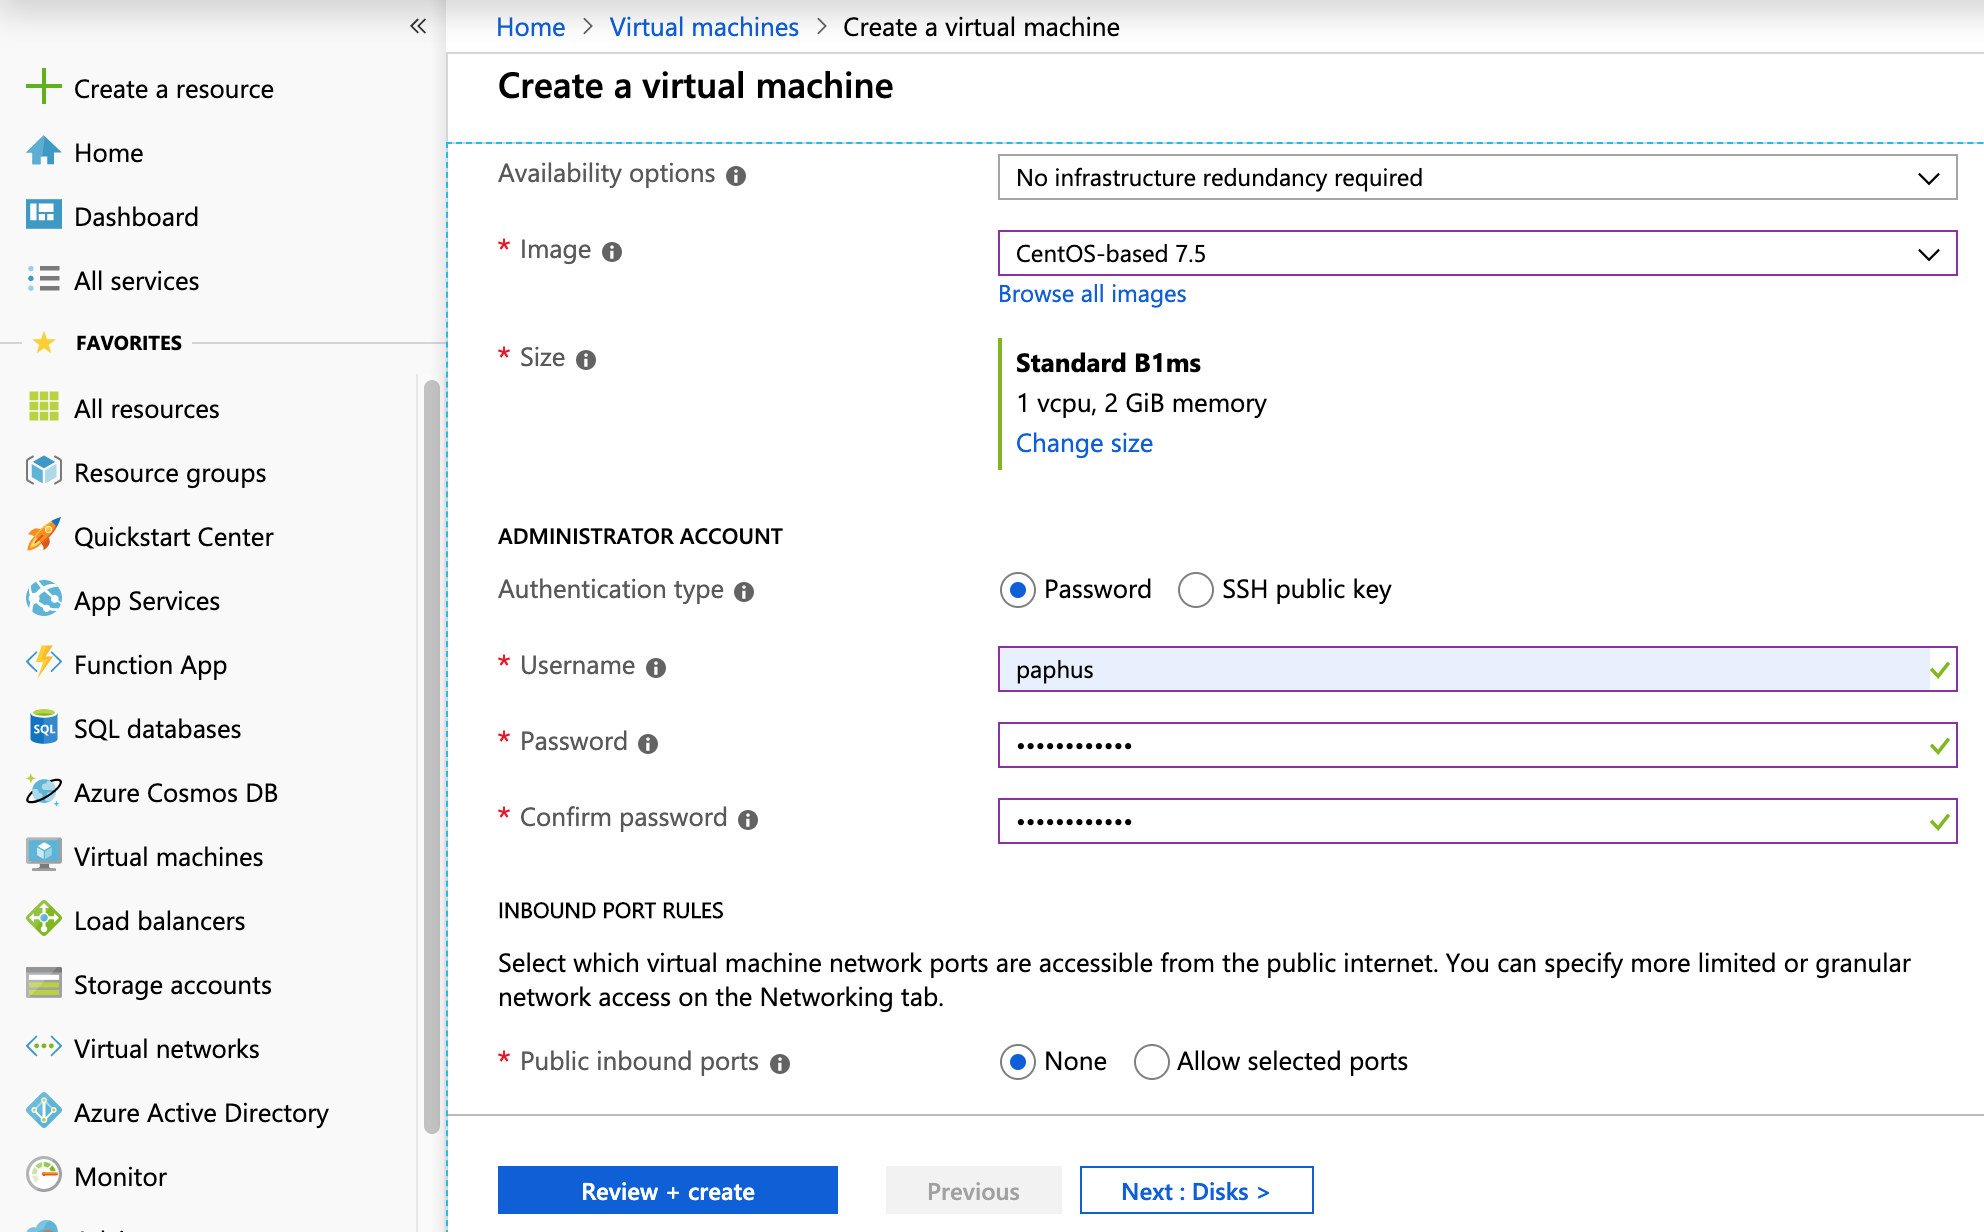
From the same Basics configuration page, scroll down, and select Image with CentOS-based 7.5. CentOS is our recommended OS installing platform. For the size, we recommend at least 16GM RAM and 2TB hard disk in two CPUs for the production environment. For the demo purpose, we choose the basic size of 1 cpu and 2GB  RAM.

Then specify to use user/password to SSH remote access to the VM.

Then click “review + create” blue button (above) to review and create the VM, and now see the Review page before committing the VM creation operation:

It then takes about 4-5 minutes to complete the image deployment.

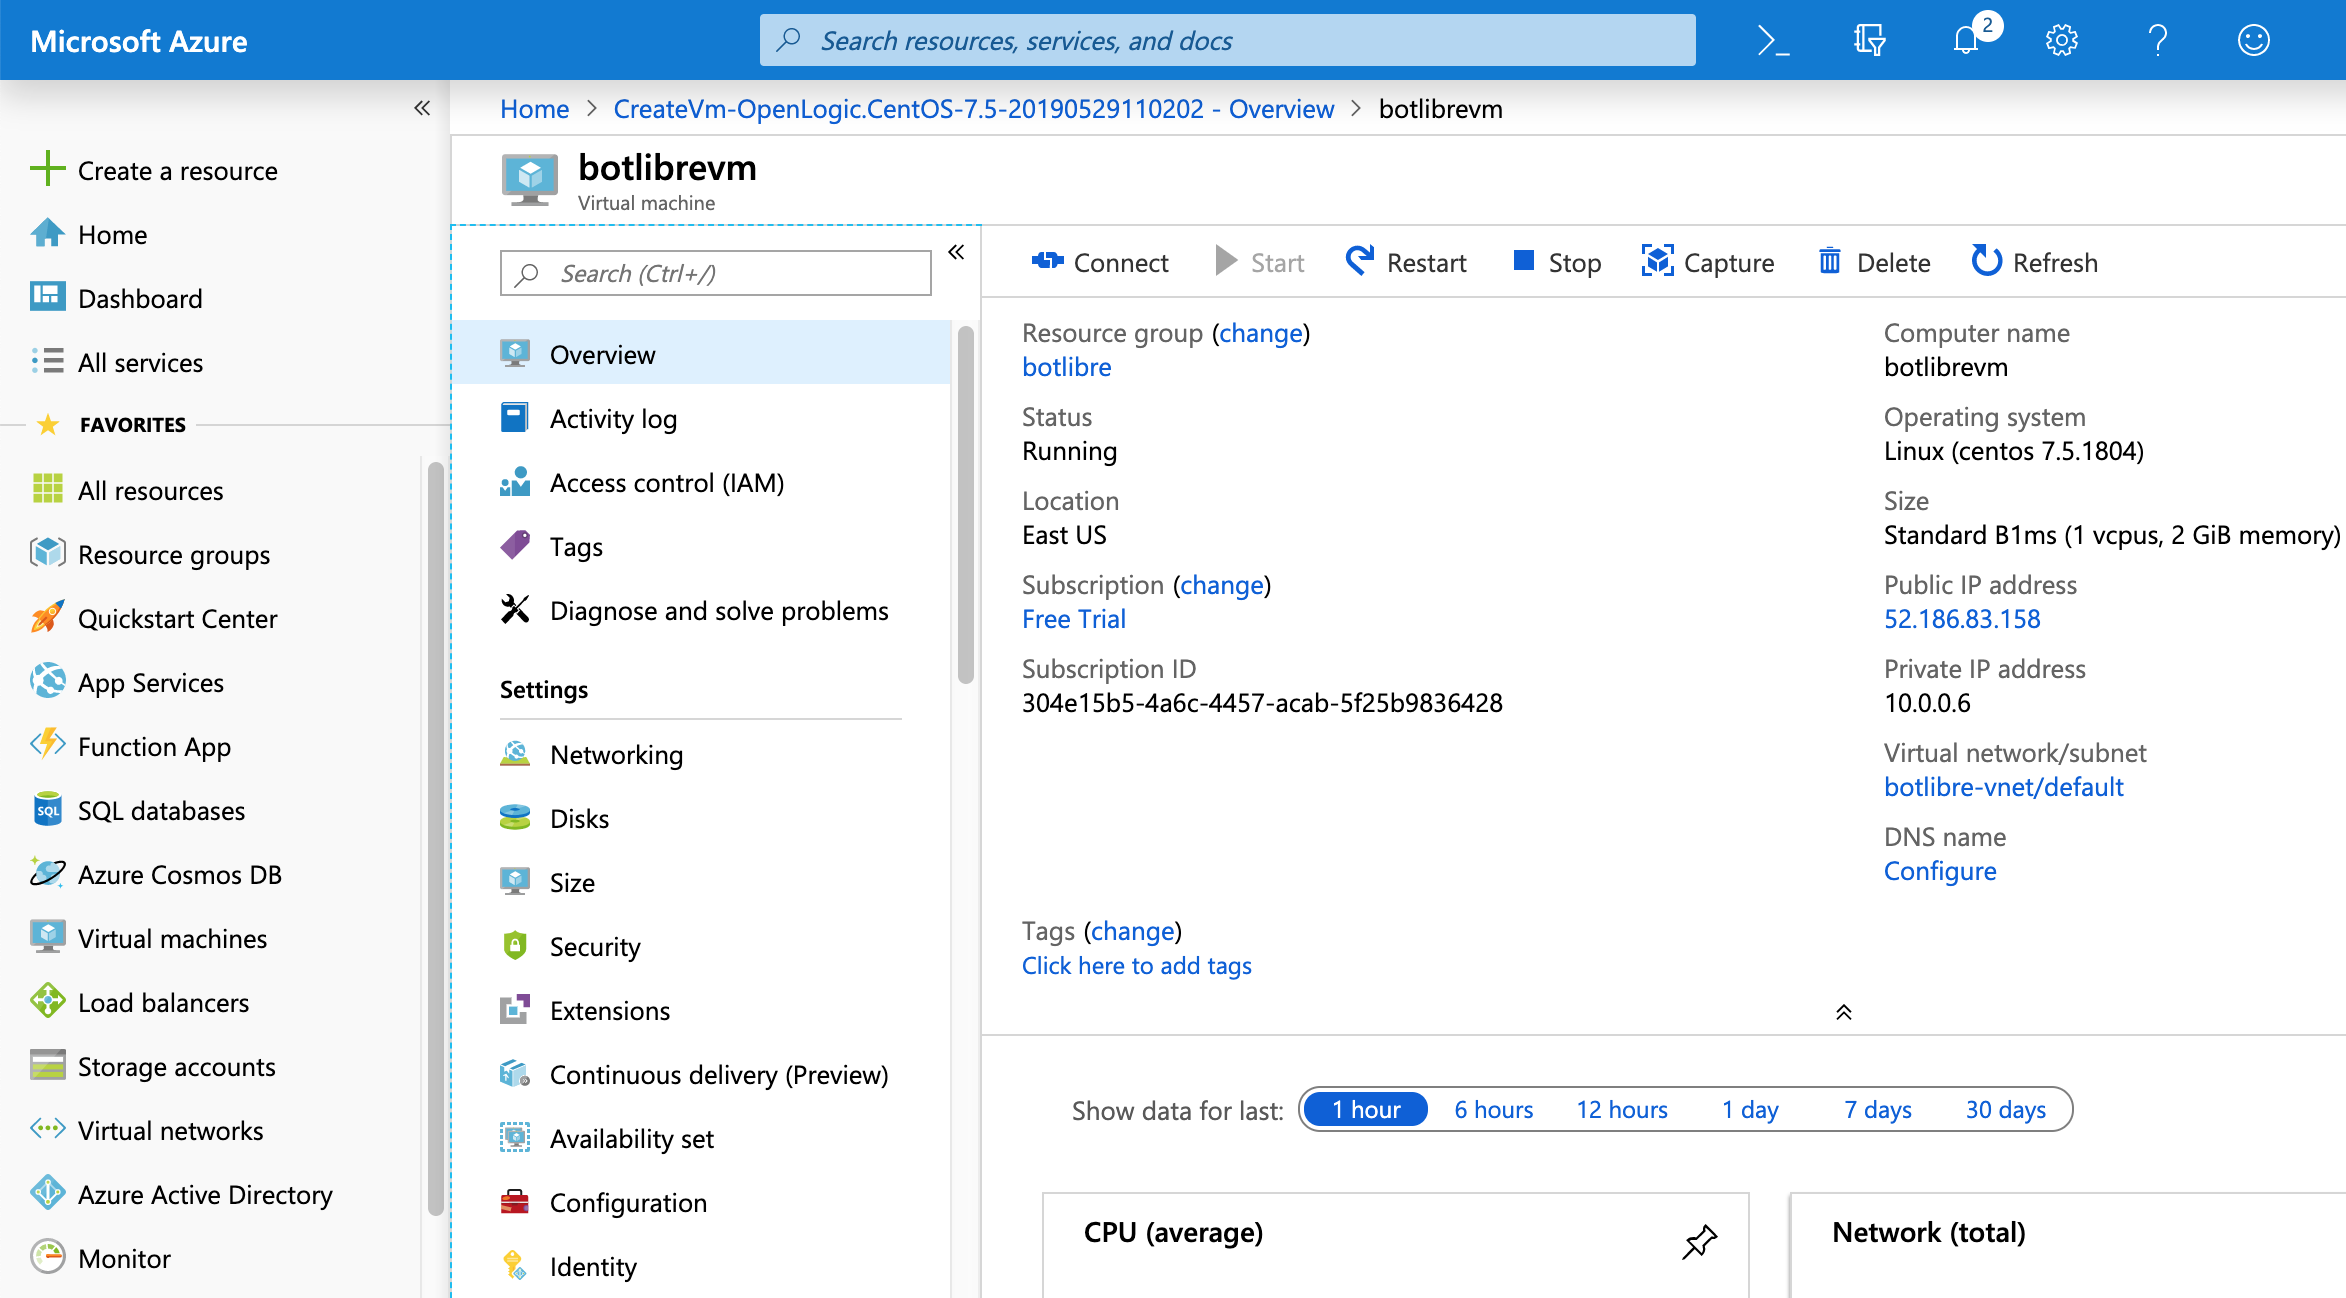
Azure assigns a public IP (e.g. 52.186.83.158) to the instance, and we need the IP to config the web server later on.

When the VM is ready, you can now access to it via Serial Console, or SSG remote access from  a client terminal.

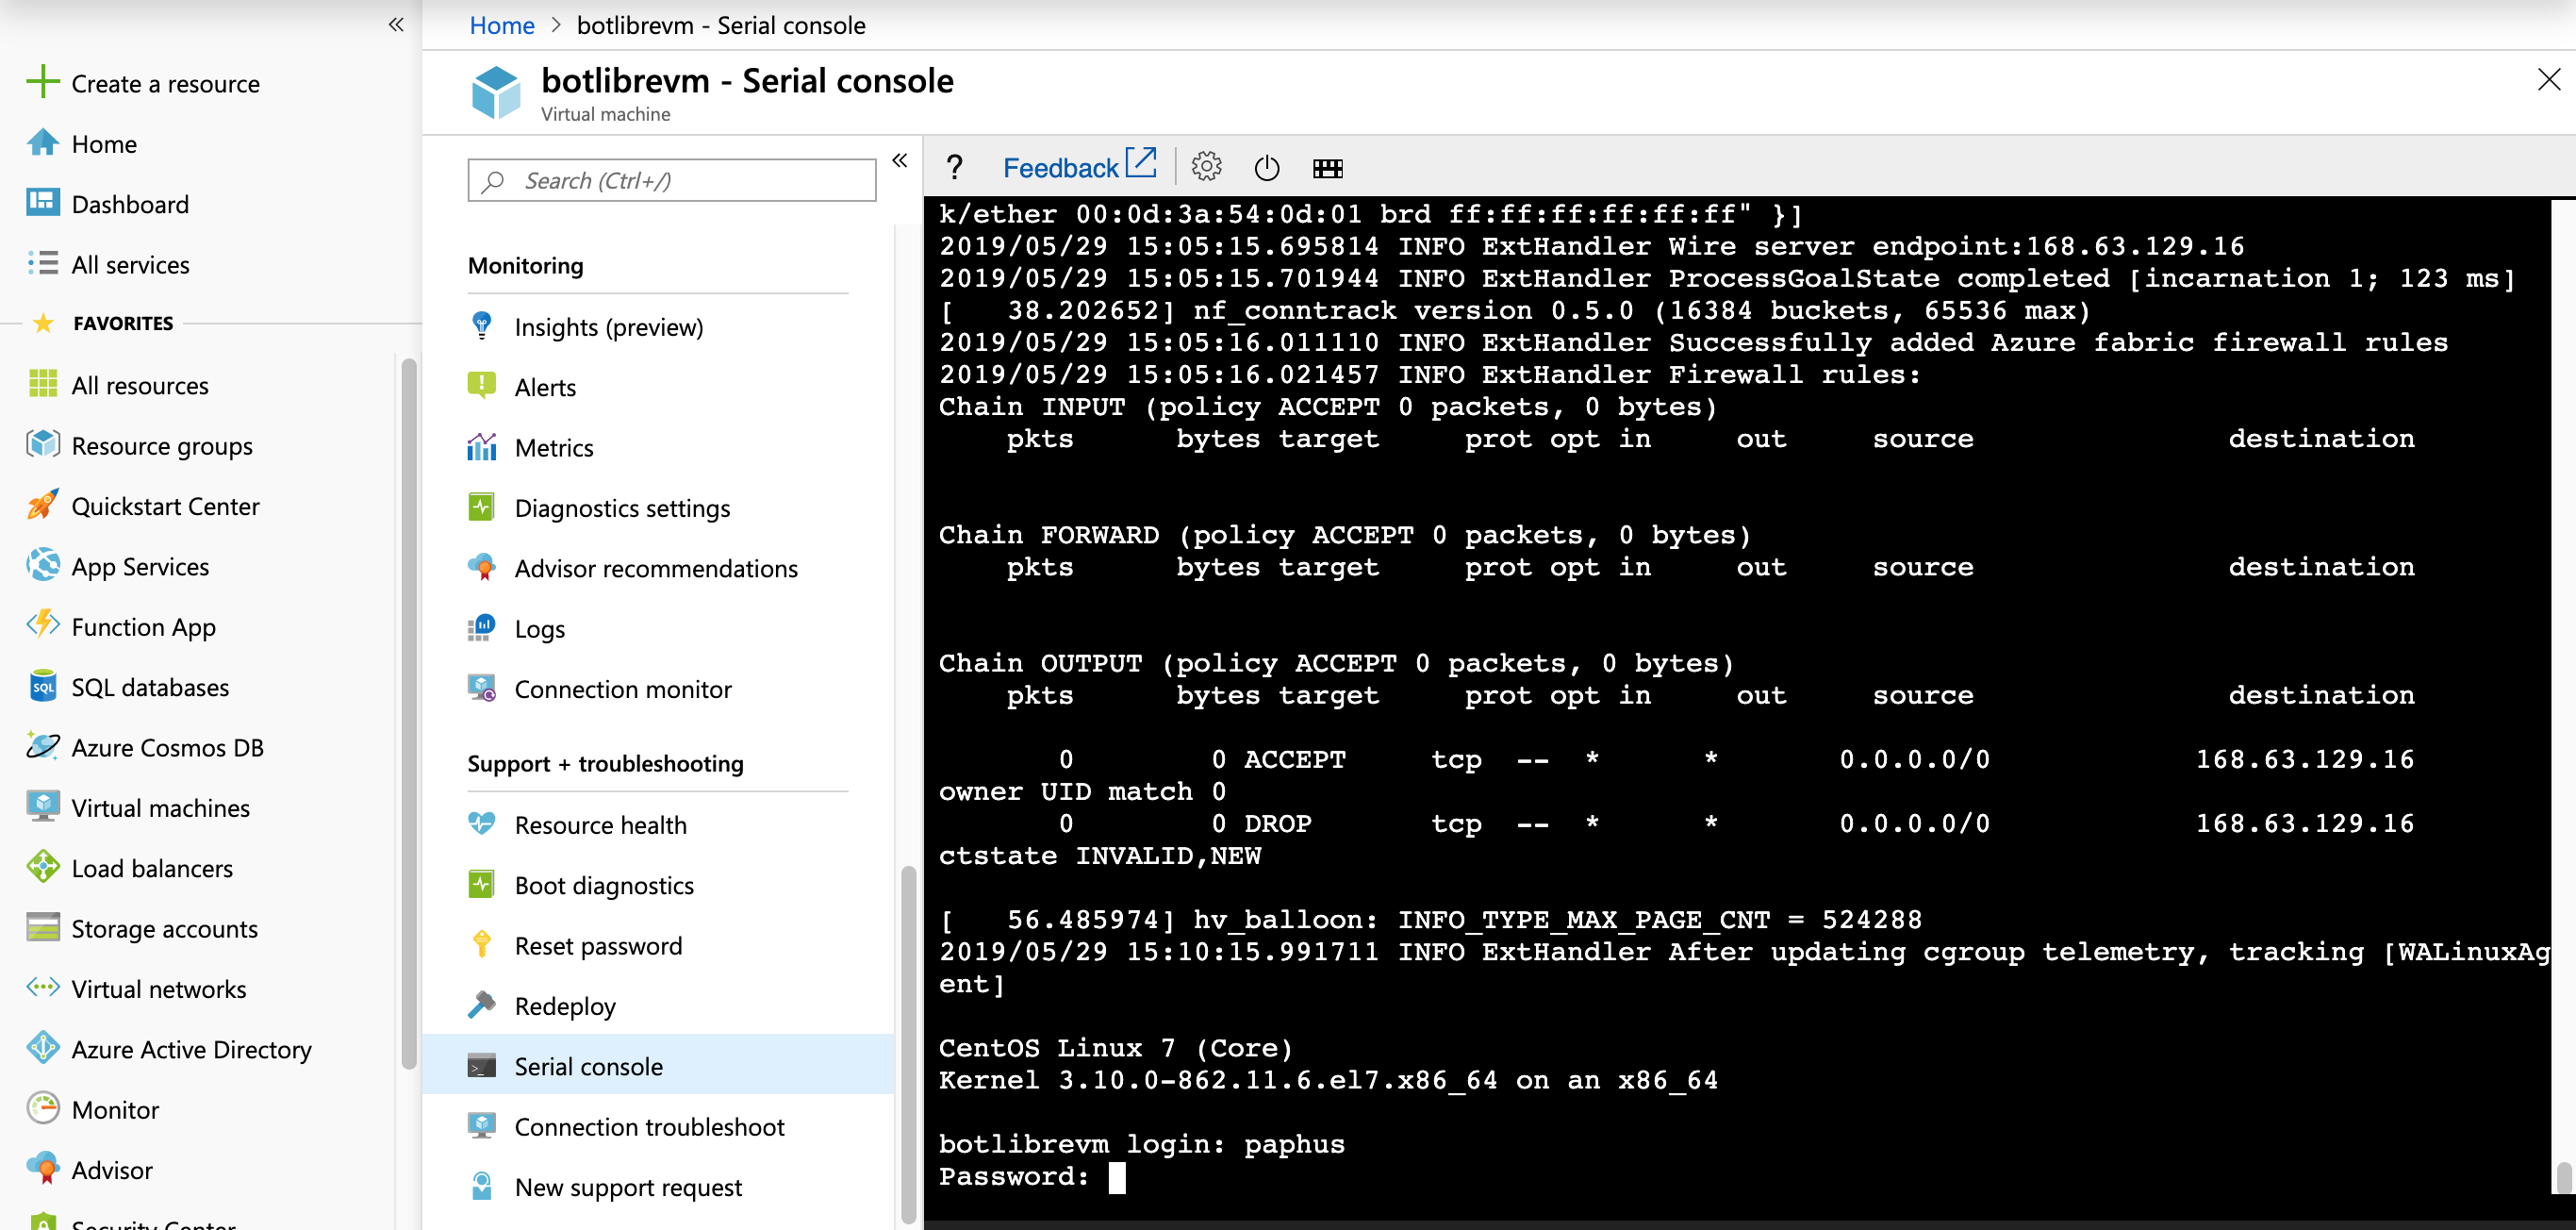
Azure's Virtual Machine Serial Console provides access to a text-based console for Linux or Windows Virtual Machines on Azure. This serial connection is to COM1 serial port of the virtual machine and provides access to the virtual machine regardless of that virtual machine's network/operating system state.

You can now use Azure Serial Console to connect to the VM. (from the VM main page, search Serial Console, or scroll down the menu and find the Serial Console from “Support + troubleshooting” section.

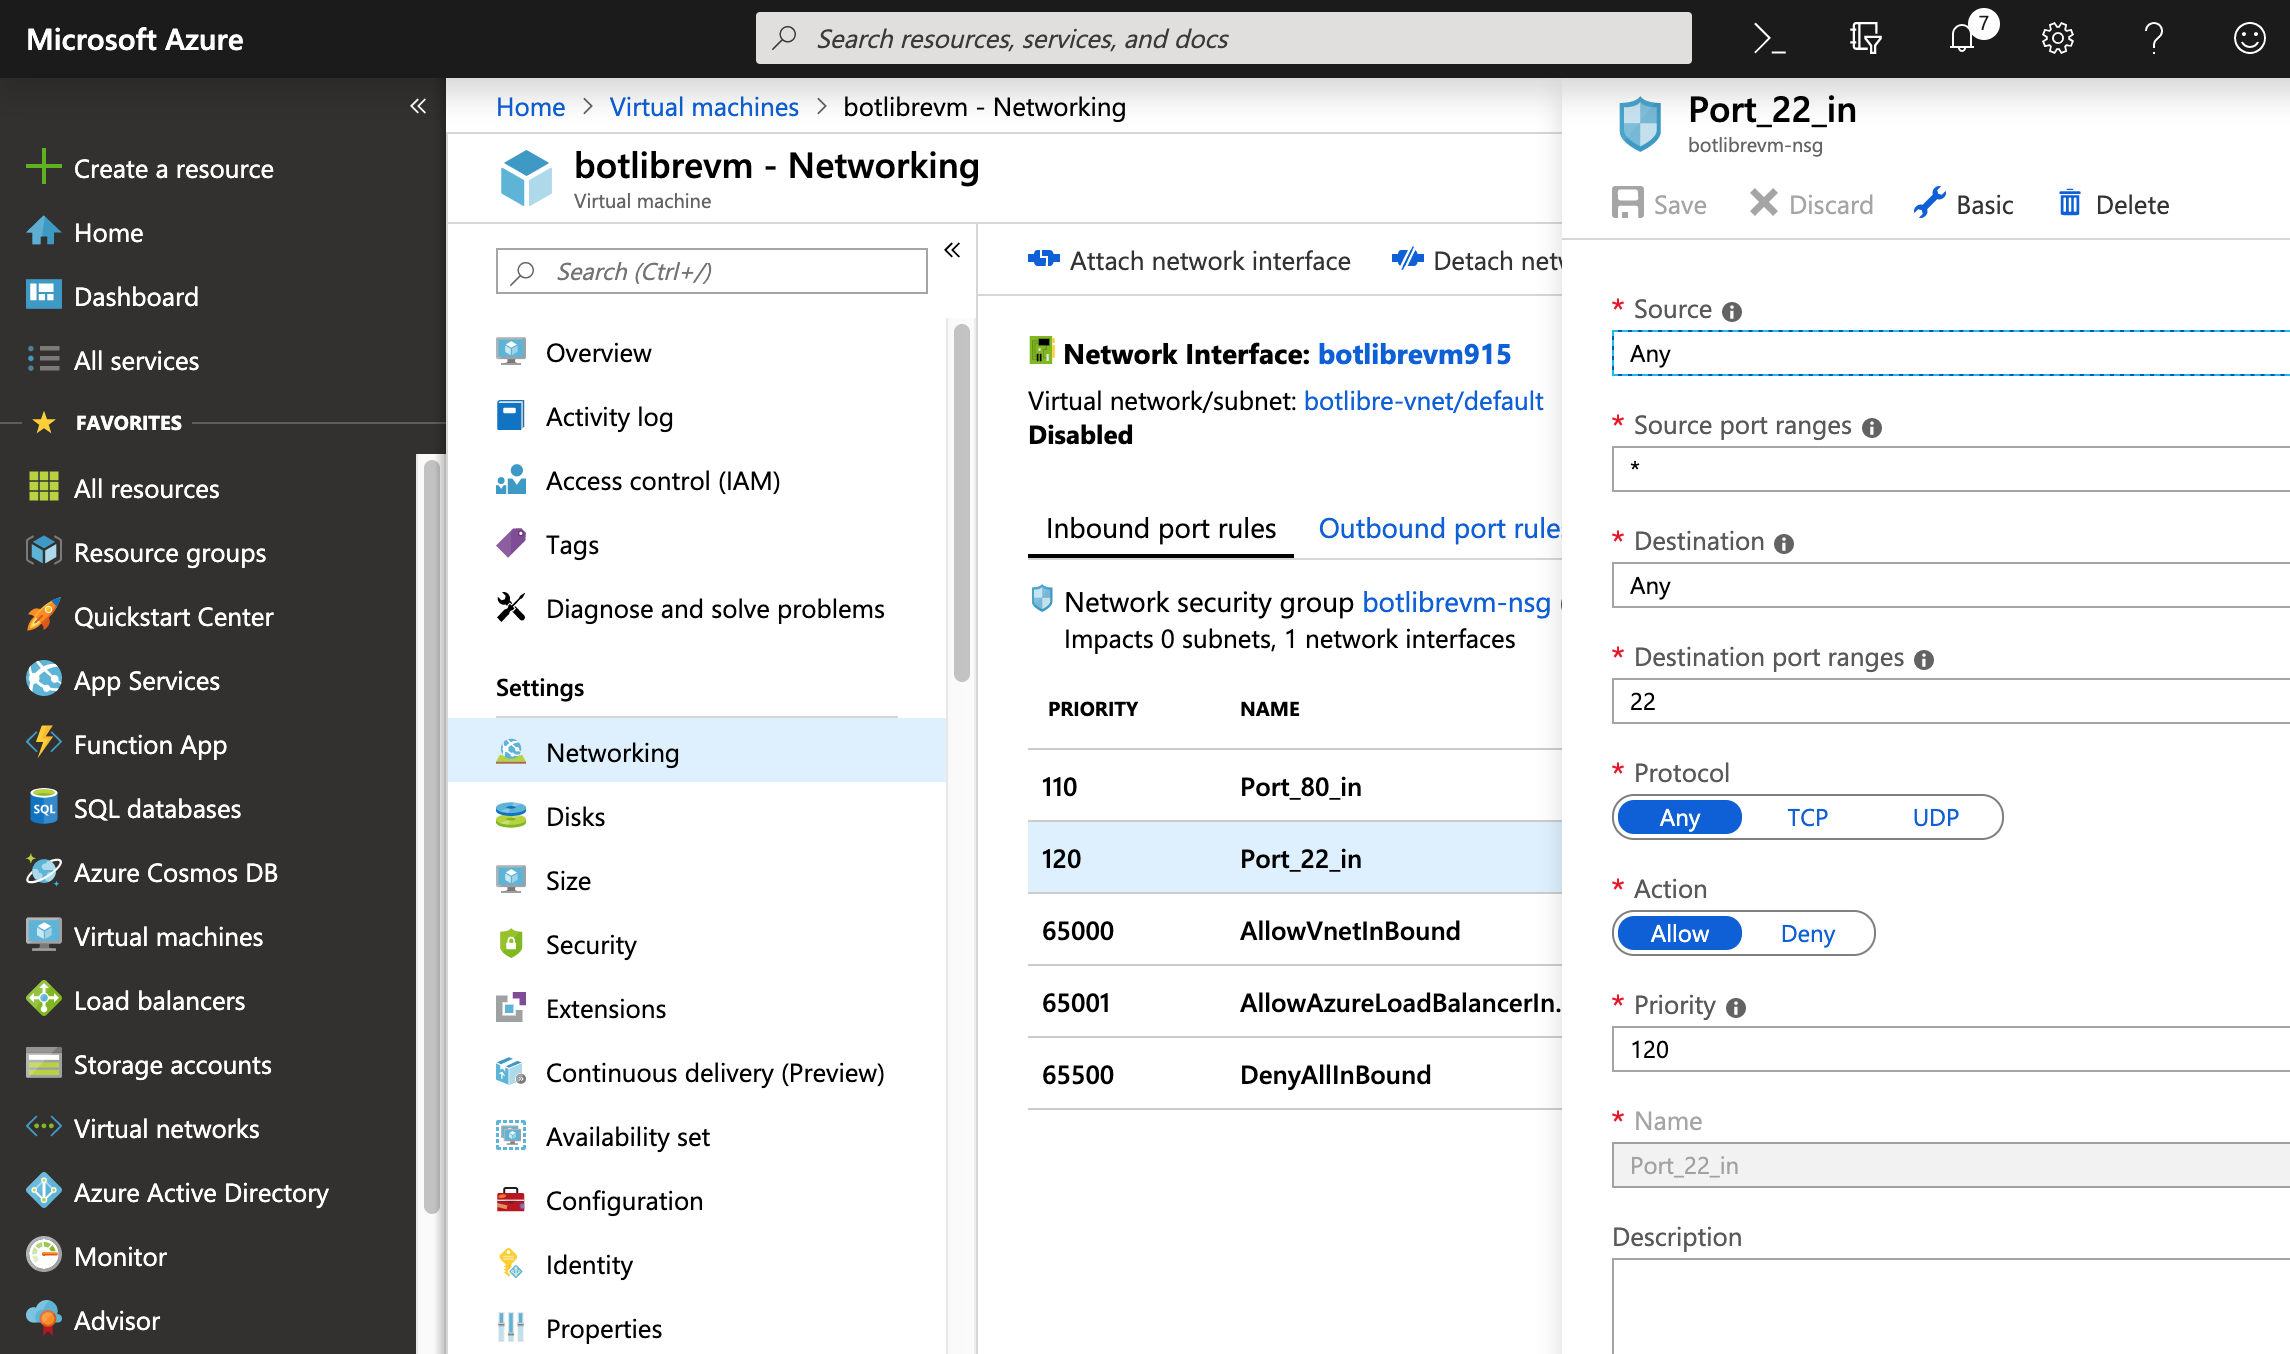
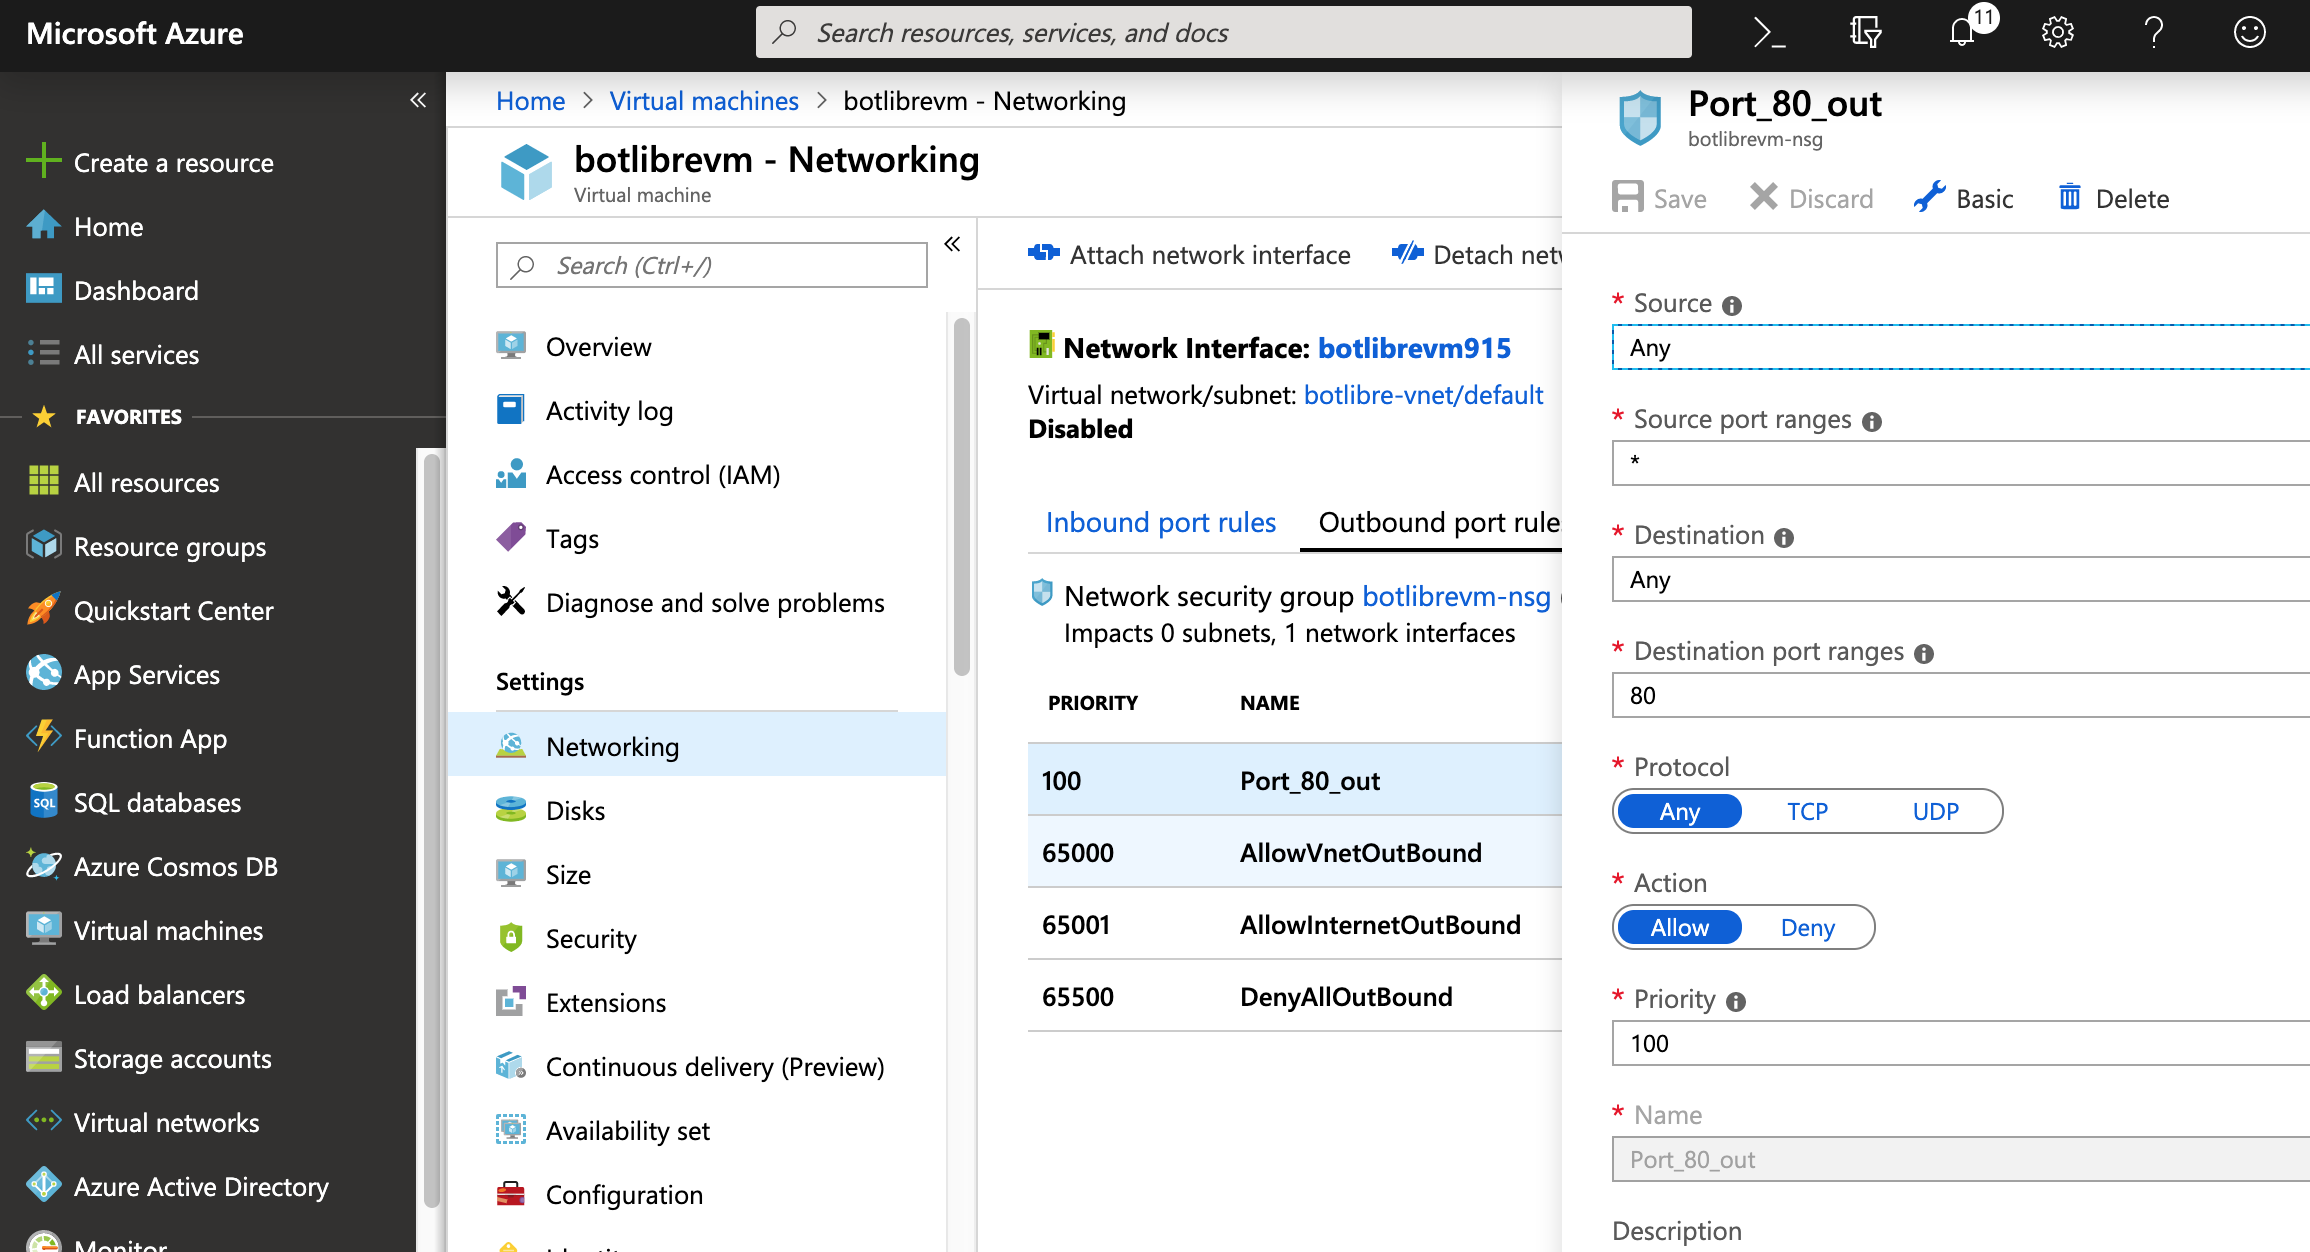
Last, you need to configure the VM networking to allow the inbound/outbound via specific port. You must add a pair of inbound/outbound port rules to allow the access of Tomcat server, which use the port 80.

If you choose ssh from a client terminal instead of using the Serial Console, you need to add the inbound port 22.


After connecting to the VM instance from the terminal or Azure Serial Console, you may start to setup the Java, Ant, Tomcat, Postgres, Python and finally deploy the botlibre web app to Tomcat.

Step 2. Install Java 

>>Install the Java JDK 1.8 (latest dot release).

# sudo su root  (switch to root user)
# cd /opt
#  wget --no-cookies --no-check-certificate --header "Cookie: gpw_e24=http%3A%2F%2Fwww.oracle.com%2F; oraclelicense=accept-securebackup-cookie" "http://download.oracle.com/otn-pub/java/jdk/8u131-b11/d54c1d3a095b4ff2b6607d096fa80163/jdk-8u131-linux-x64.tar.gz"
# cd /opt/jdk1.8.0_131/
# alternatives --install /usr/bin/java java /opt/jdk1.8.0_131/bin/java 2
# export JAVA_HOME=/opt/jdk1.8.0_131

Step 3. Install Tomcat web server.  

You can find the latest stable version (currently it’s 8.5.41) of Apache Tomcat 8 from its official download page.

Under the "Binary Distributions" section and then the "Core" list, right mouse click and save the http link pointing to the "tar.gz" archive:

# wget http://apache.mirror.colo-serv.net/tomcat/tomcat-8/v8.5.41/bin/apache-tomcat-8.5.41.tar.gz
# tar xzf apache-tomcat-8.5.41.tar.g
# export TOMCAT_HOME=/usr/local/tomcat8
# mv apache-tomcat-8.5.41 $TOMCAT_HOME
# vi $TOMCAT_HOME/bin/setenv.sh  (create a new setenv.sh file)

> add the following JVM option to increase the max memory size in your setenv.sh export JAVA_OPTS="-server -Xmx8g"

  # vi $TOMCAT_HOME/conf/web.xml

>> insert the following XML in your web.xml to enable cors filters (required for JavaScript access)

     <filter>
           <filter-name>CorsFilter</filter-name>
           <filter-class>org.apache.catalina.filters.CorsFilter</filter-class>
           <init-param>
                  <param-name>cors.support.credentials</param-name>
                  <param-value>false</param-value>
            </init-param>
    </filter>
    <filter-mapping>
            <filter-name>CorsFilter</filter-name>
            <url-pattern>/rest/*</url-pattern>
     </filter-mapping>
     <error-page>
            <error-code>404</error-code>
            <location>/404.jsp</location>
     </error-page>

# vi $TOMCAT_HOME/conf/server.xml
>> update connector port 8080->80, 8433->433
>> add to connector, URIEncoding="UTF-8"
>> update host- <public ip> > autoDeploy=”false”


> Start tomcat web server:

# cd $TOMCAT_HOME/bin
# ./startup.sh

Go to a browser and check if the server is up and running at http://<public-ip> (e.g. http://52.186.83.158 )


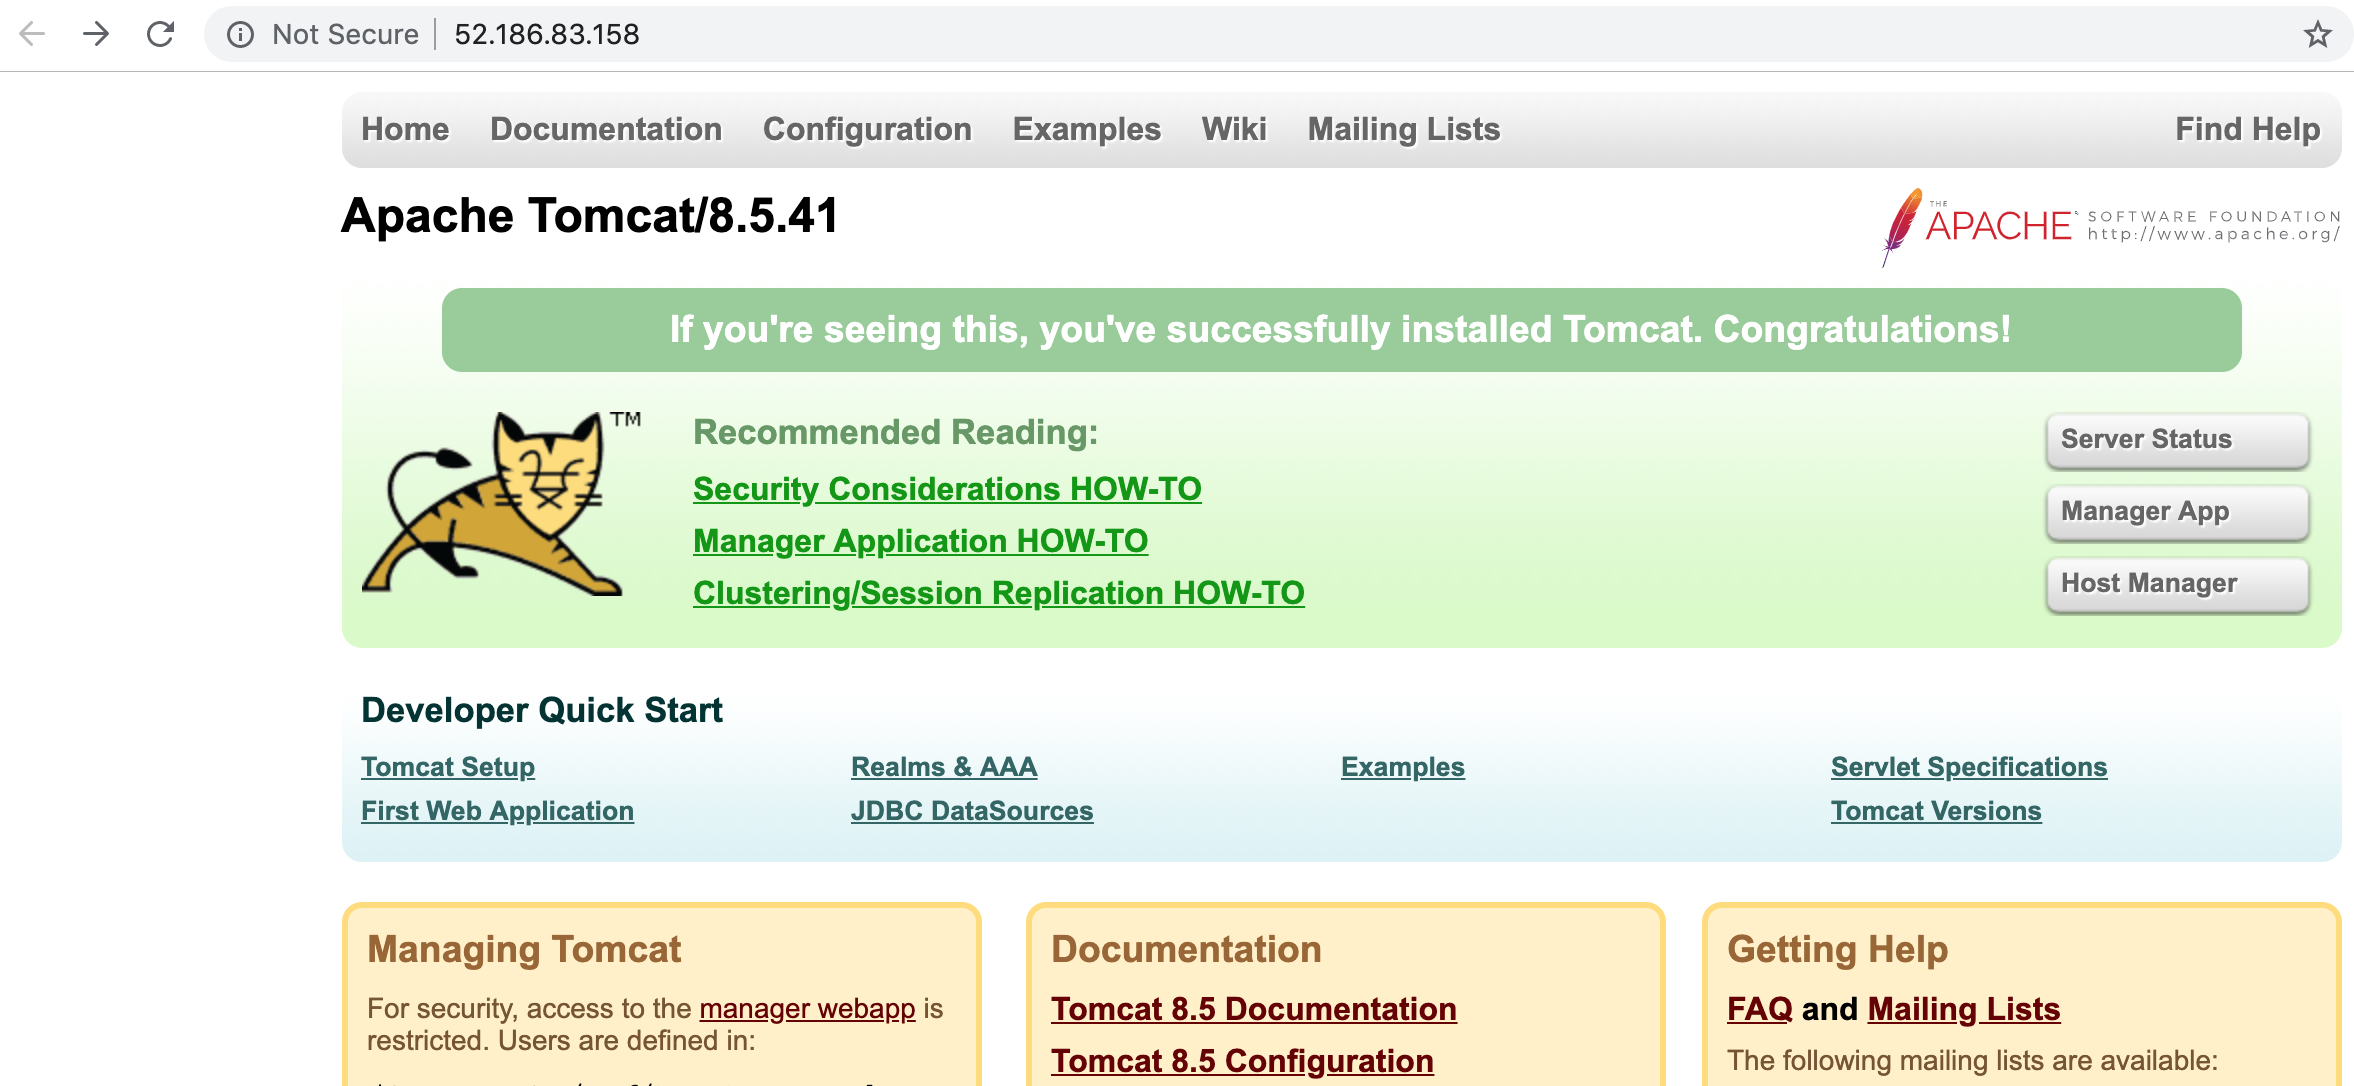
Troubleshooting: If you do not see the server running, check the server log at $TOMCAT_HOME/logs/catalina.out

Then shutdown the server:

# cd $TOMCAT_HOME/bin/
# ./shutdown.sh

Step 4. Install PostgreSQL database

Install the PostgreSQL 9.4 database.

>> first disable yum updates in case yum uses an older version

# vi /etc/yum.repos.d/CentOS-Base.repo
>> add lines to exclude postgresql from yum
[base]
...
exclude=postgresql*
[updates]
...
exclude=postgresql*

>> install postgres database and init it

# cd /otp
# rpm -Uvh http://yum.postgresql.org/9.4/redhat/rhel-6-x86_64/pgdg-centos94-9.4-3.noarch.rpm
# yum install postgresql94 postgresql94-server postgresql94-contrib

>> Switch to non-root user postgres

# su - postgres
# /usr/pgsql-9.4/bin/initdb /var/lib/pgsql/9.4/data

>>switch back to user ‘paphus’

# exit (this exit to root user, which Azure does not provide the password for root)
# su - paphus (switch to customer user)
# sudo service postgresql-9.4 start
>>[sudo] password for paphus: ****
Redirecting to /bin/systemctl start postgresql-9.4.service
# sudo service postgresql-9.4 stop . (stop database)

>> Configure restart:

# sudo chkconfig --levels 235 postgresql-9.4 on

>> Set database password:

# sudo service postgresql-9.4 start 
# sudo -u postgres psql postgres \
# \password
>> here, type postgres as the database password for user postgres, twice
\q

Step 5. Install Python server

Bot Libre uses a separate Python web server to support deep learning analytics. Python is not required for bots or NLP, only deep learning analytics such as image classification. If you do not require deep learning you can skip this step.

Run the following commands, one by one, to install Python, Pop, Tensorflow, Flask and Psycopy2.

# sudo su root ( switch to root user)
# yum update
# yum install yum-utils
# yum groupinstall development
# yum -y install https://centos7.iuscommunity.org/ius-release.rpm
# yum -y install python36u
# yum -y install python36u-pip
# yum -y install python36u-devel
# pip3.6 install tensorflow==1.7
# pip3.6 install flask
# pip3.6 install psycopg2-binary
# pip3.6 install pillow
$ pip3.6 install lxml
# pip3.6 install Cython
# pip3.6 install jupyter
# pip3.6 install matplotlib
# pip3.6 install pandas
# pip3.6 install opencv-python

Then you may copy the /python from the BotLibre install to /usr/local/python

# mv <BotLibreInstallRoot>/python /usr/local/python

>> start the python server

# nohup python3.6 /usr/local/python/app.py &

>> Verify that the Python server is up and running

# wget http://localhost:6777/
>> Connecting to localhost (localhost)|127.0.0.1|:6777... connected.
HTTP request sent, awaiting response... 200 OK

Step 6. Install BotLibre

The Bot Libre application is a Java “war” file. A war file is a zip file that contains a website and Java libraries

There are several installation steps:

  • Copy library jars to /usr/local/tomcat8/lib (from bot libre lib sub directories, do not copy botlibre-ai.jar, do not copy botlibreplatform.jar, do not overwrite any files already in tomcat lib)
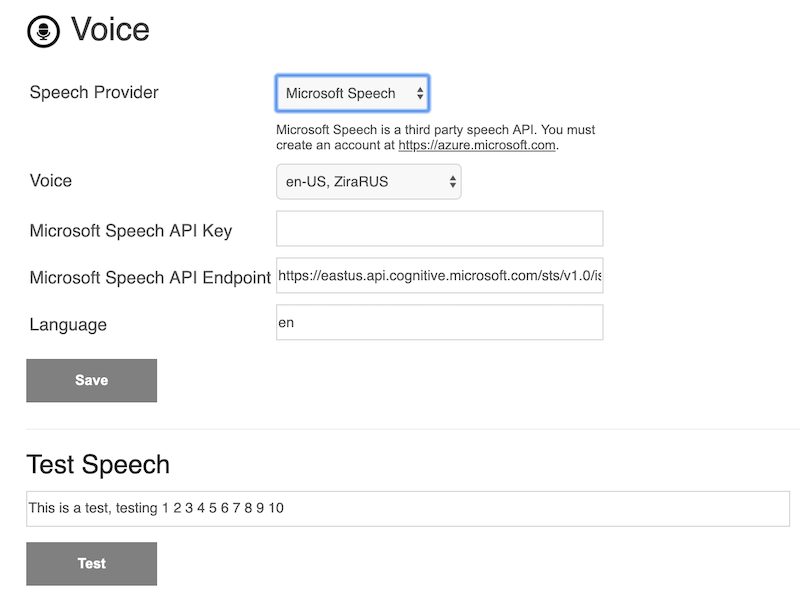
  • Copy speech voice files to /usr/local/tomcat8/bin/lib (unzip speech voice zip into lib voices directory)
  • Shutdown Tomcat server: cd $TOMCAT_HOME/bin/; ./shutdown.sh
  • Deploy war file by emptying the $TOMCAT_HOME/webapps/ directory, and copying the botlibreplatform.war to $TOMCAT_HOME/webapps/ROOT.war.
  • Start Tomcat Server: cd $TOMCAT_HOME/bin/; ./startup.sh 
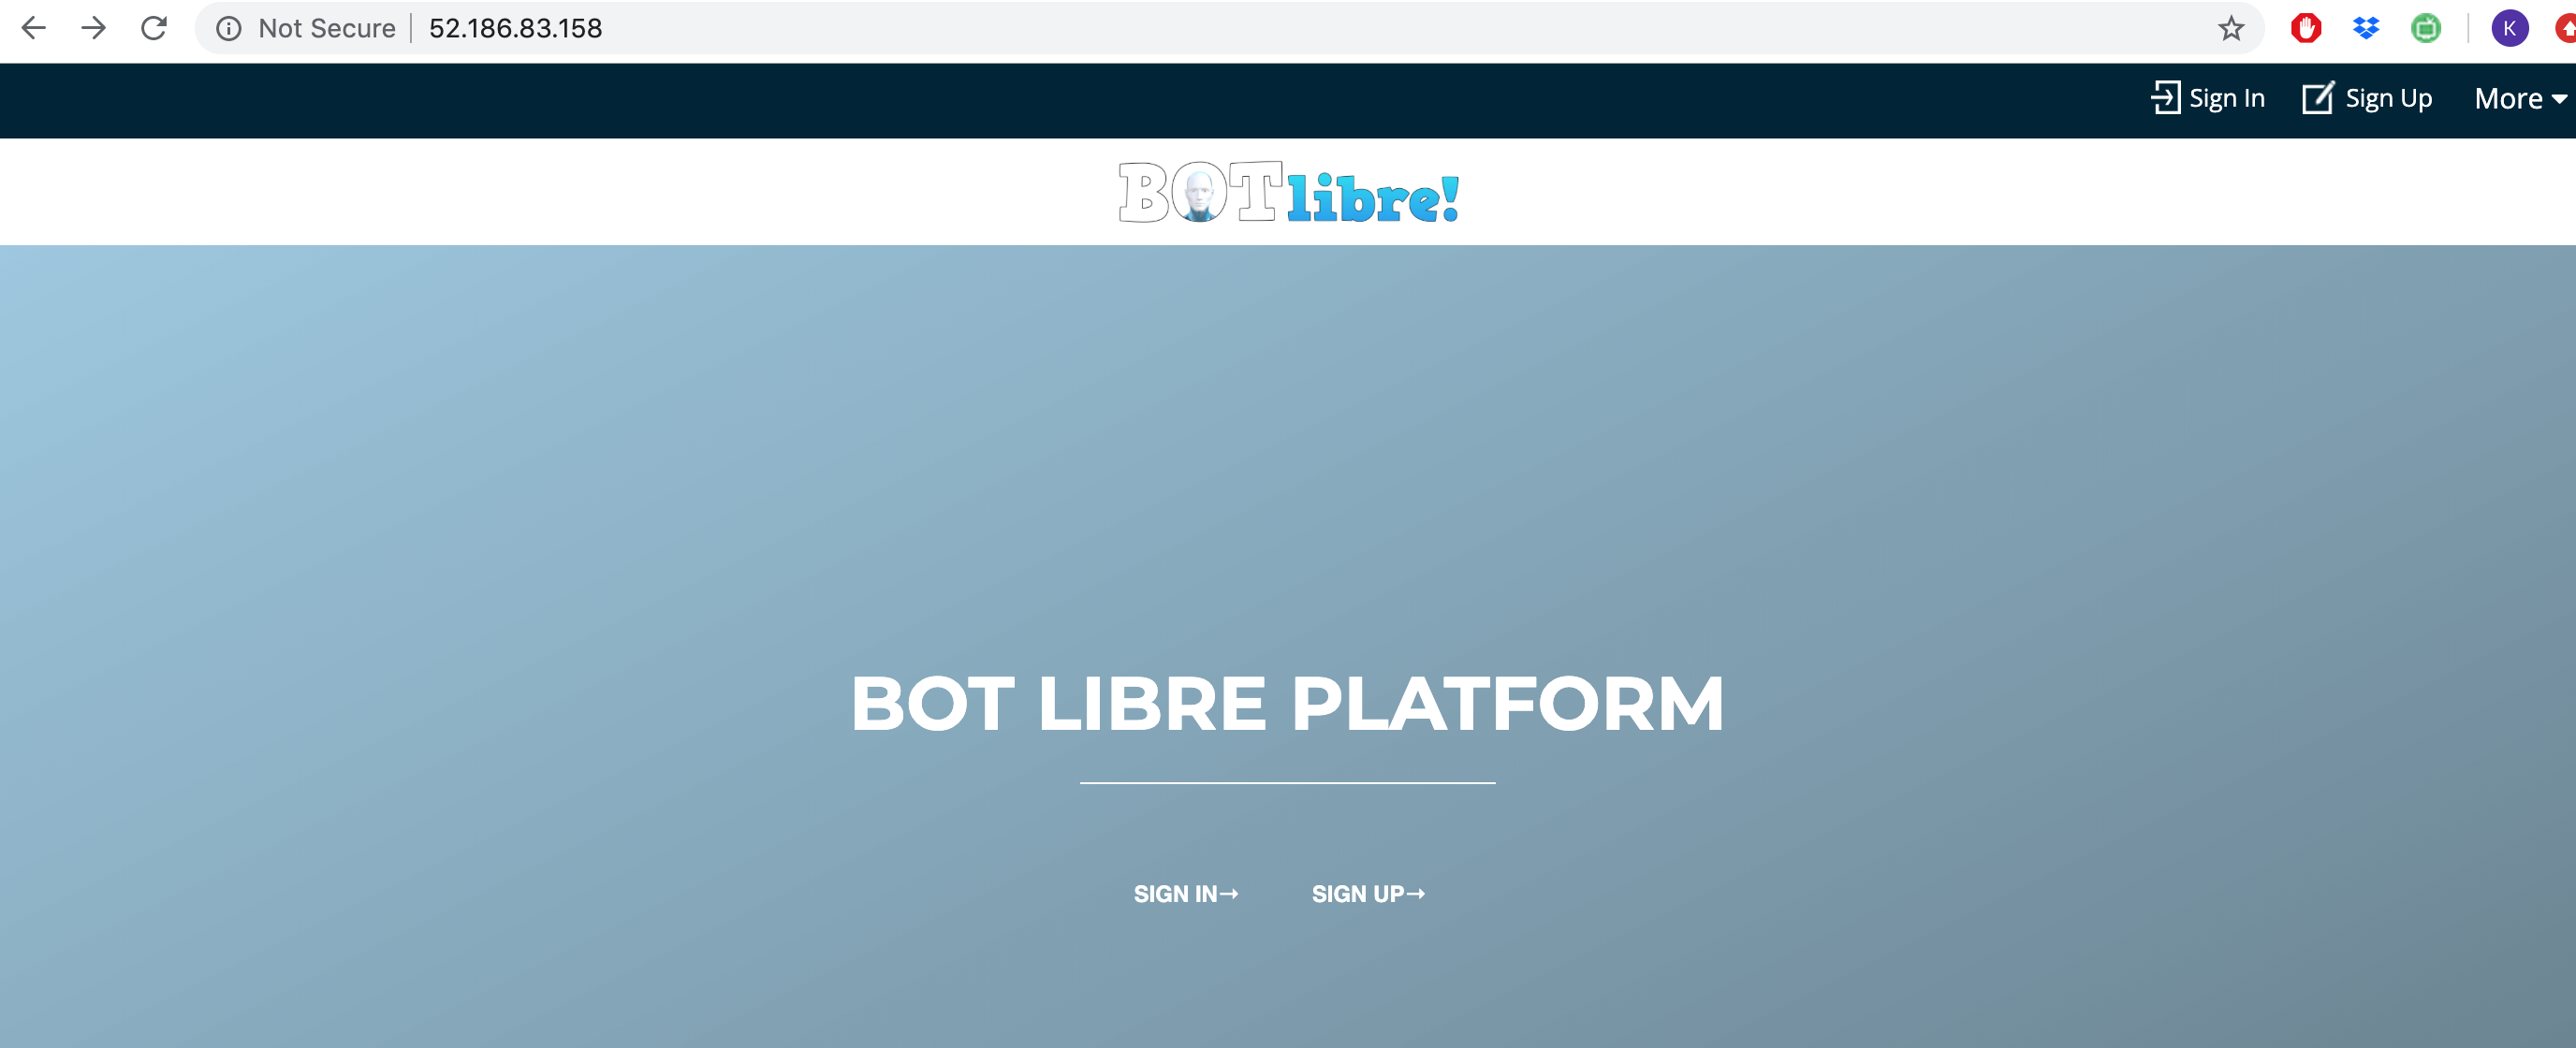
  • Open http://<public-ip> e.g. http://52.186.83.158/

Then you may refer to the generic BotLibre install guide to login as admin user (default password is password), and create workspace, create bot, configure bot and train bot.