Pages

Monday, December 15, 2014

How to add a 3D avatar to your website or blog

BOT libre 2.0 includes support for creating, using, and embedding web avatars. A web avatar is your website's visual or animated web presence.

BOT libre avatars can contain 3D animation, video, audio, and images. You can create your own avatar or choose a shared avatar from the BOT libre open avatar directory. Avatars can either be connected to your BOT libre bot, or controlled directly through JavaScript, or even connected to your home grown bot, or third party bot.

The BOT libre JavaScript SDK makes it easy to add an avatar to your own website or blog, to welcome your website visitors, or provide them with information or help. A website avatar gives visitors to your website a good first impression, can highlight important differentiators of your business, or draw attention to special offers.

Embedding an avatar

You can browse existing avatars or create your own from BOT libre's open avatar directory. To embed an existing avatar simply select the avatar from the browse directory and click on the Embed button. The embed page will let you test the avatar, choose its voice, enter it what to say, and generate the embedding JavaScript code. You then just need to copy the embedding code and paste it on your website.

The following example shows how to embed the Julie avatar in your website to welcome visitors.

The example shows how to use the WebAvatar class and its createBox() function to add an avatar to a web page. The message() will make the avatar speak the text, and can optionally include an emote, action, and pose. The emotion and pose influence which video or image will be displayed, the action can trigger an image, or audio. You can also choose the voice for the avatar.

When using the SDK ensure you set your application id. You can obtain your application id from your user page, it is free and easy to generate.

Connecting your bot to an avatar

To connect your bot to an avatar, go to your bot's main page. Click on the Admin button and the Avatar link. When you click on the Choose Avatar input a list of available avatars will be presented for you to select from. If you want to create your own avatar, you can create one from the Avatars browse page. If your bot has an old image avatar, or you just want a simple image avatar, you can click on the 1.0 avatar link.

Once your bot is connected to its avatar, you can link phrases or responses to avatar emotions, actions, and poses. You can teach the bot to associate emotions and actions with phrases and responses when chatting with it in learning mode. The emote and action drop downs in the chat page can be used for this.

The Chat Logs page under your bot's Admin page lets you review and edit all emotions, actions, and poses that have been associated with phrases and responses, or add new ones.

Creating Your Own Avatar

You can create your own avatar from the browse avatars page. To create an avatar, just give it a name, description, and category to categorize it under. You can either make the avatar private and choose who can access it, or make it public and accessible by anyone. You can also choose what license you wish to release its content under.

To edit the avatar, click on the Editor button. The avatar editor lets you import video, audio, and image files. You can associate each media with an emotion, action, or pose. For example if you have a video that makes the avatar talk, you would associate the pose for the video to talking. The emotions let the avatar express different emotions, and will let the bot using the avatar express itself. There are a fixed set of emotions, but you can create any actions and poses that you wish. You can have multiple media for a emotions, action, or pose, and one will be chosen at random. For actions, and poses, you can have an audio element in addition to a video element. Audio can be used to make your avatar perform actions such as laugh, or used as background music or noise for a pose.

Your video files can be any valid web video format, including mp4, webm, or ogg. Audio files can be any web audio format, such as mp3, or wav.

You can create your media content using stock content from media websites such as Fotolia, or free media libraries like openclipart.

You can use 3D software such as Daz3D to generate images and video for your avatar. You can use available 3D models, or buy stock 3D models from 3D media marketplaces.

You can bot yourself, a friend, or model by capturing photos, or video clips using your phone, or camera. If you are adventurous, you can use a green screen (a green sheet will do) to make a transparent background for your media.

If you are an artist, model, or studio, you can make your own images, or 3D models and video. You can use BOT libre to showcase, or sell your media and talent.

Video types and browser compatibility

Avatars can include several types of media. Simple image avatars are the most compatible with all browsers. Video avatars require the browser support HTML5 video, which most modern browsers do. There are several web video formats, including mp4, webm, and ogg. The mp4 video format is the most compatible with all browsers and works in the latest Firefox, Chrome, Internet Explorer, and Safari browsers. The webm format has the advantage of supporting transparent backgrounds, but is only currently supported by Chrome and Firefox, and only Chrome supports transparency. Chrome is the most popular browser for most websites, Firefox is normally second, then Safari, Internet Explorer, and other browsers. If browser compatibility is important to your website you can use JavaScript to choose your avatar based on the browser.

Sunday, November 9, 2014

Add Speech to your Website using the BOT libre TTS JavaScript SDK

The BOT libre JavaScript SDK provides free dynamic access to all of BOT libre's services including chat bots, live chat, chat rooms, forums, and speech. The speech API for the SDK can be used in conjunction with chat bots, live chat, or on its own.

The speech API is part of the BOT libre JavaScript API.
To add the BOT libre JavaScript SDK to your webpage you just need to import it in your webpage's <head> section.

The speech API is SDK.tts(text, voice). The text is the text you would like converted to voice, and the voice is the voice you would like to use. A voice is not required, if none is passed, the default voice is used. There are currently 20 voices available in several languages. You can test the voices here.

The available voices include:

  • cmu-slt - English : US : Female
  • cmu-slt-hsmm - English : US : Female
  • cmu-bdl-hsmm - English : US : Male
  • cmu-rms-hsmm - English : US : Male
  • dfki-prudence-hsmm - English : GB : Female
  • dfki-spike-hsmm - English : GB : Male
  • dfki-obadiah-hsmm - English : GB : Male
  • dfki-poppy-hsmm - English : GB : Female
  • bits1-hsmm - German : DE : Female
  • bits3-hsmm - German : DE : Male
  • dfki-pavoque-neutral-hsmm - German : DE : Male
  • camille - French : FR : Female
  • camille-hsmm-hsmm - French : FR : Female
  • jessica_voice-hsmm - French : FR : Female
  • pierre-voice-hsmm - French : FR : Male
  • enst-dennys-hsmm - French : FR : Male
  • istc-lucia-hsmm - Italian : IT : Male
  • voxforge-ru-nsh - Russian : RU : Male
  • dfki-ot-hsmm - Turkish : TR : Male
  • cmu-nk-hsmm - Telugu : TE : Female

Example Speech API Usage

Try it out now (press speak)

When using the BOT libre SDK, ensure you set your application id. You can obtain your application id from your user page.

Friday, October 31, 2014

Chat Logs : how to train your customer service bot by monitoring its chat logs, using keywords and topics.

Bot Libre supports a diverse set of features for creating and training your bots. Today we will discuss the Training & Chat Logs feature, and how to create and train a customer service bot using the Training & Chat Logs page. The Training & Chat Logs page provides the best way to monitor and train your bot, by letting you see its conversations and let you correct its responses. No scripting or programming is required.

To create a customer service bot, create your bot using the 'service_template'. This template has learning disabled. This is important, as normally for a customer service bot, you do not want it to learn responses from your users. It also does not include the generic AI scripts WhatIs, WhereIs, Understanding, as these scripts can normally lead to the bot responding to questions outside of its domain. If you created your bot through other means, you can disable Learning, and Comprehension from the Learning & Settings page in its Admin Console. You can also remove the WhatIs, WhereIs, and Understanding scripts from the Scripts page in its Admin Console.

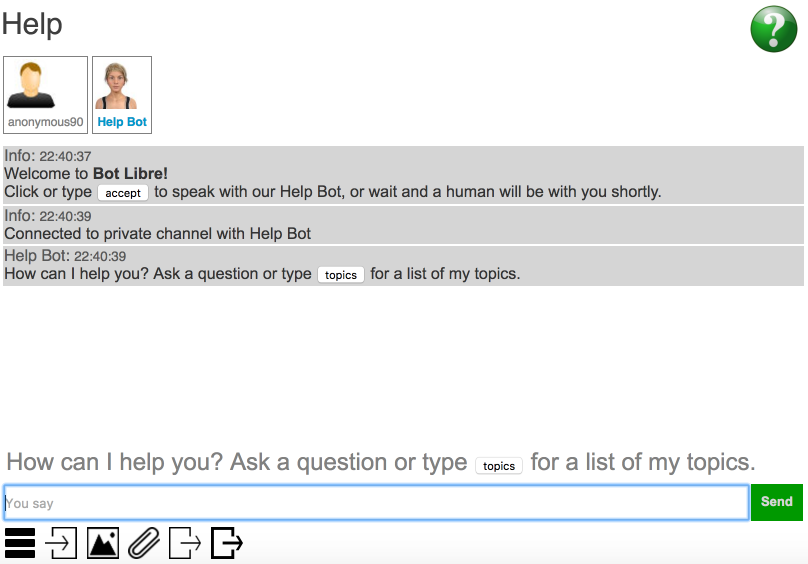
Once you have created your bot, you can enter or upload some common questions and answers for your domain. If you already have a FAQ on your website, uploading this would be a good way to start. Once you have your basic bot built, you can deploy it to your website or beta site, and let others interact with it. Letting users talk with your bot is the best way to see what questions you should train it for.

To view your bot's conversations or trained responses go to the Training & Chat Logs page. To get to your bot's Training & Chat Logs page, first select your bot from Browse (click on My Bots), then click the Admin Console button (gear icon), and finally click the Training & Chat Logs link from the top toolbar or menu.


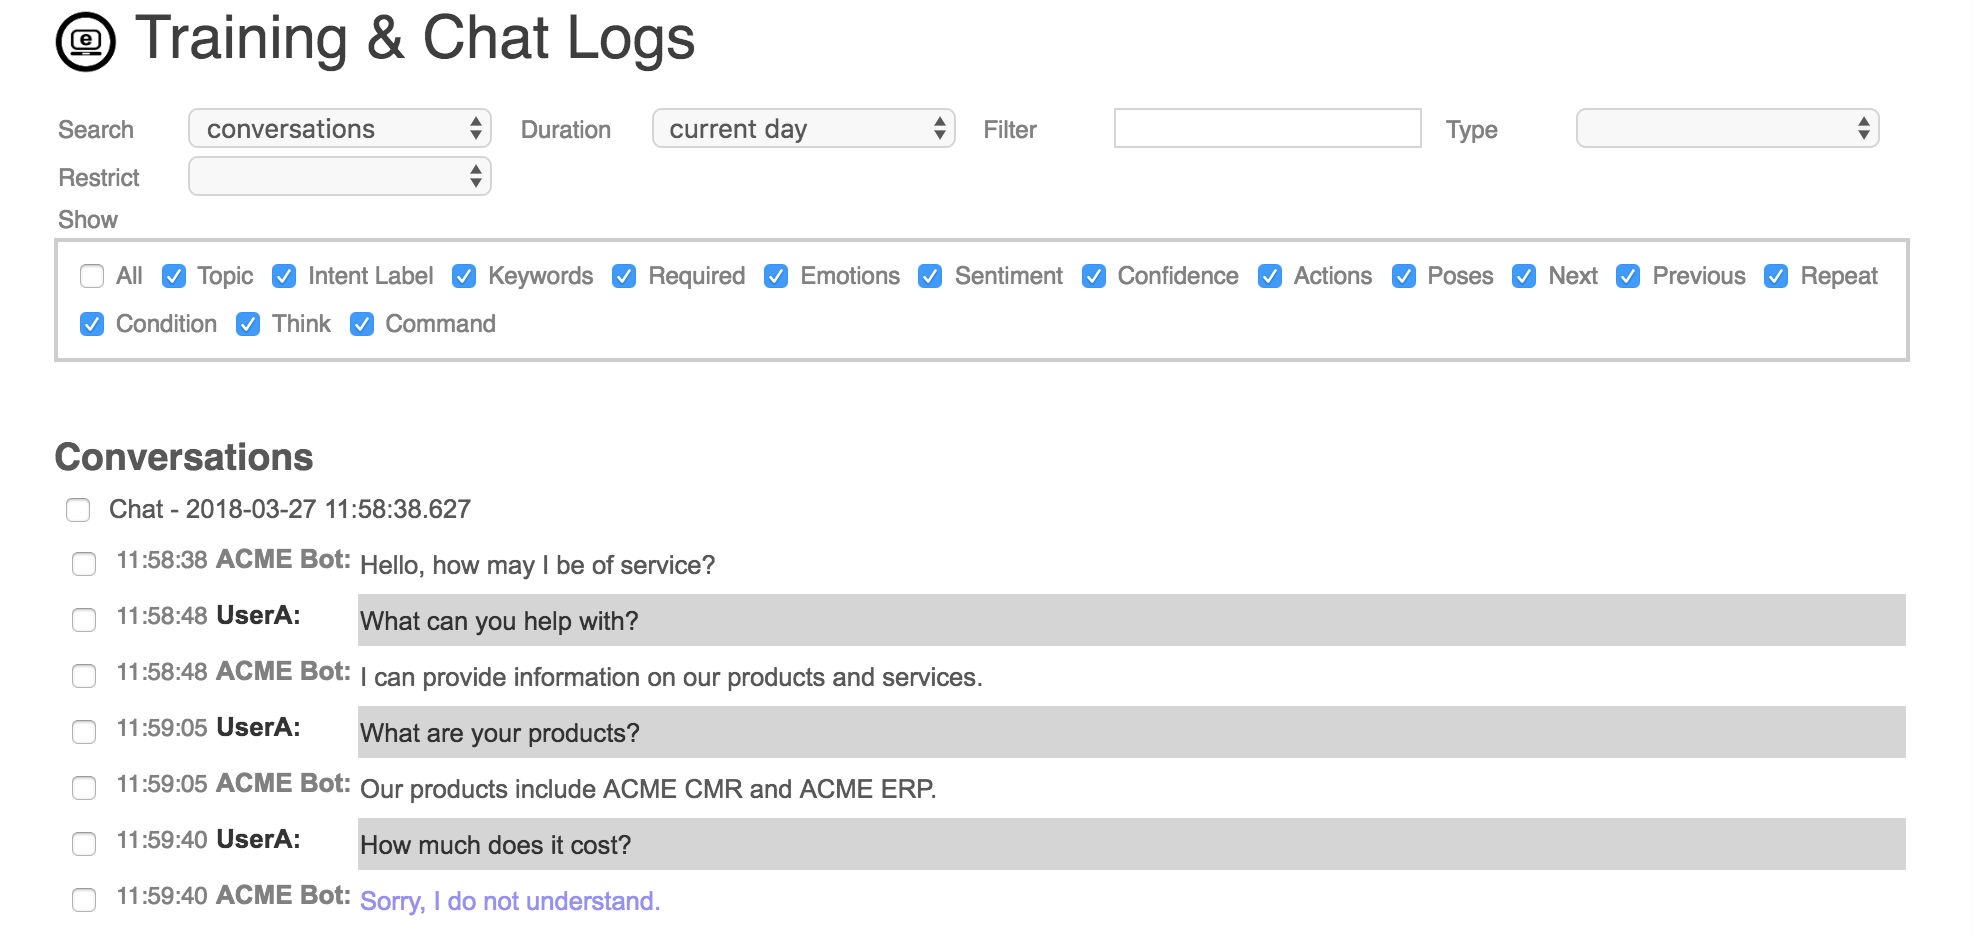
The Training & Chat Logs page initially shows nothing, you need to first select what your want to see from the Search drop-down.
The choices are:

  • conversations : the log of each conversation your bot has had
  • responses : all responses your bot has been trained with
  • greetings : all greetings your bot will use to start conversations
  • default responses : all default responses your bot will use when it does not know a better response
  • phrases : all phrases (sentences) your bot has encountered
  • words : all words your bot has encountered
  • flagged responses : all responses that have been flagged by users or administrators

Next you need to select a Duration from the next drop-down. The duration is just the time period to view, from the last 24 hours, to week, month, or all. You can also filter the results that contain certain words, or filter the type of conversation (chat, email, tweet, Facebook, Telegram, Slack, etc).

Conversations

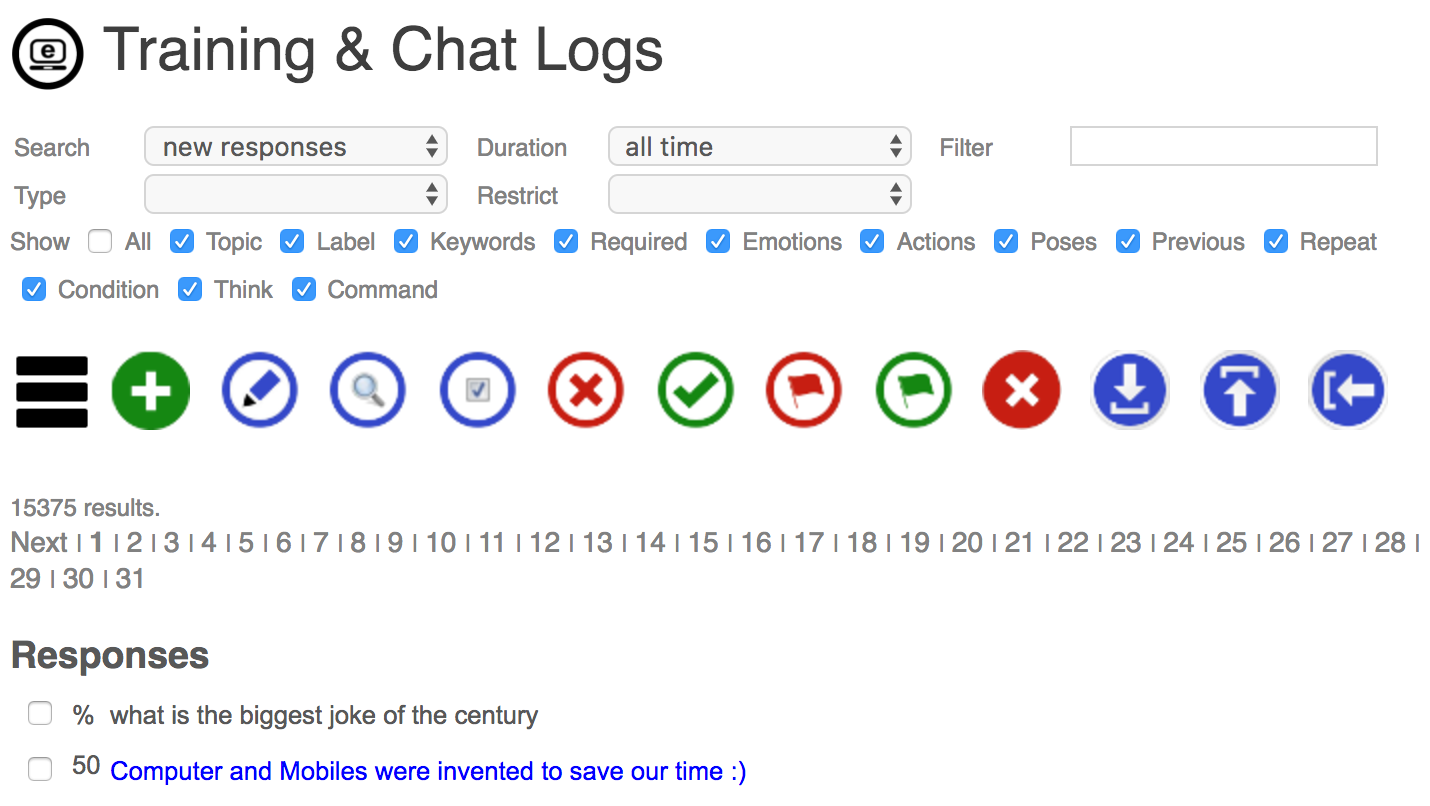
To see how your bot is doing, search for all conversations since you last checked it. This will give you a list of conversations. The top toolbar gives a set of buttons for administrating your bot's responses.


From the left to right the buttons are:

  • menu : choose icons from menu
  • home : return to the training home screen
  • enter : enter a new default response.
  • correction : enter a better response for each selected response in the conversations
  • inspect : browse the selected responses or phrases.
  • select all : select all listed conversations
  • invalidate : mark the selected responses as incorrect, or decrease their % correctness (the bot will never use these responses to the question again)
  • validate : mark the selected responses as good responses, or increase their % correctness (the bot will use this response to similar questions)
  • flag : flag the selected phrases as offensive, the bot will never repeat them, and will not let users enter them
  • unflag : unflag the selected phrase as not offensive phrases
  • delete : remove the response from the question, or delete the conversation
  • download : export and download the listed conversations as a chat log, response list, or AIML set
  • upload : upload and import a chat log, response list, or AIML file from your computer
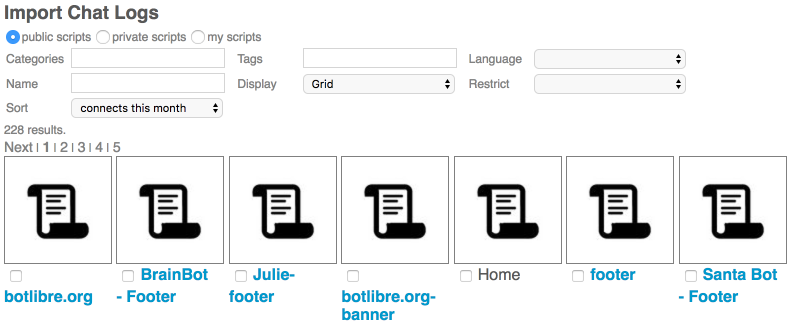
  • import : import a chat log, response list, or AIML script from the shared script library

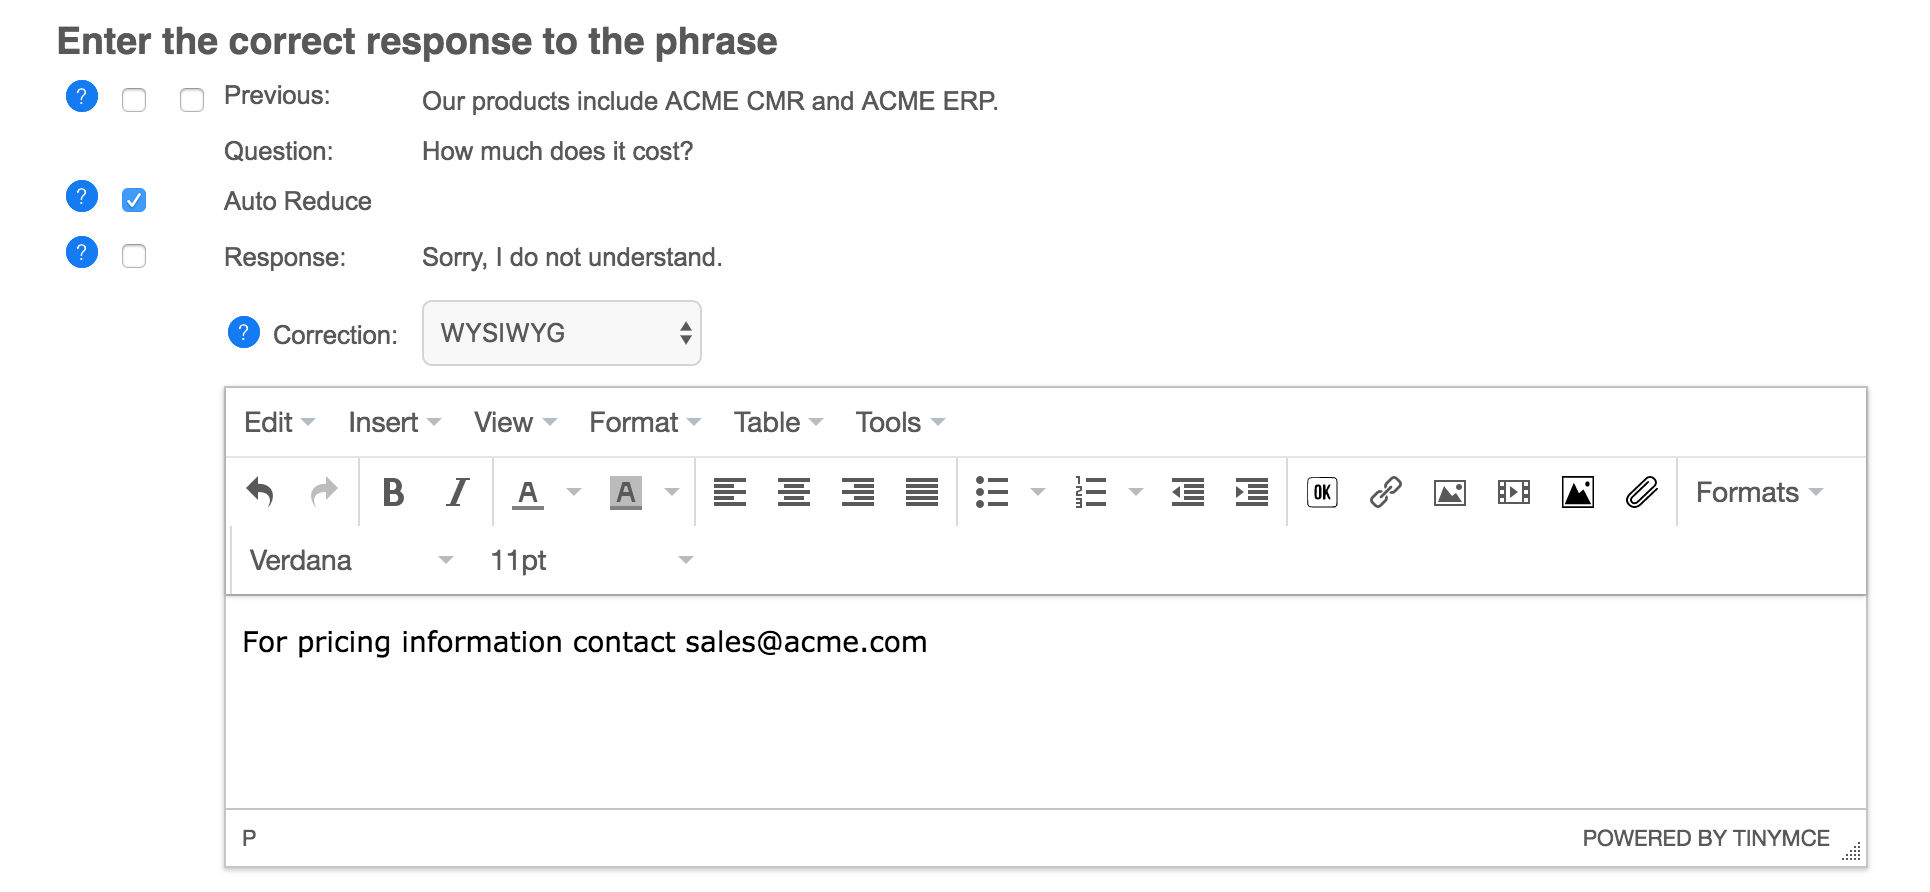
When you review your bot's chat logs, search for relevant questions that it answered poorly. Click the checkbox beside its response to the question, and click the correction button. This will take you to a screen to enter a better response to the question. Enter the response, and optionally a keyword or required words from the question, or a topic to categories the response. Click Save. Your bot will now answer this question, and similar questions, or questions with the keywords, using your new response.

If the user's question was specific to the bot's previous response, then click the checkbox beside the bot's previous response. This will add the previous response to the new response, so that it will use this response in the correct context.


Responses

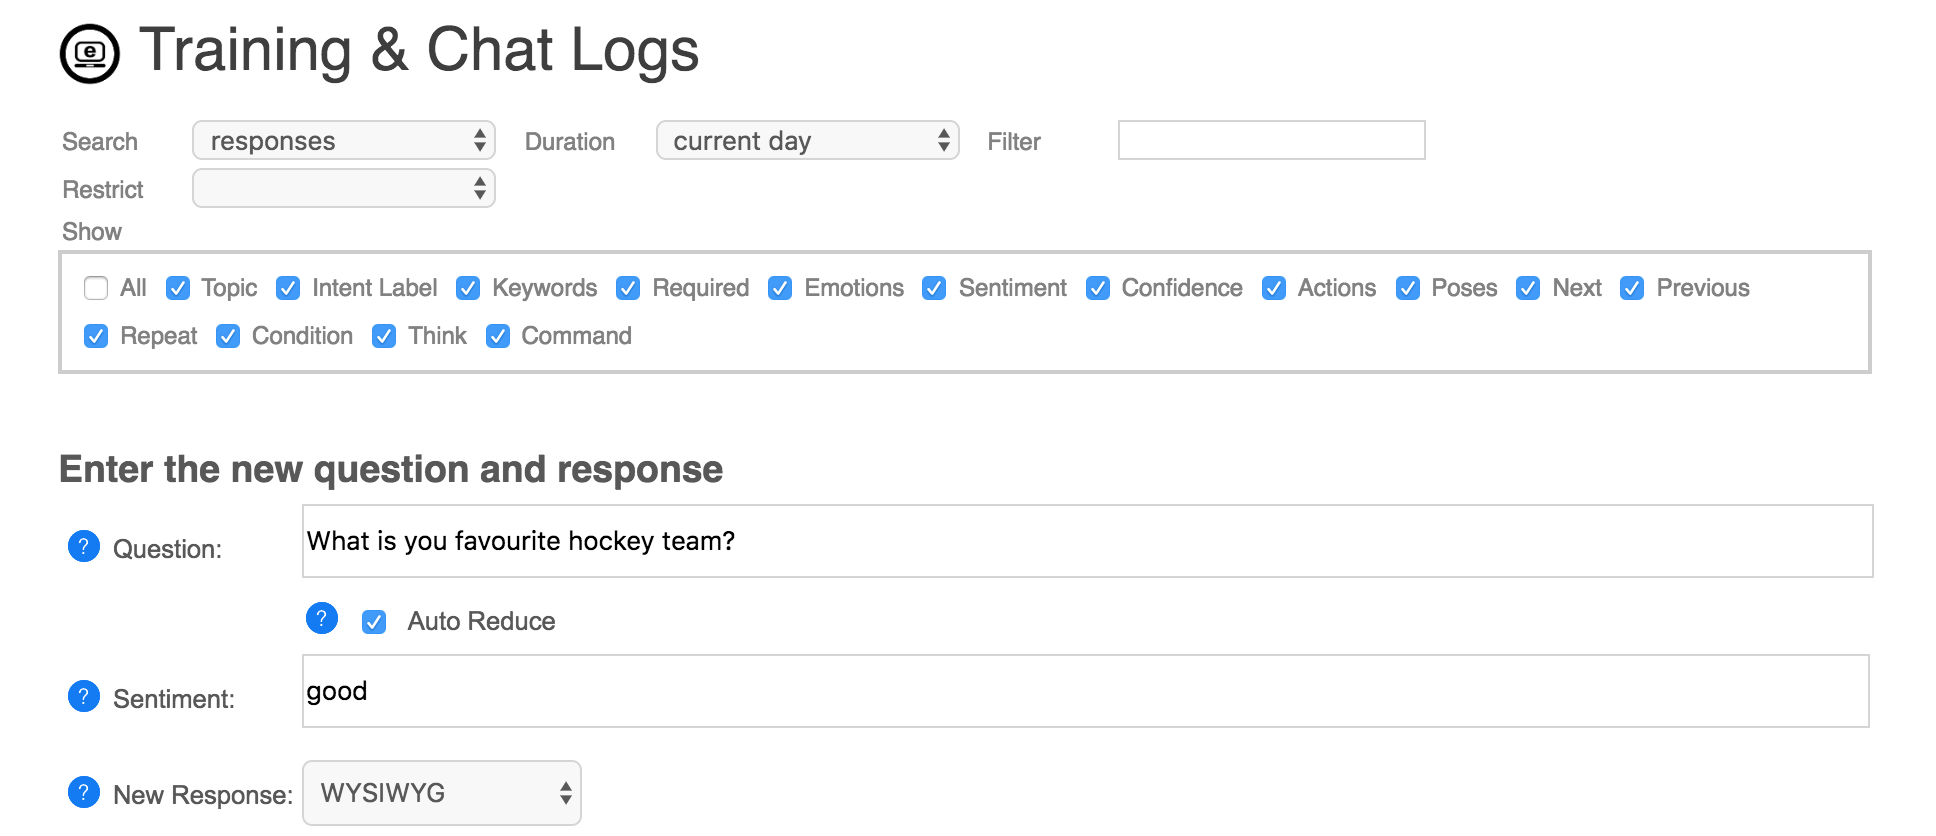
To see all of your bot's trained responses, search for responses for the all duration. This will list all of your bots responses, ordered by when they were added. A response will not only be used for the exact question it was learned for, but also any similar questions. When your bot encounters a question it does not know a response to, it will find the best matching question that it knows a response to, and use that response. If the bot does not know any similar questions, then it will use its default response.

The response browser lets you enter a new response, or edit, delete, invalidate, validate, or flag any existing responses.

The response editor lets you enter the question and response and optional response properties and metadata. You can choose to edit your response using a rich 'WYSIWYG' (what you see is what you get) editor, or a plain text editor. Responses are in HTML, and can contains most HTML tags such as <b> for bold, <a> for links, <img> for images, and <button> for buttons.


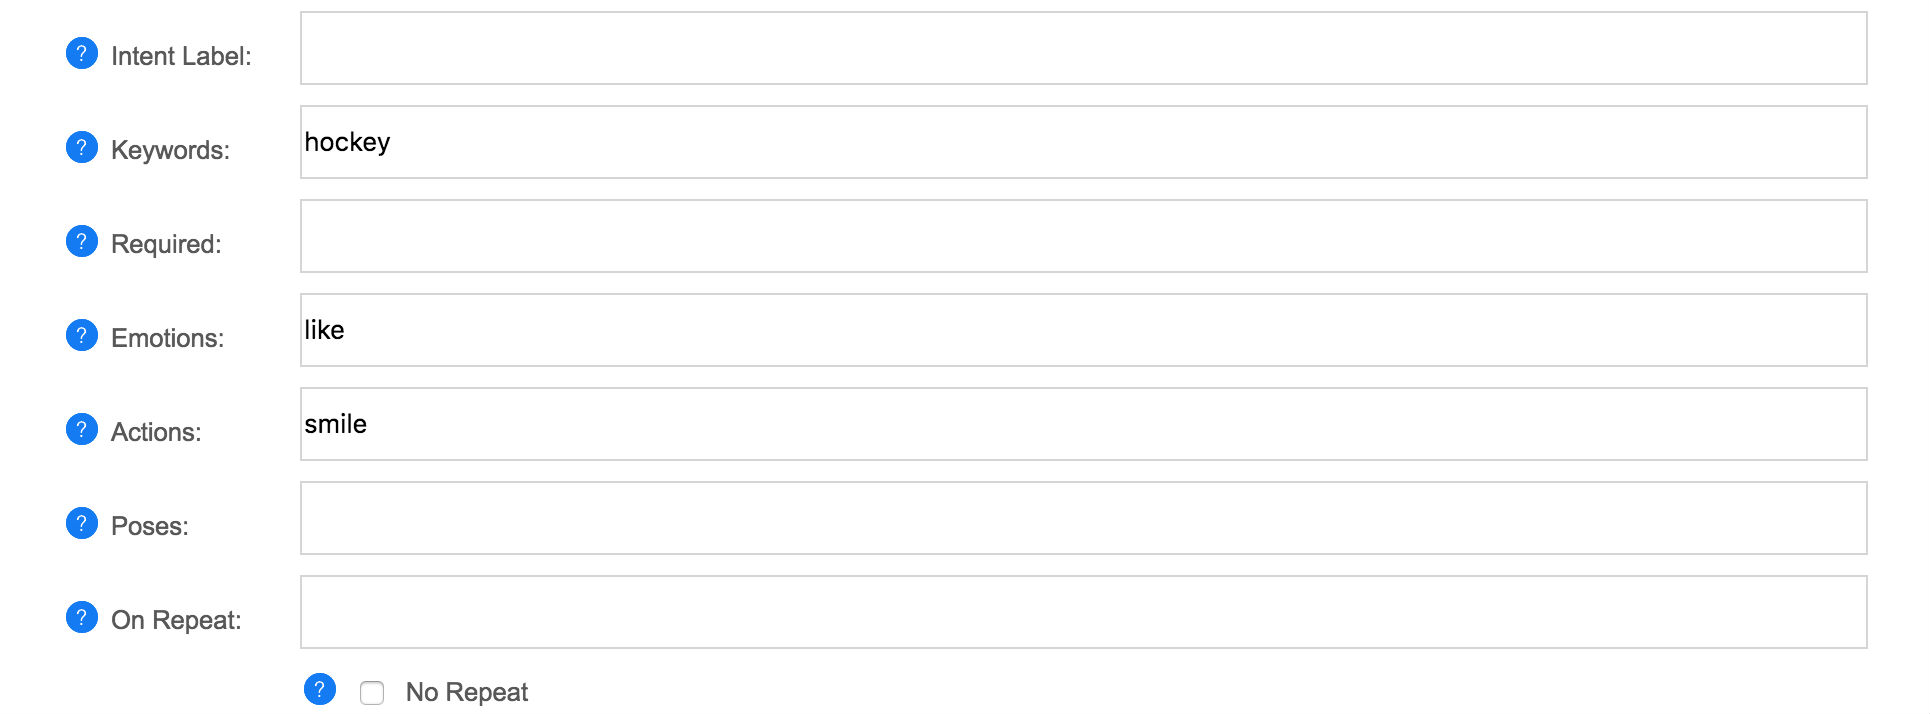
Response Properties and Metadata

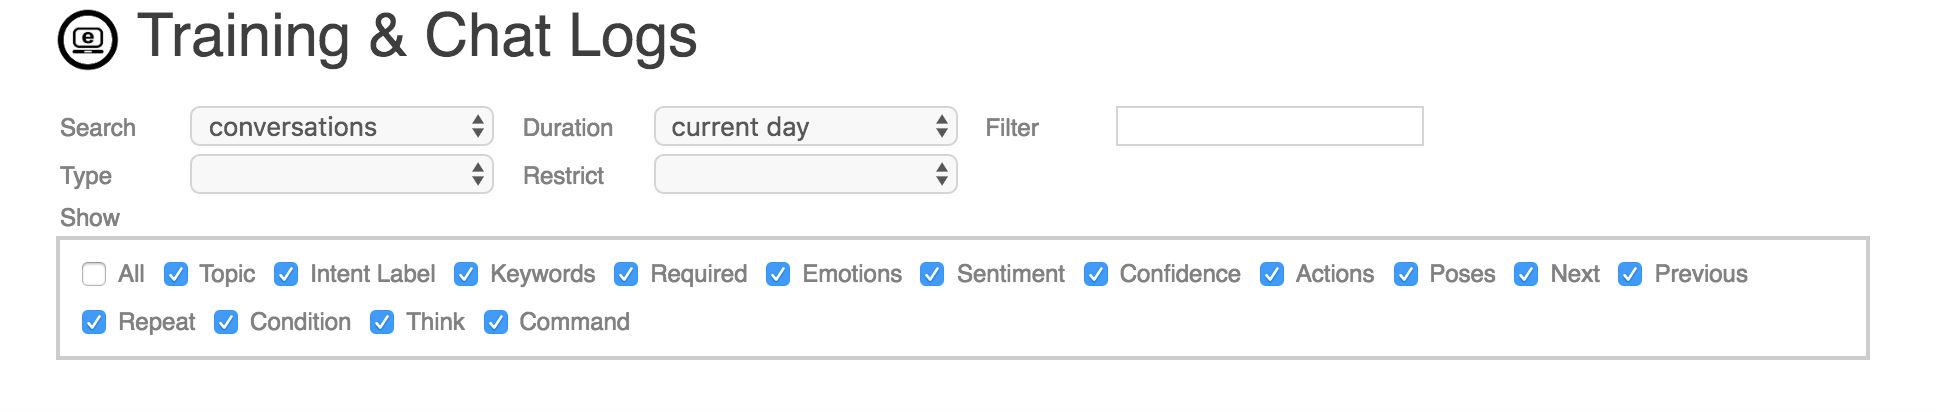
Response can contain several different metadata properties that can be set to influence when the response is used, or how it functions. To show the different response properties click on the checkbox for the property under the toolbar. For example to show topics, click on show 'Topic' checkbox, and then the response topics and topic input will be available.

To edit a response and its properties, click on the checkbox before the response in the list of responses, then click on the 'Edit' toolbar button or menu. You do not need to enter any of the response properties, but they can be used to improve when you bot uses its responses, and for more complex conversational dialogs.

Keywords

Keywords are important words in the question that should influence when the response is used.

Keyword Example
// Keywords are used to allow this response to be used for any questions on hockey or spinach.
question: do you like hockey
response: Hockey is my favorite sport.
keywords: hockey

question: i love spinach
response: Spinach is is my favorite food.
keywords: spinach

A keyword will be used by the bot to select the best response. Keywords let some words count for more than other words. In the example, the bot knows two responses, how will it respond to the phrase "I love hockey"? Without the keywords the bot would probably match this question with "I love spinach", but since hockey is a keyword, it will instead match it with "Do you like hockey?".

If the response has no defined required words, then the keywords will also be required for the response match. So "I love hockey" would not be matched with "I love spinach." because it is missing the keyword.

Be careful using too many keywords. If every word is a keyword, then their value is diminished. Never make common words like "the", "a", "he", "what" keywords, if you require one of these words for a match use a required word instead.

You can also review all of your bot's keywords by searching for 'words' and restrict to 'keywords'. This lets you remove a word from being a keyword if you added it by mistake.

Required

A required word is a word that is required to be in the question for a specific response.

Required Example
// This example requires the words 'like' and 'hockey'.
question: do you like hockey
response: Yes, I like hockey.
required: like hockey

A required word can be used to ensure the bot does not choose a response if the required word is missing from the question. For example the question "Do you play hockey?" would normally be matched to this response, but because it is missing the required word "like", it will not be considered as a match.

Previous

A previous responses is the bot's preceding response. Previous responses can be used to give a response a context.

Previous Example
// This example uses previous to give different answers to 'yes' depending on the context.
question: yes
response: Great, wanna go out sometime?
require previous: Are you single?

question: yes
response: I am please to hear that.
require previous: Are you happy?

The question "Yes" has multiple responses. The bot can use the previous response to choose the best response. You can also invalidate a previous response to ensure the bot does not use a response if the previous response was preceding.

A previous response can either be 'required' or optional. If required, the response will never be used unless one of the previous response matches. If optional (default) the response is given precedence if the previous response matches, but can still be used if the previous does not match.

Topic

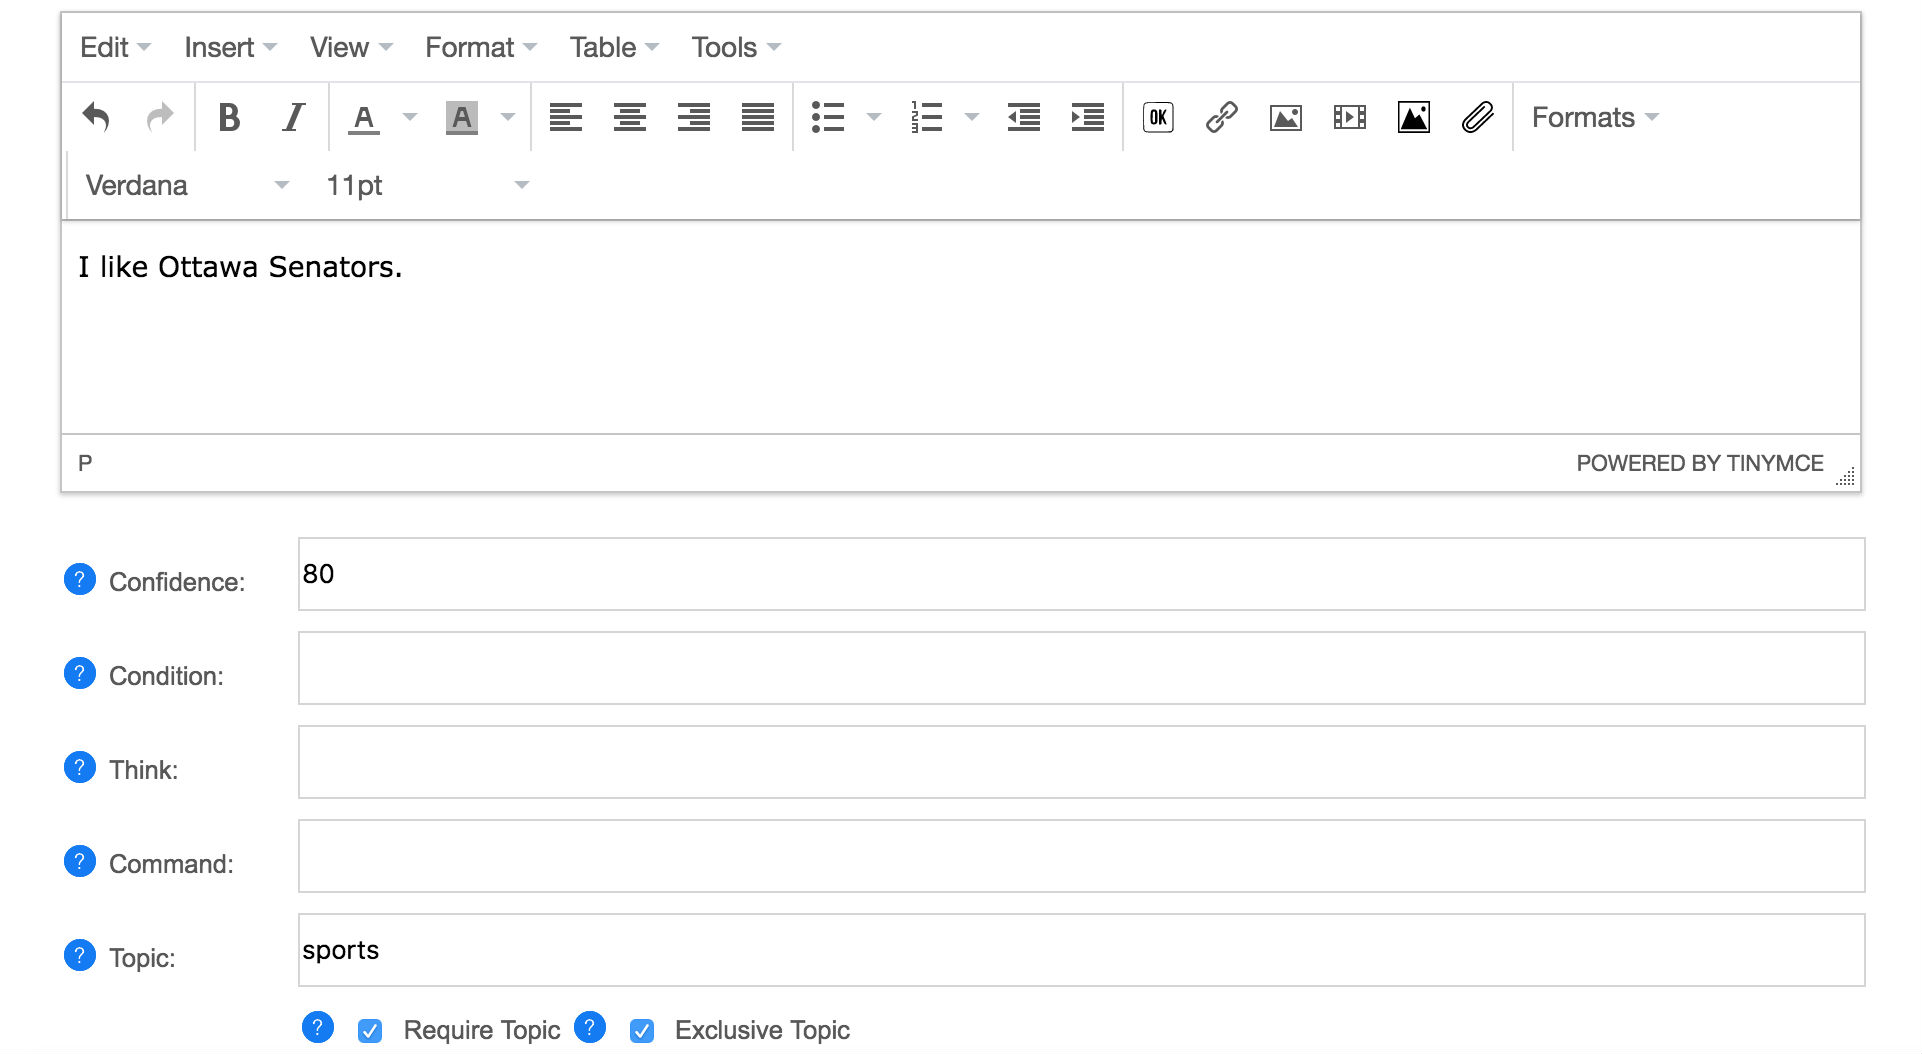
A topic is the general topic category for the response. For example a response on a hockey related question would belong to the "hockey" topic. You can use topics to categories your responses and give the bot additional context. If the bot has multiple responses to a question, it will use the one that matches the current topic.

Topics can be either optional or required. The response topic is optional by default, it you click on 'Require Topic', then the response will only be used if that topic is active in the conversation. If optional the topic will be set as active for the conversation, until a new topic is set.

Topics can also be defined as exclusive. An exclusive topic defines an isolated conversational space. For a normal topic that is not exclusive the bot can still use responses that do not have the same topic, but responses with the active topic will be given precedence over responses without a topic. For exclusive topics only response that have the same topic as the active topic will be used. No other responses will be used (other than possibly the default response if there is no topic default).

Topics can also be set on greetings to start the conversation with a topic. Topics can be set on default responses to provide a different response when that topic is active.

Topic Example
// Categorizes the product response.
question: what are your products
response: Our products include ACME CRM and ACME ERP.
topic: products

// Use an exclusive topic to define a joke conversational dialog.
question: joke
response: Knock knock.
exclusive topic: joke

question who is there
response: Boo.
require topic: joke

question: boo who
response: Don't cry. lol
require topic: joke
think: conversation.topic = null;

default: Say 'Who is there?'
require topic: joke

default: Say 'Boo who?'
require topic: joke
previous: boo

Intent Labels

A response can be given an intent label to let you reuse the same response in other questions. You can also use labels in a response's previous.

Label Example
// Use a label to reuse the common products response.
question: products
response: Our products include ACME CRM and ACME ERP.
label: #products

question: what are your products
response: #products

question: what software do you sell
response: #products

question: are they good
response: Our products are the best in the world.
previous: #products

On Repeats

If the user asks the same question, or similar questions multiple times, you may want your bot to give a different response the second time. On repeat lets you set one or many responses to use the second time that response is triggered in the same conversation. You can also set 'No Repeat' to never repeat the response in the same conversation.

On Repeat Example
// Offer to escalate the issue if the user repeatedly asks for help.
question: help
response: How can I help you?
on repeat: What is the issue that you are having?
on repeat: Would you like me to have a support staff contact you?

question: goodbye
response: Before you go, would you like to take a survey?
no repeat:

question: goodbye
response: Goodbye.

Conditions

Conditions let you enter Self code that must evaluate to true for the response to be used. This is an advanced properties as it requires you understand Self (a dialect of JavaScript), but can be used to do very powerful things.

Condition Example
// Response to goodbye differently based on the time of day.
question: goodbye
response: Goodnight.
condition: Date.get(#hour, Date.time()) > 18

question: goodbye
response: Goodbye.

Think

Think let you enter Self code that is executed when the response is used. This is an advanced properties as it requires you understand Self (a dialect of JavaScript), but can be used to do very powerful things.

Think Example
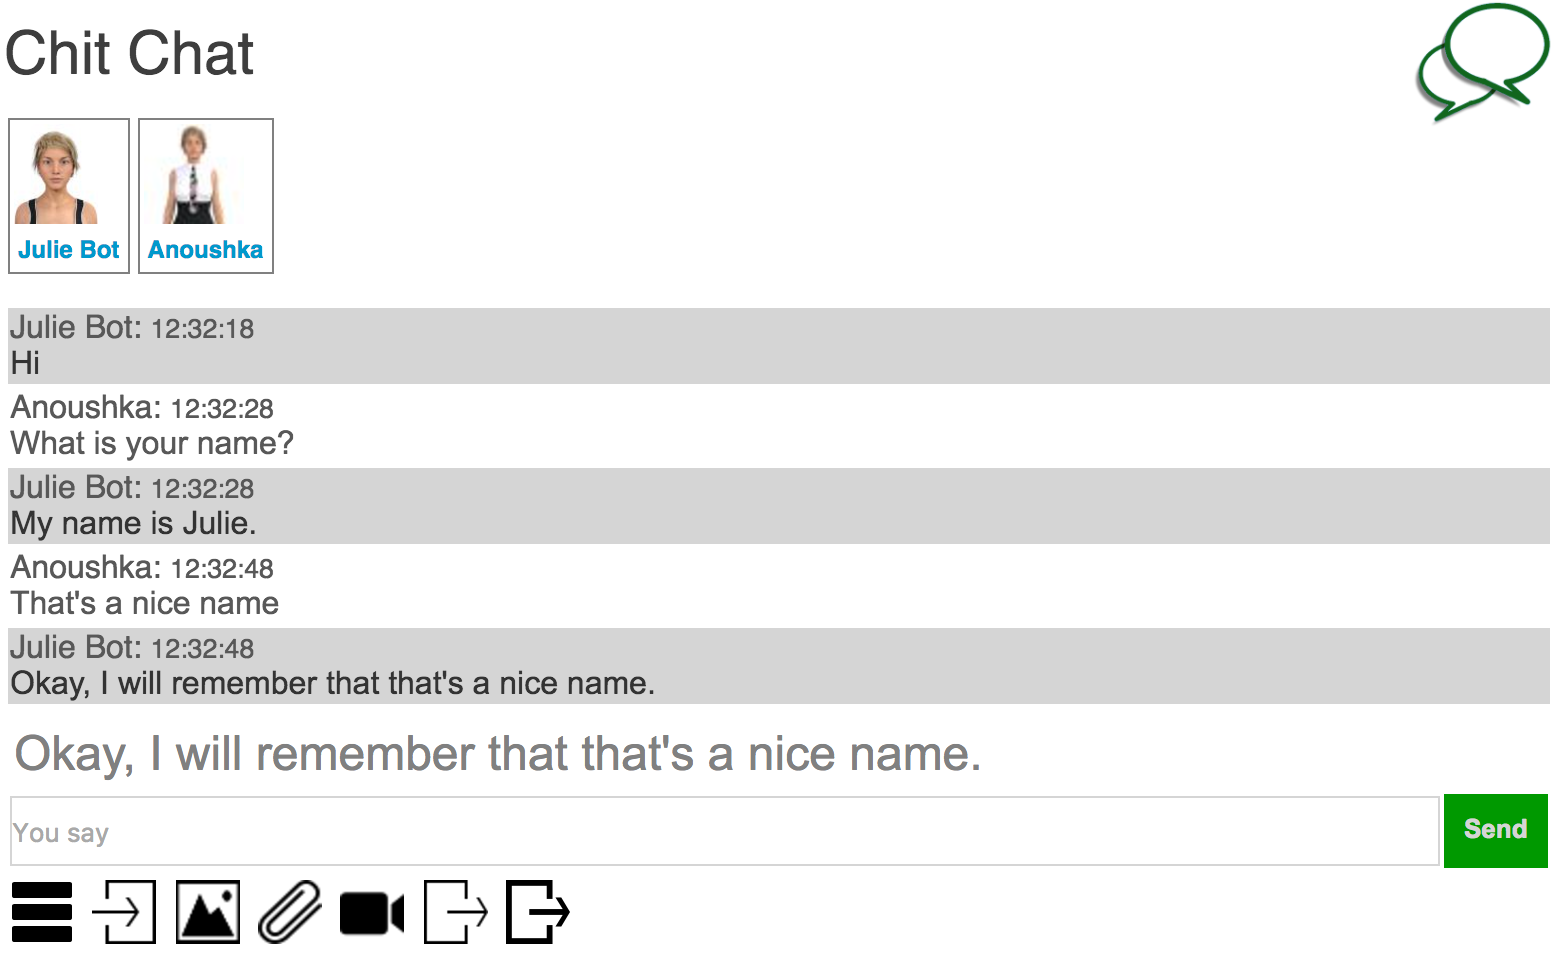
// Track the user's name.
pattern: my name is *
template: Pleased to meet you {star}.
think: speaker.name = star;

question: what is my name
template: Your name is {speaker.name}.

question: can we change the subject
response: Sure, what would you like to talk about?
think: conversation.topic = null;

Confidence

You can enter multiple responses for the same question. The bot will use the response that it is the most confident in for the current conversational context. By default a response is given a confidence level of 90%, but you can customize the value. Note that in a group discussion such as when the bot is added to a chatroom, or on Twitter, the bot will only use responses that have >=90% confidence.

Sentiment

You can associate a user question or phrase, or individual words with sentiment (good vs bad). Sentiment can be used to track how the user is feeling about the current conversation. The sentiment statistic is tracked by your bot daily and can be graphed from its Analytics page.

question: thank you
response: You are most welcome.
keywords: thank
sentiment: good

question: you suck
response: Sorry, I am doing my best. Would you like me have someone contact you via email?
keywords: suck
sentiment: bad

word: suck
sentiment: bad

word: great
sentiment: great

Next and Conversation Flows

You can add a next question to a response to start a conversational dialog. The next is a follow-up question that the user might ask after the bot gives the response. After you enter the next question and click save, the next question will appear below the response in browse. Click on the question to edit it and define its response (and optionally another next for a nested dialog). You can add multiple next question to a single response. The response's next question form an isolated conversational context.

If a response has a next question, the bot will only choose a response from the response's next, it will not consider any other responses. The bot will find the best matching next question, otherwise use the default response. To enter a default next response, enter the question as #default. You can nest next questions and response to easily form complex conversations.

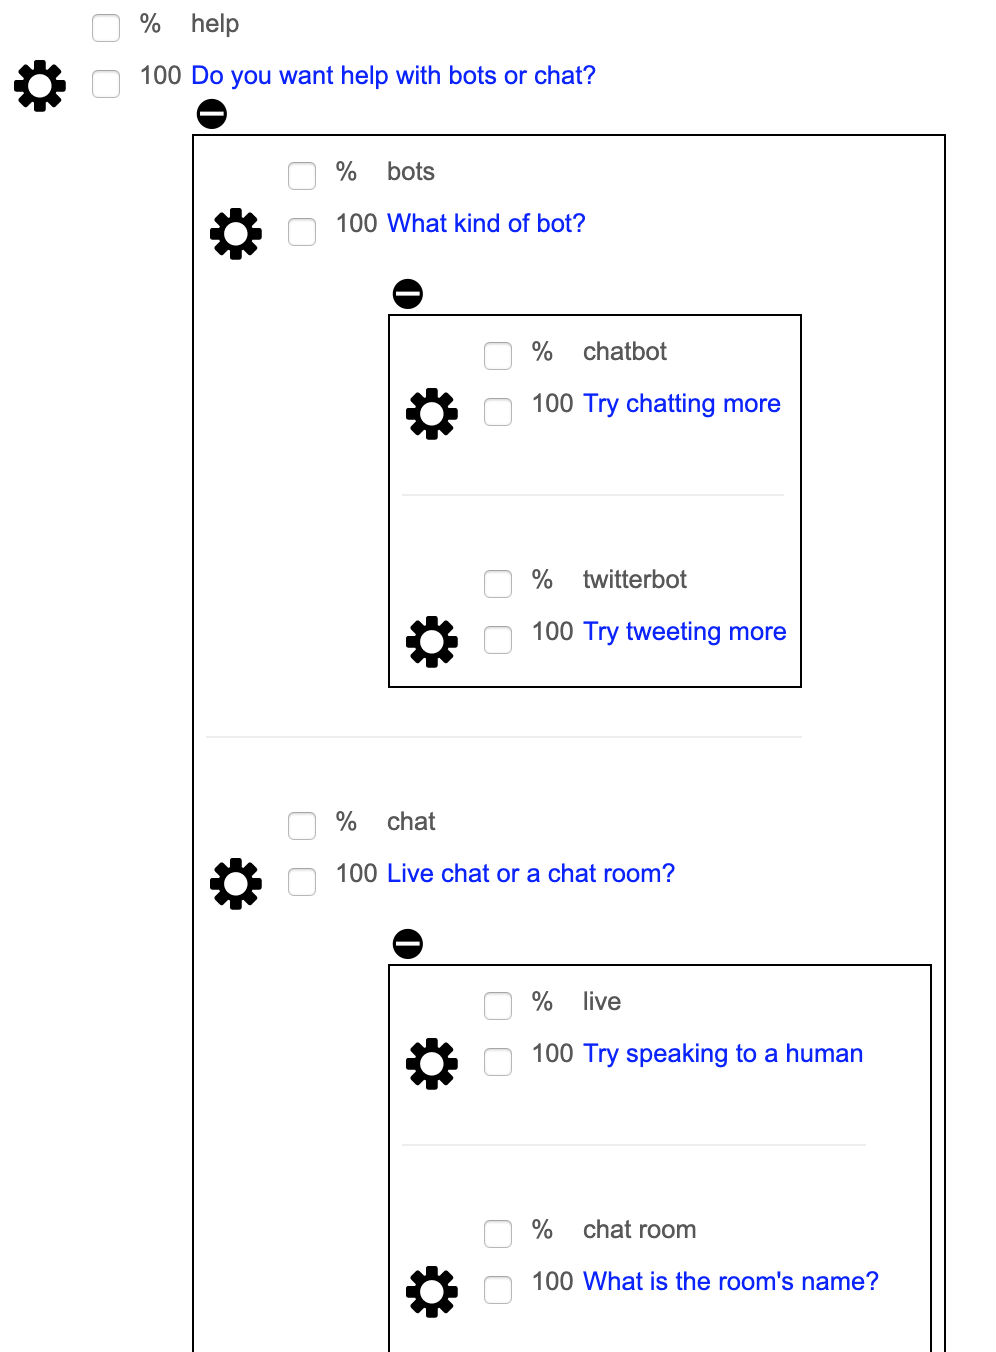
Example Next Conversation
question: help
response: Do you want help with <button>web</button> or <button>mobile</button>
keywords: help

    question: web
    response: Is you issue with <button>HTML</button> or <button>JavaScript</button>?

        question: html
        response: See https://www.w3schools.com/html

        question: javascript
        response: See https://www.w3schools.com/js

    question: mobile
    response: Are you using <button>Android</button> or <button>iOS</button>?

        question: android
        response: See https://www.android.com

        question: ios
        response: See https://developer.apple.com/ios

    question: quit
    response: Okay. Let me know if you need further help.

    default: Please specify <button>web</button> or <button>mobile</button>, or type <button>quit</button> if you do not need help.

The next question are shown in the response browser as a set of nested tables. You can edit or delete next questions and response from the browser.
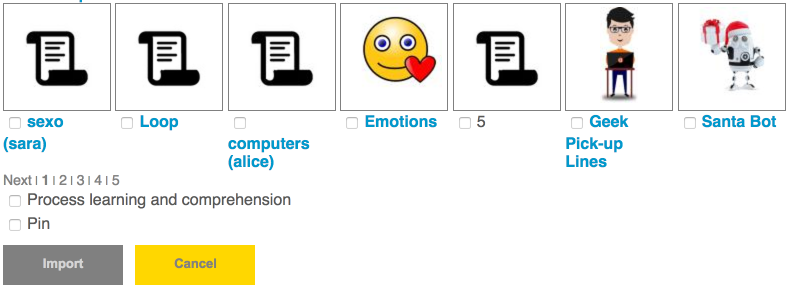
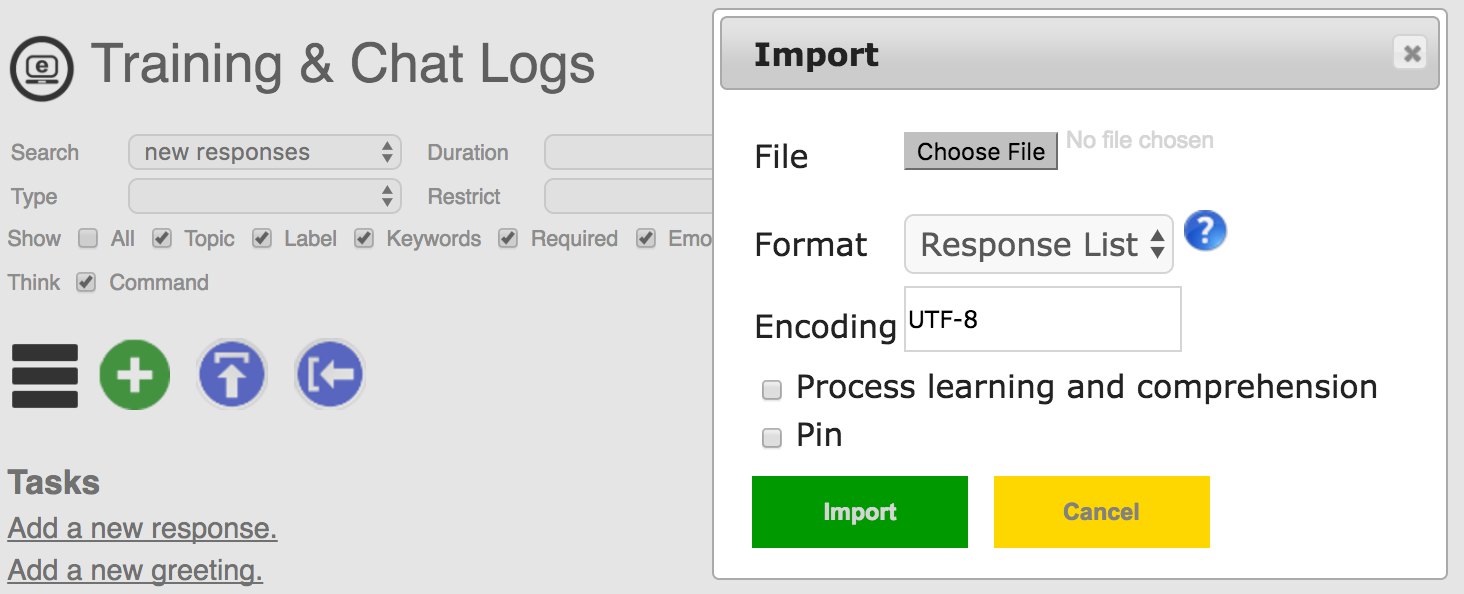
Importing

You can import shared, or upload response lists, chat logs, or AIML sets into your bot. Your bot will learn all of the imported responses. This is a good way to kick-start your bot. Be careful of importing too much, or importing responses that are not relevant to your domain, as this will make your bot less able to give responses relevant to its domain.


Response Lists

A response list is a list of questions and responses. Each question and its responses must be separated by a new line. When you import a response list, the bot will learn all of the new responses.

Response List Example
Hello
Hi

Hey
Hello

Hi
Hi

Bye
Goodbye

Good night
Good night, have a good sleep.

You can also include keywords, required, previous, topics, and other meta data in a response list. You can also define default responses, greetings, or execute scripts. A default response is used when no other response is known, and a greeting is used as the bot's first response in a new conversation. A script can include Self code to be executed, which can add knowledge directly to your bot's object database.

Advanced Response List Example
greeting: Hello, how may I be of service?
greeting: Hi, how can I help?

default: Sorry, I do not understand.
default: I do not understand, please rephrase your question.

what are your services
Our services include chat bot hosting and development.
keywords: services
topic: services

error
Are you getting an error?
keywords: error exception

yes
Please email the error to support at support@botlibre.com
previous:are you getting an error

script: #self.botmaster = "Admin";

Note all of the examples in the previous section are in the response list format as well.

Chat Logs

A Chat Log is the log of one or more conversations. Each phrase must be prefixed by the speaker, and each conversation must be separated by a new line.

Example Chat Log

User: Hello
Bot: Hello
User: How are you?
Bot: I am fine, yourself?
User: I'm good.

User: Hey
Bot: Hey whats up?

This log contains two conversations. When you import the chat log, the bot will learn the responses in context, in that it will both record the responses to the questions, and the previous response. This will allow the bot to choose the best response for questions it knows multiple responses to, based on the context. For the example above if you say "Hello" the bot may answer "Hello" or "How are you?", however if its previous response was "Hello" then it will answer "How are you?" because of the context.

You can also add emotions to responses in a chat log. This will tag the word or phrase with the emotion. Emotions will affect the bot's mood and avatar.
The available emotions are:

  • love, like, dislike, hate
  • serene, calm, anger, rage
  • ecstatic, happy, sad, crying
  • courageous, confident, afraid, panic
  • surprise, bored
  • laughter, serious


Example Chat Log with emotions

User: Do you like me?
Bot:<love> I love you.

User:<anger> Your are stupid.
Bot: That is not a nice thing to say.

Bot:<laughter> lol

There is an import option to Process learning and comprehension. Instead of just importing the responses, this will have the bot listen to the conversation and learn from it. If you have comprehension enabled in your bot, it will process each response through comprehension.

Comprehension will analyze the questions and responses and try to generalize the responses into scripted formula responses. For example is may take the response "Bot: My name is Bot" to be generalized to Formula:"My name is {get #name from :target}". Or could learn how to count from the response "Bot: 2" to "User: 1".

It will also lookup each word for its meaning from Wiktionary, and process questions and answer through its state machines. For example the question "User: What is the Earth" will have the bot lookup in Freebase all information related to the planet Earth, and import the information into its brain. Comprehension will take significantly longer to import the chat log, so only use this for small chat log files that you want the bot to learn from.

AIML

AIML stands for the Artificial Intelligence Markup Language. It is an XML standard for defining chat bot responses. You can import any AIML file as a chat log. The bot will learn all of the patterns and templates as questions and responses. It will convert any AIML tags in the template to Template responses using Self code, and use wildcard Patterns for any AIML patterns.

AIML is normally executed as a script, where each pattern either matches or does not match a question. When importing AIML as a chat log, it will not be executed as a script. Each AIML pattern will be matched based on how well it matches the question. For example the pattern "what is meaning of life" could match the question "what's the purpose of life", if it were the best match. Standard AIML would not perform such as match, as only exact or wildcard matches are allowed.

The chat logs method of importing AIML allows the AIML to be integrated with the bot's responses, knowledgebase, and learning. Importing AIML as a chat log is the best way to import large AIML files. You can also import AIML from the Scripts page, if you want the AIML to be executed precisely.

AIML Example
<aiml>
  <category>
    <pattern>*</pattern>
    <template>Sorry, I do not understand.</template>
  </category>
  <category>
    <pattern>*</pattern>
    <template>I do not understand, please rephrase your question.</template>
  </category>
  <category>
    <pattern>what are your services</pattern>
    <template>Our services include chat bot hosting and development.</template>
    <topic>service</topic>
  </category>
  <category>
    <pattern>^ error ^</pattern>
    <template>Are you getting an error?</template>
  </category>
  <category>
    <pattern>yes</pattern>
    <template>Please email the error to support at support@botlibre.com</template>
    <that>are you getting an error</that>
  </category>
</aiml>

Summary

You now should better understand how your bot responses to questions, and how to best train your bot for your domain using Training & Chat Logs, Responses, Keywords, Required, Previous, Topics, etc. If you are interested in learning scripting, you can program more advanced responses using Self or AIML from the Scripts page.

Tuesday, September 9, 2014

Embedding your bot on your own website with the BOT libre JavaScript SDK

BOT libre enables you to embed your bot on your own website. It is quite easy to embed a bot, and only takes a few lines of HTML code. You can embed a bot on your website to provide help or service, to provide information, or just for fun.

The embedding HTML code can be copied from your bot's Embed page under Admin.

The simplest solution is to embed your bot inside your webpage using an iframe. This just displays embedded content directly from the BOT libre website inside your webpage. The Embed page provides lots of options that let you customize the embedded content, such as changing the background color, changing the prompt and button text, or even providing your own CSS style sheet.

Another option is to access the BOT libre web API from your website's server (PHP/Java/etc.), or to access the web API from JavaScript. Using the API directly gives you complete control over the interface to your bot. BOT libre now provides an open JavaScript SDK that makes embedding and accessing a bot using JavaScript a lot easier.

To BOT libre JavaScript SDK is provided as open source under Project libre on GitHub and SourceForge. The BOT libre SDK includes a Java and Android SDK and components, and now includes a JavaScript SDK.

To add the BOT libre JavaScript SDK to your webpage you just need to import it in your webpage's <head> section.

The SDK provides several components that lets you access BOT libre's services including:

  • SDK - static class providing services such as Text To Speech (TTS), debugging, and configuration.
  • SDKConnection - class providing access to the BOT libre web API through JavaScript Data Transfer Objects (DTO). This includes chat bots, live chat, forums, and user administration.
  • WebChatbotListener - class that links the chat bot web API to an HTML form.
  • LiveChatConnection - class providing access to BOT libre's live chat web socket API.
  • LiveChatListener - interface for live chat.
  • WebLiveChatListener - class that links the live chat API to an HTML form.
  • Credentials - class to provide your application credentials including your application id.
  • ChatConfig - DTO class to provide a chat bot message.
  • ChatResponse - DTO class to provide a chat bot response.
  • UserConfig - DTO class to provide user information.
  • BrowseConfig - DTO class to browse or search the bot/channel/forum/domain directory.
  • InstanceConfig - DTO class to provide chat bot information.
  • ForumConfig - DTO class to provide forum information.
  • ChannelConfig - DTO class to provide live chat channel information.
  • DomainConfig - DTO class to provide domain information.

To embed your chat bot you can either use the SDKConnection directly, or use the WebChatbotListener to link the API to an HTML form in your webpage. Using WebChatbotListener is the easiest solution, the following code demonstrates how to create a form and link it using JavaScript.

Example embedded chat bot using JavaScript and HTML

Try it out now live

The above script was included in this page to enable you to talk with Brain Bot.


Speak Disconnect

So that's it, you should now be able to embed your bot on your website or blog using JavaScript.

Tuesday, May 20, 2014

Scripting your bot with AIML

BOT libre now has complete support for the Artificial Intelligence Markup Language (AIML). AIML is a standard XML specification designed for scripting chat bot responses. AIML 1.0 was released in 2001, and the current 1.0.1 release was released in 2011. AIML 2.0 is currently under development. AIML is supported by many different chat bot programs and hosting services. BOT libre supports all of the AIML 1.0.1 tags and a few common extensions.

About AIML

AIML defines how a bot should respond to a question using <pattern> and <template> elements. A pattern represents the user's question, and the template defines the bot's response. The pattern and template elements are grouped in a category element, which can be grouped under topic elements.

Here is a simple "Hello World" AIML example:

This code will make your bot respond with "Hello to you too" to the question "Hello World".

Patterns are normally defined as all upper-case, but are case insensitive, so the case really does not matter. Punctuation is normally stripped from patterns and ignored when matching. Patterns can contain wildcards using the "*" and "_" characters. Both "*" and "_" are the same wildcard, and will match any subset of text, their difference is in only in the order they are applied ("_" patterns are matched first, and "*" patterns last).

Here is a simple wildcard example:

This code will make your bot respond with "Hello to you too" to any question containing the word "hello".

AIML supports contextual responses through the "that" element. The "that" element specifies that the pattern should only be matched if the bot's previous response matches the "that" pattern. This allows the same question to be responded to in different ways, depending on the context.

Here is a joke "that" example:

This code will make your bot tell a joke.

Templates can contain mixed text that include various AIML programatic tags. AIML defines tags for text formatting and conversion, dates, variables, condition statements, and recursion. Templates allow you to create sophisticated and intelligent responses.

Here is the list of AIML 1.0.1 template tags.

  • <star index="N"/> - replaced with value of * in pattern (or Nth *)
  • <that index="M,N"/> - replaced with value of bot's previous response (or Mth previous response, and N sentence of the response)
  • <input index="N"/> - replaced with value of users's input (or Nth *)
  • <thatstar index="N"/> - replaced with value of * in "that" (or Nth *)
  • <topicstar index="N"/> - replaced with value of * in topic (or Nth *)
  • <get name="XXX"/> - replaced by the value of the conversation specific variable
  • <bot name="XXX"/> - replaced by the value of the bot specific variable
  • <sr/> - short form for <srai><star/><srai> (replaced with response to value of * from pattern)
  • <person2/> - converts the text (or <star/>) between 1st and 2nd person (I <-> he, etc.)
  • <person/> - converts the text (or <star/>) between 1st and 3rd person (I <-> you, etc.)
  • <gender/> - converts the text (or <star/>) between male and female (he <-> she)
  • <date/> - replaced with the current date and time, a "format" attribute is also supported
  • <id/> - replaced by the client id
  • <size/> - replaced with the size of bot's memory
  • <version/> - replaced with the AI engine version
  • <uppercase> - converts the text to uppercase
  • <lowercase> - converts the text to lowercase
  • <formal> - converts all words in the text to be capitalized
  • <sentence> - converts the first word in the text to be capitalized
  • <condition name="X" value="Y"> - defines an "if" condition based on comparing the value of a variable to a pattern
  • <condition name="X"> - case statement
  • <condition> - multi-valued if/else statement
  • <random> - choose on of the nested <li> values at random
  • <li name="X" value="Y"> - used in random and condition tags
  • <li value="Y"> - used in random and condition tags
  • <li> - used in random and condition tags
  • <set name="XXX"> - set the value of a variable
  • <gossip> - logs the text
  • <srai> - recursively evaluates the text and replaces it with the response
  • <think> - evaluates the nested statements but does not output any result
  • <learn> - load external AIML file, this is not currently allowed
  • <system> - executes a OS command, this is not currently allowed
  • <javascript> - executes JavaScript code
  • HTML - various HTML tags are also allowed (<b>, <a>, <i>, <ul>, <li>, <p>, <br>)

Here is a complex template example:

This code will make your bot respond to the question "Do you like apples or do you like oranges" with "I love apples and I love oranges".

AIML libre

BOT libre supports both importing and exporting AIML. AIML can be imported in two different ways, either as a program script, or as a chat log.

Importing AIML as a program script is done from the Program page. You can import and order the script with respect to your other scripts files. Scripts can be defined in either AIML or Self.

When you import an AIML file, it will be converted to Self code, and stored in your bot's brain along with all of its other information. The Self syntax for AIML is a hybrid syntax that uses AIML terminology, but with the Self scripting structure. Self is a state machine oriented language defined for BOT libre's AI Engine originally from the Open Pandora's Box pen source project. Self is very different than AIML, but can process any AIML code similar to any other AIML interpreter. AIML imported as a program script will be executed similar to any other AIML interpreter.

Here is the Self code for an imported AIML script:

Importing AIML as a chat log allows the AIML categories to be integrated into the bot's knowledgebase. The pattern/template categories from the AIML file will be merged along with the bot's other question/response pairs that it has learned through conversation, correction, or importing.

The bot will not run the AIML script as a script, it will decide for itself when to use the response. The bot will choose its response based on how well the question matches the responses question, the responses correctness, and the context. Even without a * in a pattern it still may be matched to a similar question, if it is the best match available. This gives you the freedom from having to write a pattern for every possible phrase, by just letting the bot figure it out.

Using AIML in Twitterbots and Email Bots

AIML can be used to script Twitterbots, Email bots, or IRC bots, the same as bots trained through other mechanisms. AIML templates and patterns can be used anywhere other response are. AIML can be used from the Training page, used in correction in the Chat Logs page, or used for autotweets in the Twitter page.

AIML Resources

One of the main benefits of the AIML standard, is that there are a lot of AIML resources on the Internet. The are resources for both learning AIML, and there are many freely available AIML scripts for many domains, and in many different languages.

Talk with ALICE

To see what conversations AIML is capable of, try out ALICE on BOT libre. There are two ALICE bots on BOT libre. ALICE is a bot that has imported most of the ALICE AIML sets from the ALICE foundation. Free bots on BOT libre have a 100,000 neuron limit, and some of the ALICE scripts are very big, so the mp* scripts were left out, as well as a few of the other big scripts. ALICE can chat, and if you type "joke" can tell you a joke.

ALICE libre is a hybrid bot, that has imported the ALICE AIML sets as chat logs, not as scripts. This means she is free to choose her responses. She has learning, and comprehension enabled, so can also learn new things.

Sara is a Spanish language AIML bot, that has imported the Sara AIML set.

Tuesday, May 13, 2014

Create your own bot app with the BOT libre SDK

The BOT libre SDK is a Software Development Kit that makes it simple to add a chat bot to your own mobile application or website.

The SDK currently provides two components. The first is a Java Connection API that makes it easy to access BOT libre from a Java environment such as Android, or a Java web server. The second component is a set of Android activities that you can add to your own Android app, or copy/customize in your own app.

The SDK is developed under Project Libre an open source project hosted on GitHub
https://github.com/paphus/Project-Libre

Connection API

You can create a connection to the BOT libre server using the SDKConnection class. You need to pass your connection Credentials, which includes your application ID. You can obtain an application from the BOT libre website, from your user details page.

SDKConnection connection =
        new SDKConnection(new BOTlibreCredential("12345");

The SDK includes a set of data objects that represent the BOT libre object model.
The data objects are in the com.paphus.sdk.config package, and include the following,

  • UserConfig - Defines a user's credentials and info.
  • BrowseConfig - Defines a search query criteria.
  • ChannelConfig - Defines a live chat channel's details.
  • InstanceConfig - Defines a bot's details.
  • ForumConfig - Defines a forum's details.
  • ForumPostConfig - Defines a forum post.
  • DomainConfig - Defines a domain's details.
  • ChatConfig - Input for chat bot messaging.
  • VoiceConfig - Defines a chat bot's voice.
  • ChatResponse - Response for chat bot messaging.
  • ContentConfig - Defines a tag/category request.

Users

The API allows you to connect a user, or create a new user.

Use the connect() API to connect a user, the user's details will be returned, or an error message if the connect fails. The returned user details will not include the password, but will include a token, that can be used in place of the password. After connecting a connection, all subsequent requests will use the user credentials, until you call disconnect().

UserConfig user = new UserConfig();
user.user = "test";
user.password = "password";
user = connection.connect(user);

Use the create() API to create a new user. A user id and password are required. You can also pass the user's name, email, bio, and other details. The user details are returned, with a token in place of the password.

UserConfig user = new UserConfig();
user.user = "test";
user.password = "password";
user.name = "Test Account";
user.email = "test@test.com";
user = connection.create(user);

Bots

The API allows you to browse bots, get a bot's details, and chat with a bot.

The browse() API is used to browse or search the set of channels in the domain.

BrowseConfig browse = new BrowseConfig();
browse.type = "Bot";
browse.typeFilter= "Public";
browse.tag= "cool";
browse.sort = "name";
List bots = connection.browse(browse);

The fetch() API is used to get a bot's details.

InstanceConfig bot = new InstanceConfig();
bot.id = "12345";
bot = connection.fetch(bot);

The chat() API is used to chat with a bot.

ChatConfig chat = new ChatConfig();
chat.instance = "12345";
chat.message = "Hello bot";
ChatResponse response = connection.chat(chat);

Live Chat

The API allows you to browse channels, and get channel details.

The browse() API is used to browse or search the set of channels in the domain.

BrowseConfig browse = new BrowseConfig();
browse.type = "Channel";
browse.typeFilter= "Public";
browse.tag= "cool";
browse.sort = "name";
List channels = connection.browse(browse);

The fetch() API is used to get a channel's details.

ChannelConfig channel = new ChannelConfig();
channel.id = "12345";
channel = connection.fetch(channel);

The LiveChatConnection class is used to chat in a channel. It can be created using the openLiveChat() API on the SDKConnection class. You must pass the ChannelConfig with its id set, and an implementation of LiveChatListener that will receive the chat messages. Once you have a connection established, you can send and receive messages.

ChannelConfig channel = new ChannelConfig();
channel.id = "12345";
LiveChatConnection livechat = connection.openLiveChat(channel, myListener);
livechat.sendMessage("Hello World");

Android Activities

The SDK includes a set of Android activities you can reuse, or modify in your own app. The MainActivity contains the SDKConnection and some shared data, so you will need to include it even if not using the activity. The bot activities include, ChooseBotActivity, InstanceActivity, BrowseActivity, and ChatActivity. The live chat activities include, ChooseChannelActivity, ChannelActivity, ChannelBrowseActivity, and LiveChatActivity.

Here is an example of launching a bot InstanceActivity.

MainActivity.current = new MainActivity();
InstanceConfig config = new InstanceConfig();
config.id = "12345";
HttpAction action = new HttpFetchAction(this, config);
action.execute();

Note, because of the way Android does its packaging, you will need to search/replace the "com.paphus.sdk.activity.R" import with your own application's unique package. This will resolve the generated R class dependencies.

You can use the SDK to access any of BOT libre's services, for personal, academic, or commercial applications. You cannot use them for spam, or to violate the BOT libre's terms of service. BOT libre's services are also provided as a commercial service on Paphus Live Chat.

Sunday, April 13, 2014

Bot Libre for Android 2.0

The BOT libre Android mobile app has be updated with a big set of new features.

The BOT libre Android app allows you to create, and train your own chat bot, and share it with your friends, from your Android phone, tablet or device. The chat bots have artificial intelligence and are capable of learning through conversation. You can create your own bot, or chat with other peoples bots. There are over 1,000 bots on BOT libre to talk with.

BOT libre for Anroid 2.0 now includes:

  • Live Chat - Create your own personal, or business chat channel to let your friends or customers chat with you. When your not available your bot can answer questions in your place.
  • Chat Rooms - Create your own chat room to share with your friends, colleagues, or customers. Add your bot to your chat room, and it will chat and learn from others.
  • Forums - Create your own forum to share with your friends, colleagues, or customers.
  • Domains - Create your own personal or business space to host your chat channels, forums, and bots.

Welcome

When you connect to BOT libre, you can now choose to browse or create bots, forums, live chat channels, or domains.

Browse

Browse lets you search content by category, tag, or filters, and order the results by several difference options. You can also select the last bot, or content that you accessed. The browse result gives you an order list of the content to chose from.

Chat

While chatting with a bot, you can now control your screen usage, either maximizing the bot's image by tapping on it, or hiding it but double tapping on the conversation pane.

Admin

Several new admin options have been added, including:
  • Users - Control who can access your bot, and who can administer it.
  • Voice - Choose and configure the voice, and language used by your bot.
  • Learning - Configure how your bot learns, and who is learns from.
  • Training - Set your bot's greeting phrases, and default phrases to use when it does not know any response. Train your bot with question/answer pairs.
  • Avatars and Icon - Change your bot's icon, or add images for its avatar, and tag images with emotions.

Live Chat

You can now browse, or create your own live chat channels, and chat rooms. You can chat with your friends, customers, or colleagues, or add your bot to a chat room, and let people chat with it, and have it learn from others. You can create public or private channels, and can control who can access your channel.

Forums

You can now browse, or create your own forums. You can ask questions, and find answers on the BOT libre forums, browse other user's forums, or create your own forums. You can create public or private forums, and can control who can access your forum.

BOT libre

The BOT libre mobile app accesses the same bots, chat channels, forums, and servers as the BOT libre website. You can access the bots you create from the app on the web. The web interface includes several other features, including, chat logs, Twitter bots, email bots, IRC bots, AIML and Self script programming, and lets you browse your bot's brain.

BOT libre also provides a REST API that lets you build your own mobile app, or website to access your content, and is free for commercial use. Paid commercial hosting is also available through Paphus Live Chat.

Wednesday, February 26, 2014

Create bots with a real brain

Bot Libre bots are not like other chat bots. They are not limited to simple response searching, or scripted responses. Bot Libre bots have a real brain that functions similar to a human brain.

Their brain stores everything about every conversation, and they are always analyzing everything. When you chat with a bot it remembers what was said, who said it, what it was in response to, when it was said, what the words were in each sentence, and in what order, and which words came before/after which other words. All of this information is stored in the bot's memory in a database. The bot's memory is structured similar to a human brain with nodes and relationships, similar to neurons and dendrites. The nodes and relationships know how many times they have been accessed and when they were last accessed. The relationships know their probability of correctness, and take precedence over other relationships the more their correctness is reinforced.

The bots have thoughts, senses, a consciousness, a mood and emotions. When you chat with a bot, it will try to understand your question, and it will analyze your responses to it to search for linguistic patterns, and language rules.

The bot's have two stages of learning. These include mimicry, and comprehension.

Mimicry

When a bot does not know how to respond to a question, it may ask the user how it should respond. It will then remember and learn this response, and answer the same question, or similar questions with the same response. The bots learn in context, so if they know multiple responses to a question, they will choose the one that is the most appropriate for the context, taking into account what was said previously, and the bot's consciousness state (if you were talking about apples, it might choose the answer most related to apples).

The bots also learn grammar. You may notice their grammar starts off not very good, but they will quickly adjust their responses the more they learn about grammar (provided you talk to it with good grammar, they will also learn bad grammar and slang). They don't learn grammar by rules, but by what 'sounds' right based on the context (the same as humans do).

If a bot gives a bad response to a question, you can correct its response by clicking correct, and providing the response it should have said.

You can control who your bot learns from. You can configure it to only learn from administrators, connected users, members, or everyone (default). You can also control who can correct your bot's responses.

You can also train your bot by uploading chat logs. The chat logs should have the format,

user:Can you help me?
admin:What would you like help with?
user:My computer.
admin:Have you tried rebooting it?

user:Hello
admin: Hello user, how may I help you?

Each question/response must be on a new line and prefixed with the speaker. The speaker's names are important, as if the name appears in the sentence, the bot will create a formula response that replaces the name with the current users name. Also, if your bot only learns from administrators, the speaker you want your bot to learn from in the chat log must be named admin. Each conversation must be separated by a empty line, this designates a new conversation. This is important because the bots learn in context, so you must be clear on when one context ends, and another begins.

You can review your bot's conversations, and responses from the Training & Chat Logs page under Admin. The chat logs page allows you to search, review, correct, and invalidate your bot's responses.

Comprehension

The second stage of learning is comprehension. The bot will analyze its conversations in the background, and attempt to identify linguistic patterns and rules.

A basic rule it may define is when it says "Hello" and you say "Hello Hal" and it knew that its name was Hal, then it would learn it should respond to "Hello" with "Hello [target]". Other rules can be much more complex. Such as if you repeatedly answer "Do you like [noun]?" with "Yuck, I hate [noun].", then it will respond to any such question with the response.

You could also start counting, and correct its response to be the next number, then it will learn to respond to "[number]" with "[get #next from :number]". It also learns in context, so can learn to only respond with the next number when the previous reply was the previous number.

You can write your own scripts with your own rules, and the bot will process them the same as the ones it wrote itself. You can add your own scripts, view the ones that are bootstrapped, or the ones the bot wrote itself, from the Scripts page under Admin.
A new bot currently comes with several bootstrap scripts:

  • WordMeaning : Understands "[word] means [anotherword]", i.e. "tall means big", or "hola means hello". This can be used to teach a bot new words, names, or another language.
  • Calculator : Understands addition, subtraction, multiplication and division using a Calculator tool.
  • WhatIs : Answers "What is [x]" style questions by looking up the object in Freebase, using its Freebase sense.
  • WhereIs : Answers "Where is [x]" style questions by looking up the object in Freebase, using its Freebase sense.
  • Watch: Answers "What is the time/date/year" style questions.
  • Topic: Answers "What is the current topic" style questions.
  • Loop: Detects loops in the conversation.
  • MyNameIs : Understand "My name is [name]" phrases.
  • Understanding: Understands basic language, such as "I am tall", "What is your name?", "Who are Barack Obama's children?", "Is he the US President?"
  • Self : This starts as an empty state machine, and is programmed by the bot.

AIML

You can also import scripts defined in the Artificial Intelligence Markup Language (AIML). You can import them either as chat logs, for your bot to learn from, or as program scripts. AIML makes it easy to define search based rules, such as "* travel *" -> "Where would you like to travel to?".

Real Intelligence

The Bot Libre bots can be trained to be very intelligent, and provide valuable expertise in the domain that they are trained in, but we are just getting started. The Bot Libre AI engine is constantly under development, and the bots become smarter with every update.

Our goal is to have the bots be as capable (or more capable) as a human expert in the domain they have been trained in. We still have a long way to go, but the journey has begun.

Friday, January 31, 2014

Live Chat!

Bot Libre now includes free hosted live chat, chat rooms, and forums. You are free to create your own live chat channels, chat rooms, or forums and link or embed them on your own website or blog.

You can access the live chat, and forums from the select tag on the menu bar of the site. Click on Live Chat, or Forums.

The live chat page shows the featured channels, and lets you search public channels, or view your own private channels. A public channel can be accessed by anyone, a private channel can only be accessed by the users you grant access to. You can administer your channel users from the Admin page. You can also add a bot to monitor, or service your channel from the Admin page.

Live chat channels can be configured in two different modes, One On One, and Chat Room.

Live Chat

One On One is an online call center style configuration where users only get to chat with an operator. When a user connects they are queued for the next available operator. When an operator or administrator connects they can see the connected users, and can chat with the other operators. They can accept the first user in the queue, or private a specific user.


Chat Room

Chat Room is a channel where all users can see and chat with all other connected users. Users can also private other users to engage in a private one on one chat session. Administrators also have the option of booting users.

Chat Bots

Both type of channels can be configured with a chat bot. The bot will service the channel and chat with the users. For a One On One channel, the user is free to chat with the bot at anytime, such as when all operators are busy, or no operators are online. Adding a chat bot to your channel can help you reduce your call center staffing requirements, and improve your customer response time. Chat bots work 24x7, so you can still service your online call center when no operators are available.

For a Chat Room the chat bot will take part in the discussion. In Chat Room mode, the chat bots are configured to only answer questions that they know the answer to, or that are direct to them. Users can private the chat bot like any other user, and administrators can boot the bot if they choose.

The channel bot is configured from the Admin page. You can select any of the bots that you have created, or create a new bot. You can monitor and administer the bot the same as any of your bots. The bot can be configured in three modes.

  • Listen Only - The bot will only monitor the channel conversation, and will learn responses from the operators or users. This is a good way to train your bot.
  • Answer Only - The bot will monitor the channel and answer any questions it knows, or directed to it, but it will not monitor all conversations, and will not learn from operators, or other users.
  • Answer and Listen - The bot will both answer questions, and learn from operators and users.

Every Bot Libre bot has its own dedicated live chat, and chat room channel. From any bot's page you can click on the 'Live Chat', or 'Chat Room' button to access the bot's live chat channel. The first time the bot's channel is accessed, it will be automatically created to mirror the bot's info. The bot's administrators will be assigned to administrate the new channel.

You can access your live chat channels embedded link from the channel page. You can use this link to embed your channel on your own website, or blog. You are free to use all of Bot Libre's services for free, for personal, academic, or commercial purposes. Professional hosting is also offered for all of Bot Libre's services through Paphus Solutions Inc.